Images in the Doc pane
The Doc pane (and its little brother, the Item Editor) are ideal places to store images, either as part of a larger document, or as a simple viewer of images.
1. Inserting Images in a document
1.1 Using Copy / Paste
- For an existing local image file: Copy the file (using Windows Explorer) and Paste (or Paste Special). Select the "File List" clipboard format. This will link to the existing image file
- For an image in another document / web page: Copy the image (common method is right-click > Copy Image) and Paste Special. Then select one of
- Bitmap Image clipboard format. This will create a new local copy of the image (stored in the YourIQBase..SNDB.Files\ItemIDXXXX_files folder)
- HTML clipboard format. This will link to the actual file / URL
1.2 Using Drag / Drop
- To create a new item, use Windows Explorer to drag an image file to a grid. The Add File dialog will show. Select Doc pane as the Link storage. The new item will show the image in the Doc pane
- To drag-drop an image to an existing document, see the next section
1.3 Using the Insert Image Dialog
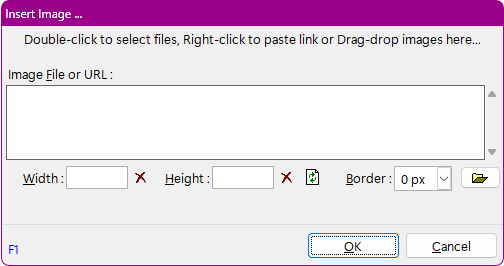
in the Doc pane, click the + button > Image ... (or Menu > Insert > Image). The Insert Image dialog will show:

- Click the Browse button or Double-click to select a local file
- Right-click > Paste the image path or URL (previously copied to the clipboard)
- Click in the large text box and paste
- Drag an image file / URL over this dialog
- Click OK
2. Editing Images
Double-click on an image to open the image properties dialog
- The image width and height is shown
- Clear both to reset the size to the original image size
- Clear the height to have it automatically calculated from the width
It is also possible to single-click on an image and resize it using the sizing handles
3. Auto-Fit Images
- Use Menu > View > Auto-Fit Image to ensure that images are scaled down perfectly fit in the Doc pane window (Ctrl+Shift+A)
- Images smaller than the Doc pane window are not affected