IQ as a Relational Database: Book Review Process
InfoQube is exceptionally powerful and allows user to create functionality which traditionally requires a significant investment of time and programming knowledge using a relational database.
In this example, we'll describe a end-to-end book review process with the following pieces of information:
- Authors
- Books
- Reviewers
- Book Reviews
- Rating (individual and overall)
- Outcome
- Communications
In addition, specific views will ease these management tasks:
- Flagging late reviews
- List of book reviews for each reviewer with status
- Pivot pie chart showing the count of Authors per country
The end result will be a dashboard to manage all aspects of this process:

1. Creating the Source Grids
We'll use the Item field as much as possible. It will hold the most pertinent information of each source table. While this is not essential, it fits with the overall InfoQube's philosophy and, in general, eases information management.
You can either perform these steps on an existing IQBase or on a new IQBase (with sample data)
The source grids (i.e. database tables) are:
- Authors
- Reviewers
- Books
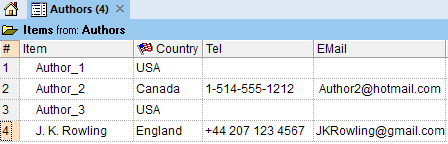
1.1 Authors Grid
- View > Grids > New Grid...
- Set the Grid name to Authors.
This automatically creates a Yes/No field, named Authors, to mark specific items as being book authors - Add any contact information fields to this view (such as Tel and EMail)
One way to do this is to show the Properties pane, open the All Fields section in field tree-view mode. All build-in contact related fields are under the field AddressBook - We'd like to enter the Author's country, which is not in the sample IQBase, to do this:
- Open the Manage Fields dialog
- Click on New
- Name it AuthorCountry
- Type = Text
- Editor type = Auto-list of values
- Click Close
- Add this new field to the grid (using Add / Remove Column dialog or right-click on the field in the Properties pane and select Show field in the current grid
- To have a more user friendly field caption, right-click on the header and select Column Header > Caption...
- Replace AuthorCountry with just Country.
- Right-click and choose the flag icon
- Click OK
- Add a few authors to this grid
Important: Since this grid will be used in a pop-up list, it needs to be set visible to other applications. 2 ways to do this:
- Grid properties > Options > Grid visible to other applications
- Grid > Create an ODC file
The grid should now look like this:
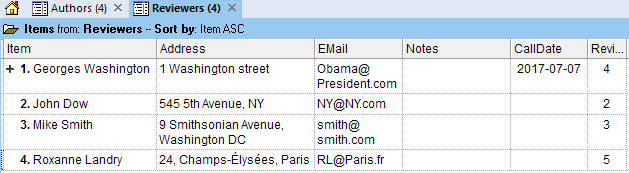
1.2 Reviewers Grid
Repeat the same steps for Reviewers:
- Grid name: Reviewers
- Create a numeric field ReviewerID with Auto checked (creates an auto-number)
- Columns: Item, Address, Email, Notes, CallDate, ReviewerID
Important: Since this grid will be used in a pop-up list, it needs to be set visible to other applications.
The grid should now look like this:
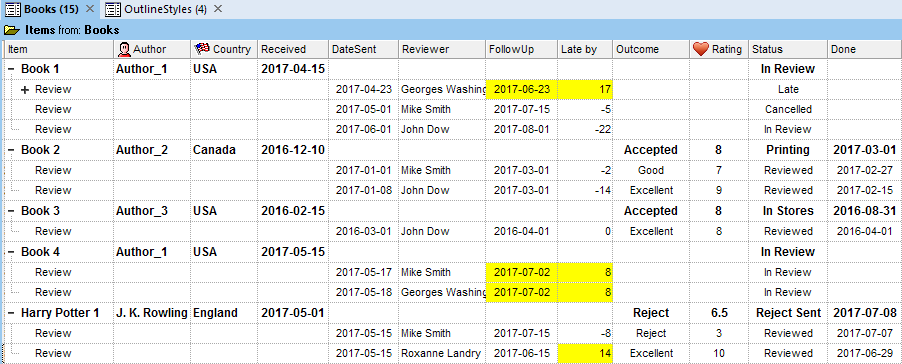
1.3 Books Grid
The books grid is the central view of the review process. It shows:
- Book information (name, author, date received, average rating, outcome, status)
- Under each book entry, a list of review entries, one per reviewer (reviewer's name, date submitted, deadline, rating, done date)
- Summary of communications with reviewers
- The HTML pane can contain rich text content for each review and book review process output report
Steps are as follows:
To store the book information:
- Create a new grid, named Books
- Create field BookAuthor: This popup will show entries in the grid Authors
(It uses an SQL query to be able to pick up both the name and country of the author at the same time)- Type: Text
- Editor: SQL query
- Pop-up list: SELECT Item as BookAuthor, AuthorCountry from Authors
- Save all listed fields: checked
- Create field BookReceived
- Type: Date
- Default value: int(now)
- Create field Outcome: Outcome of the review, pop-up list
- Type: Text
- Editor: Auto-list of values
- Create field BookRating: Average of Reviewer's rating of the book, between 1 and 10 (max)
- Type: Number
- Column Equation: Parent = AVG(Children)
- Create field Status
- Type: Text
- Editor: Auto-list of values
To store the book review information
- Create field BookReviewer: This popup will show entries in the grid Reviewers
(It uses an SQL query to be able to pick up both the name and ID of the reviewer at the same time)- Type: Text
- Editor: SQL query
- Pop-up list: SELECT Item as BookReviewer, ReviewerID as BookReviewerID from Reviewers
- Save all listed fields: checked
- Create field BookReviewerID
- Type: Number
- Type: Number
- Create field DateSent
- Description: Date the review request was sent to the reviewer
- Type: Date
- Default value: int(now)
- Auto-assignment rules: A: [FollowUpDate] = [DateSent] + 60 | E: [FollowUpDate] =
- Create field FollowUpDate: Will be shown in yellow when a follow up is required (such as when the review is late)
- Type: Date
- Conditional Formats:
Criteria: [ReviewLateNbDays] > 0 and [Done]=0
Formats: BackColor=&H00FFFF
- Create field ReviewLateNbDays: Will be shown in yellow when the review arrived late
- Description: Nb of days the review is late
- Type: Number
- Row Equation: = datediff("d", [FollowUpDate], now)
- Auto-update checked
- Conditional Formats
Criteria: >0
Formats: = BackColor=&H00FFFF
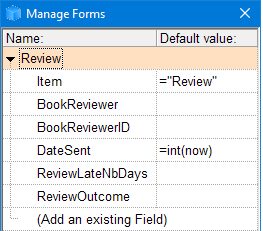
Optional: To ease the creation of a review, you can create a form:
2. Creating Reviews Management Grids
3 support grids will be created to better manage reviews:
2.1 FollowUps Grid
The FollowUps grid show the list of reviews which require a follow up with the reviewer, typically because it is late:
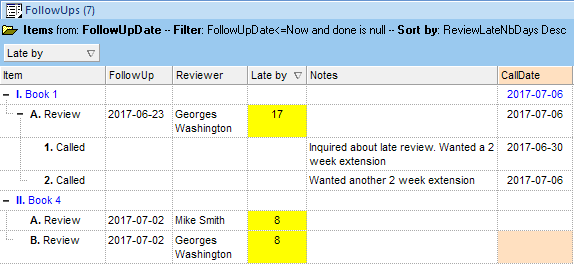
- List all late reviews (i.e. FollowUpDate is past and not done)
- Sorts reviews by how late they are
- Book name is shown as a context parent (it could also be shown as a column if desired)
- Sub-items show the call log
- CallDate at the review and book levels show the most recent call
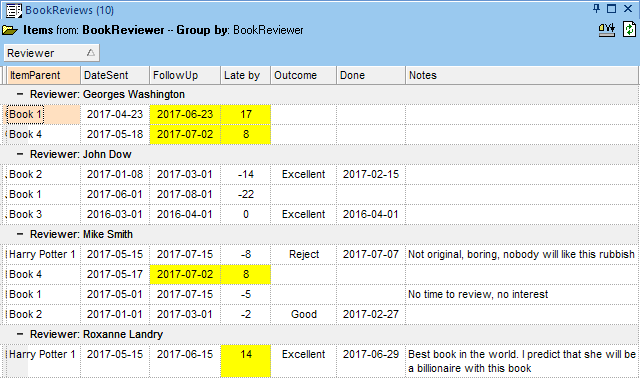
2.2 BookReviews Grid
The BookReviews grid uses IQ's built-in grouping feature (see 5. Sorting and Grouping Items for details)
Users can group by any displayed field, to view reviews by DateSent, Outcome, or as in this example, by Reviewer:
2.3 Overview Grid
The last grid will combine all the preceding ones in a unified view, using docking panes. That way, users can see all aspects in a single view, kind of a dashboard.
To create this view:
- Create a new grid, named Overview
- View > Grids and right-click on Authors. Select Copy View.
- Back in the Overview grid, right-click on the tab and select Paste View
- The Authors grid will be shown in a pane to the right edge of the Overview grid
- Repeat the above procedure for the other grids
- Rearrange panes to built a set-up close to the fist screenshot at the top of this page
(The end result will depend on how panes were actually rearranged)
n.b. The Overview grid itself is not really used, though users could enter management notes and instructions. Its main purpose is to be a placeholder for other grids
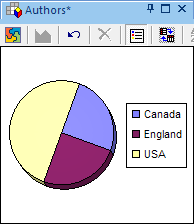
2.4 Adding a Pivot Chart
When MS Office 2002 and up is installed, pivot tables and charts can be used inside InfoQube. To demonstrate this, we'll create a pie chart showing the author's country
- Open the Authors grid
- If the Overview is grid is already open, this will move focus to the Authors pane, which is not what we want. Hold Shift when opening the Authors grid to open a new copy
- View > Pivot Chart
- Show fields and drag Item to the data area. Drag the AuthorCountry field to the x-axis
- Choose the chart type. In this case, a Pie chart was chosen
- Show the Legend
- Right-click on the tab and select Copy View
- Switch back to the Overview grid (or open it if closed)
- Right-click and select Paste View
- Drag the pane to move it if desired
3. Using the Book Review App
3.1 Managing Authors
The Authors grid has just 2 columns:
- The column Item contains the author's full name
- The column Country (field AuthorCountry) is an auto-list:
- Enter the country in the text box, or
- Press F2 to show a pop-up list of current values:

- As the number of authors increases, the list can be filtered using column filters
3.2 Managing Reviewers
As for Authors, it is easy to add / edit / remove Reviewers. Note that:
- The ReviewerID is an auto-number, so no need to edit it manually.
It isn't really used in this example but is there to show how to normalize the data.
3.3 Managing Books
To manage books:
- Enter the title in the Item column
- Move to the Author column and press F2. The list of authors will be shown:

Select the author and both the BookAuthor and AuthorCountry fields will be automatically filled - Enter the date the book was received for review
- Update the Status and Outcome columns (i.e. fields) as the review process goes on
3.4 Managing Book Reviews
In this solution, book reviews are entered as sub-items of each book. To add a review:
- Add a sub-item (Ctrl + Enter or use the Review form)
- Enter the date sent.
- The DateSent field has an auto-assignment which will automatically fill the FollowUpDate to be 60 days later. You can change that default or manually change the FolowUpDate
- Move to the Reviewer's name column and press F2. The list of reviewers will be shown:
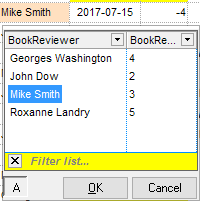
Select the reviewer and both the BookReviewer and BookReviewerID fields will be automatically filled - Update the Status and Outcome columns (i.e. fields) as the review process goes on
- The Late by column (field ReviewLateNbDays) automatically updates as time goes by (its row equations has Auto-Update checked). It is recalculated on each change of day
- When the review is done, do Item > Mark as Done (Ctrl + M) to fill the done date
- Both FollowUp and Late by cells will turn yellow when a review is late. Once the review is done, the FollowUp column yellow color will be removed as no follow up is required
- For each review, sub-items can be added to track that review (calls, documents sent, etc)
- The review item's HTML pane can be used to hold the reviewer's evaluation:
(a little bit of humor here, though based on a true story. See J.K. Rowling post here)
Note: By design, there is no cascading updates / deletes. So changes to the Authors and Reviewers lists will not be reflected in the book reviewers
3.5 Doing Follow-ups
We all have busy schedules, so need to be reminded when a deadline approches or worse, when it is passed. The FollowUps grid can help you manage reviews and show you a short list of reviewers to contact, such as:
- Call the reviewer
- Calls are entered as sub-items of the review. You can use / customize the Call form to quickly enter call information / log
- Call date is automatically entered and bubbles up to the parent items, so you see when the last call was made
(avoids the embarrassment of calling a reviewer twice)
- Send an automated email, reminding he or her about the deadline. To do this:
- Create a template item and enter the email content in the HTML pane. You'll probably need 2 templates, one for a coming deadline, and one for a past deadline
- See 6. Example : Generating Invoices and -- link to nonexistent node ID 884 -- for details
- The grid shows reviews that are not done and have a past follow-up date. This can be fine-tuned for individual needs. A column filter could be used, but in this example, a source filter was used instead, as it has more advanced filtering capabilities
To do so:- Grid > Source Bar
- The current filter is: FollowUpDate<=Now and done is null
- To show the coming deadlines, next week for example, the filter would be ReviewLateNbDays<0 and ReviewLateNbDays>-7 and done is null
- The source filter has a dropdown button which shows recently used filters (press Delete to clean up the list if need be)
4. Building upon this Sample
This sample was designed to demonstrate many of the advanced features of InfoQube, and how these could be used to handle a specific task
It is just a start though and more could be done, such as:
- Color-code items based on user-specified criteria
- Show reviews on the Calendar. Color coded, such as the start of the review could be shown in green and the due date in red
- Use the Gantt chart to show a graphical view
- Use a Timeline view when the number of reviews increases, as a more compact view than Gantt charts
- Use filtering, sorting, hoisting and searching to effectively manage all reviews
- Use Microsoft Office Pivot table and Pivot charts as a reporting tool
- Create a live connection to other applications, such as Excel, so other people can view all (or part) of the review process
- Use the HTML pane to capture reviewer's reports and eventually send these to the author
- Use Email merge to send information to reviewers, to authors, etc
- Set-up an EmailToIQ address so reviewers and authors can send information to be automatically retrieved by InfoQube