Sorting and Grouping Items in Grids
Ordering, sorting and grouping information, so it appears just the way you want, is critical for effective information management. And how information should be sorted has a lot to do with the type of information:
- When writing the outline of a book for example, it is essential to be able to move chapters, sections and sub-sections around. One expects that once set, the order will not change.
- Dealing with an "in box" however is different. New items should automatically appear at the top of the list. Notes under an item should appear as entered, unless there are many many notes, in which case, some automatic sorting is really useful.
- Tasks and other date related items are also typically sorted unless they are tasks under a project.
- In project management software, task order is important and somewhat but not completely related to the task date. Gantt chart bars and task dependencies can influence what the optimal task order is.
- For contacts, it must be really easy and quick to filter and automatically sort by name. Hierarchy of contacts (i.e. Company -> Employees) should help finding contacts, not make it more difficult (See 1. Grid Display Modes).
- For accounting entries (revenues, spending, etc) it is important to be able to quickly sort by one or more columns. Filtering and Grouping are also very desirable.
Sorting Modes
To achieve these seemingly conflicting needs, IQ grids have a number of sorting modes (Grid > Sort):
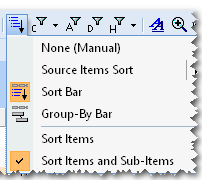
- None (Manual)
- Sort Bar
- Source Items Sort
- Group-By Bar
The sorting modes are mutually exclusive, so only one can be active at any one time.
Sometimes you want to sort items and all sub-items while in other situations, sorting should only for the selected level. This is controlled by this setting:
- Sort Items: When this is selected, only first level items will be sorted. Sub-items will not be sorted.
- Sort Items and Sub-Items: When this is selected, all items are sorted (items, sub-items, sub-sub-items, etc).
1. None (Manual)
In manual sort mode, items keep their position:
- Only user intervention (commands, drag-drop) can change the order of items.
- Clicking a column heading selects the column.
- Switching to another sort mode does not alter the manual order. Simply select the Manual mode to the return to the original order.
To move items in the hierarchy, one can select one or more items and:
- Drag-drop to the new position
- Use the commands to move items > Move > (up, down, right, left). The keyboard shortcut is Alt + Arrow keys
- Right-click on a column header and select Sort Items Ascending / Descending to sort items based on values in that column.
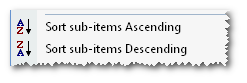
Remember that this is a sort command. Hence new items will not sort but appear where positioned. To have grids that automatically sort, use any of the other 3 sorting modes (see sections 2, 3, and 4 below) - Right-click on an item and select Sort Sub-Items Ascending / Descending to sort sub-items based on values in that column
1.1. Moving Items by Drag-drop
- To drag-drop, first select items (1 or more)
- To select, click on an item text (item column)
- You can also select items using Shift and Up / Down arrows
- To select non-contiguous items, use the Ctrl key + click
- To start drag-drop, click anywhere in the selected text (item column)
- As you move the over the grid, the cursor will show a horizontal red line between items. This is the position that the selected item(s) will be moved.
Also, depending on where you are on the grid, the selected item(s) will be at the same level and the drop position OR as sub-items of these:- If dropped in the right half of the item column, these will be sub-items. The cursor reflects this
- Anywhere else, these will be sibling items (default)
- If over the selected items, a "No-drop" cursor is shown
- Once drag-drop has started, hold the Ctrl key to leave the items where they are AND add a reference elsewhere in the grid or another grid. Use this when you want to have multiple parents.
1.2. Moving Items using the Move Commands
- Select items (see section 1.1 above)
- Press Alt + Up / Down / Left / Right arrows to move items (or use the Item > Move commands)
- The Item Move commands are in a detachable mini-toolbar. Drag the dotted line above the commands to rip it off the main menu. Once floating, you can dock it anywhere if you wish
- Move commands limit movements to the item's hierarchy level, so you cannot move an item to be a sub-item of a different parent. This is by-design
Do do this, use Drag-drop, or :- Move it left (1 level up in the hierarchy)
- Move it up / down, so it is just below the new parent, but at the same hierarchy level
- Move it right
1.3 Using Column Sort Commands
Items can be sorted using the column menu or the column header context menu. Select Sort Items Ascending / Descending :
- The list will sort based on values in the selected column
- If Grid > Sort > Sort Items and Sub-Items is checked, sub-items will also sort (recursively, for all loaded sub-items)
- If Context Parents are shown (Grid > Context Parents), these will be sorted too. If this comes in the way of the desired sort, turn context parents off first
- If the item hierarchy comes in the way of the desired sort, change to a different display mode. See 1. Grid Display Modes for details
- If the Sort Bar is shown (see section 2 below), the Sort Bar sort is applied first, followed by the requested column sort (i.e. the Sort Bar has priority)
1.4 Using Item Sort Sub-Items Commands
Sub-items can be sorted using the item context menu. Right-click on an item cell and select Sort sub-items Ascending / Descending :
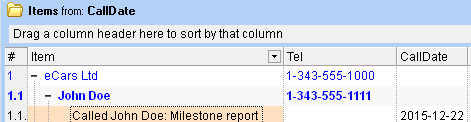
- Sub-items of the current item will be sorted based on values in the selected column. e.g. :
- To sort sub-items by item text, right-click on the current item text column
- To sort by "Priority", right-click on the "Priority" cell of the current item
- If Grid > Sort > Sort Items and Sub-Items is checked, sub-items will also sort (recursively, for all loaded sub-items)
2. Sort Bar
The Sort Bar provides a familiar, quick and easy way to sort items:
- To sort using the Sort Bar, simply drag a column header from the grid to the Sort Bar. A button will appear with the field name. The button is visually identical to the column header
- To change the sort order, click on the Sort Bar button
- To remove the sort, drag out the sort button from the bar
- You can drag more than one column header to the sort bar:

- When sorting on more than one field, sorting is done from left to right. So items are first sorted according to the left-most field in the bar.
If 2 or more items have the same value, these are then sorted according to the second field in the bar (and so on if sorting on more than 2 fields) - If Grid > Sort > Sort Items and Sub-Items is checked, sub-items will also sort (recursively, for all loaded sub-items)
- When sorting using the Sort Bar, users can still manually move items. However, order is not saved
- When the Sort Bar is shown, a single click on a column header will sort items. This is a quick way to sort items. By design, this is a temporary sort and will not persist the next time the grid is opened
- You can also perform multi-column sort by pressing Shift while clicking on a column header. Note however than using the Sort Bar simpler to use if you want to do multi-column sorting
- It should not be used for grid showing hierarchies of text items, such as a book outline, but if you do, and the item order was changed, simply switch back to None (Manual) to view the original outline
Hint:
- At any time, one can manually move items for a specific need, using the methods given in section 1 above
- Context parents are great for giving context, but they can sometimes be in the way for proper sorting. Turn off Context Parents or changing the parent level shown if need be. See 1. Grid Display Modes for details.
- You can use the build-in Order field to achieve custom sorting. Simply show this field in the grid and enter values for each item. You can then sort by this field. To quickly enter values, you can use the Edit > Renumber Items command
3. Source Item Sort
The Source Item Sort can also be used to sort items. In many situations, it will have the same result as using the Sort Bar. But there are times when the two will differ, which can be very useful. Specifically:
- The Source Item Sort is done at the database level (as its name implies)
- If sorting by a text field, such as the item text, embedded HTML code are part of the sorting (so items starting with bold text will appear first, due to the <b> tag)
- Sorting is done before context parents are added. This ensures that context parents do not affect the sort result. The Sort Bar will always be impacted by context parents
- The sorting fields do not need to be shown in the grid. The Sort Bar requires the sorting field be part of the grid (it can however be minimized or hidden)
- Sort strings can be named and support different sort for sub-items. Format: SortName: Sort string | Sub-Item Sort string
- For each grid, the history of sort strings is saved and can easily be re-used. See section 3.1 below
3.1 Using the Source Item Sort
- Source Item Sort is done though the Sort Box, which is part of the Source Bar. Grid > Source Bar shows / hides the bar.
- To sort, enter a comma separated list of fields.
- For multi-field sorts, sorting is done from left to right (same as described in the Sort Bar section). e.g. Field1, Field2, Field3
- After each field, the order can be specified: ASC or DESC, for ascending or descending order. e.g. Field1 ASC, Field 2 DESC
- If no order is specified, ASC is assumed
- Just left of the Sort Box, is a button to control the Sort Box behavior. These mimic the corresponding sorting menu commands:
- Sort On / Off
- Sort Items
- Sort Items and Sub-items
- The Source Item Sort command button shows the list of recently entered sort strings for this grid. You can select an item from this list to quickly apply a specific sort:
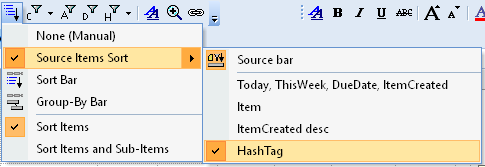
Select an item from the list to quickly apply that sort. - Each item level can have a different sort. To enable this select Sort Items and Sub-items and enter a list of sorting string separated by | . The last sort string applies to deeper item levels.
e.g. Project | Priority, DueDate Desc | Item would sort level 1 (TLI) by Project, level 2 by Priority and DueDate and level 3 and remaining levels by Item
- Examples
- Sorting Priorities with empty ones at the end: The default IQBase uses descending priorities (1=lowest), partly because this sorts blank ones at the end (as it should). If you prefer using 1=Top, use this source sort string instead:
[Priority] is not null, [Priority]
- Sorting Priorities with empty ones at the end: The default IQBase uses descending priorities (1=lowest), partly because this sorts blank ones at the end (as it should). If you prefer using 1=Top, use this source sort string instead:
4. Group-by Bar
The Group-by bar is similar to the Sort Bar (section 2 above) but goes a step further by grouping similar items. Group items can be expanded / collapsed, just like regular items.
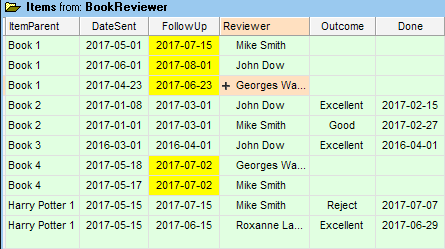
Consider the following grid:
By showing the Group-by bar and dragging the Reviewer column to it, one gets:
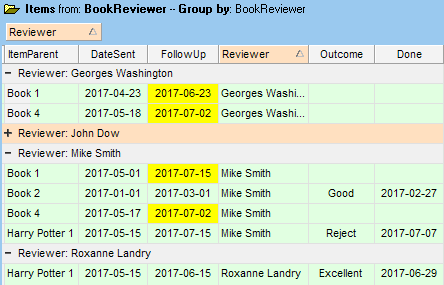
Notice how reviews are now grouped by Reviewer.
Notice also that John Dow's reviews are now collapsed. This is useful to hide some items and focus on others. Use Item > Sub-items commands to open / close items
Of course, similar things can be achieved with filters, but having more ways to slice and dice your information is what InfoQube is all about !
Tips:
- You can combine a couple of sorting methods to ease the process. For example, use column sort or sub-item sort to do the bulk of the work and Item Move to make minor adjustments
- By using a "myOrder" column (text or numeric), you can quickly apply a sort.
- If you have more than one such column, you can toggle between 2 sorts instantly.
- To populate such a column, you can use the Renumber Items command