Using the IQ Calendar
The IQ Calendar Concept
- Events can be all-day or have start / end times
- Events can span more than 1 day
- Events can be repeating
- Events can be scheduled or not. Non-scheduled events are shown in the upper part of the Calendar, along with the all-day events.
An unscheduled event has a duration but no associated time:- Event duration of the item in hours
- Dragging events between the non-scheduled and scheduled areas preserves the event duration. This is a great tool to plan your day
- The event / item duration field is handled like any other item field values (can be shown in a grid, be used in equations, etc.)
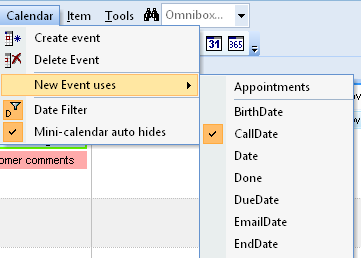
- Any date field can be shown shown in the Calendar. (by default, the Appointment field is used)
- Show Anniversaries and birthdays
- Show task due dates
- Show project milestones
- Show both Task Start and Task End in the calendar, in different colors
- etc.
- Event date and duration can be modified using grids and the Properties pane
(in addition to drag / move and other Calendar specific actions)
- Events are linked to items, so they can:
- Have any number of field values
- Have rich text content (Document pane)
- Be shown in other views (Grid, Gantt, Surface, Map view, etc)
- Be arranged in hierarchies
- Have any number of sub-items
- Have multiple parents
- You can control which events are shown in the Calendar, either based on the associated date field used, or on an event by event basis
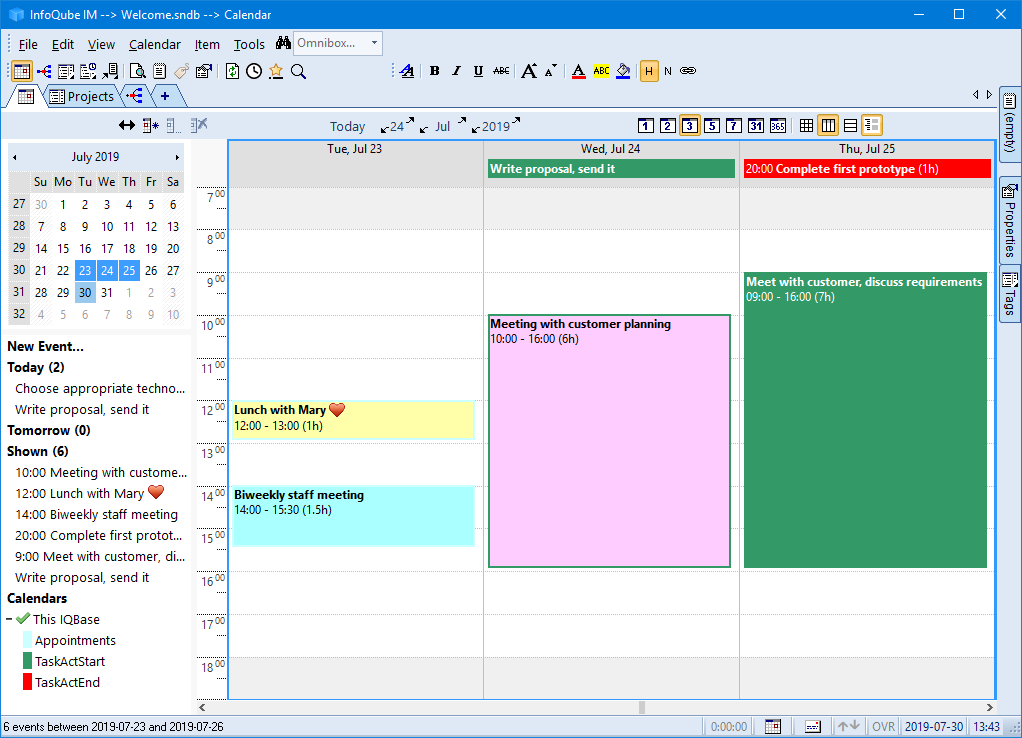
1. The Calendar UI Elements
- Show / Hide the left pane
- Add / Edit / Delete events
- Today button: Scrolls the Calendar to ensure that today is shown. Appears checked whenever today is shown
- Choose the Calendar date (day / month / year up/down and dropdown buttons)
- Set the display options
- Number of days shown: One of 1, 2, 3, 5, 7 days, month and year
- Display type: Month view, Horizontal and Vertical scrolling lists, List / Search view
- Show / Hide the time scale
- Show / Hide Done items
- Mini-calendar: Dates currently shown in the calendar will be highlighted. Click to select specific dates, weeks and month
- New Event
- Current events (yesterday, today, tomorrow, shown)
- Click to select associated item (and view info in Properties pane, Doc pane, etc.)
- Double-click to edit event
- Hit Ctrl+E to open the Item Editor - List of calendars in this IQBase. Each calendar can be shown / hidden separately or use the main toggle to show all. Remember, in InfoQube each date field can be shown in the Calendar and will be listed here (only date fields with events are shown)
- List of Google linked calendars. Each calendar can be shown / hidden separately or use the main toggle to show all
- Drag the splitter bar to resize the left pane
- Day time scale
- Main Calendar window
- See section 3 below for more details
- Grids to view / edit date item text and date values
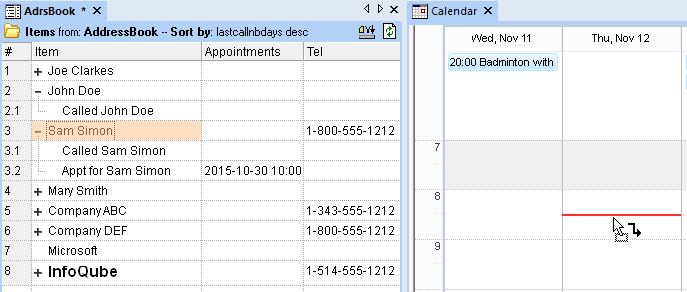
- Grids, namely the AdrsBook grid, can be used to drag an item, such as a contact, to the Calendar to create an appointment for this contact. Appointments will appear under the contact, as sub-items.
- Gantt Chart, typically for project related items
- Properties pane to view / edit item text and date values
- Document pane can be used to associate rich text content to any calendar item
- Fields can operate on calendar items (through equations and auto-assigns)
- VB Script can also operate on calendar items
2. Navigating the Calendar
- Mini-calendar
- Top toolbar
- Cursor keys
- Direct Calendar interactions: mouse click, mouse wheel, touchpad, screen touch
2.1 Using the Mini-calendar
- a day
- a day and drag to select multiple days
- hold Ctrl to select a rectangular region (only in Month view)
- a week number
- a day header
- A single click will keep the current view (nb of days shown)
- Click and drag to select more than one day will change the main calendar window to show the selected days
- Hold the Ctrl key to select a rectangular region of the mini-calendar
2.2 Using the Top toolbar
- Press Today to show the current day, while keeping the current display mode
- Navigate using the up / down arrows for day, month and year. These intelligently move the calendar based on the current display mode
- Press the day, month, year buttons for dropdown selection
- You can set the number of days shown: 1, 2, 3, 5, 7, month or full year
- Select from one of the 4 display modes, each optimized for a particular use-case. See section 3 below for more details
2.3 Using Cursor keys
2.4 Direct Calendar interactions
- Scroll in any direction:
- Click on a blank area and drag
- On a touch screen, touch and drag
- Scroll up / down:
- Mouse wheel
- Two finger up / down swipe on a touchpad
- Scroll left / right:
- Shift + Mouse wheel
- Shift + two finger up / down swipe on a touchpad
- Two finger left / right swipe on a precision touchpad
- Zoom:
- Ctrl + mouse wheel
- Mouse wheel press and drag
- Ctrl + two finger swipe up / down on a touchpad
- Pinch zoom on precision touchpad
- View > Zoom > Zoom In / Out / Reset (or equivalent toolbar command buttons)
3. The main Calendar window
3.1 Calendar Display Modes
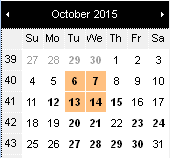
- Normal
In this mode, days are arranged in a grid with days of the week as columns and weeks as rows.
This is similar to other calendar's month view, except that one can zoom in and out and show / hide the time scale.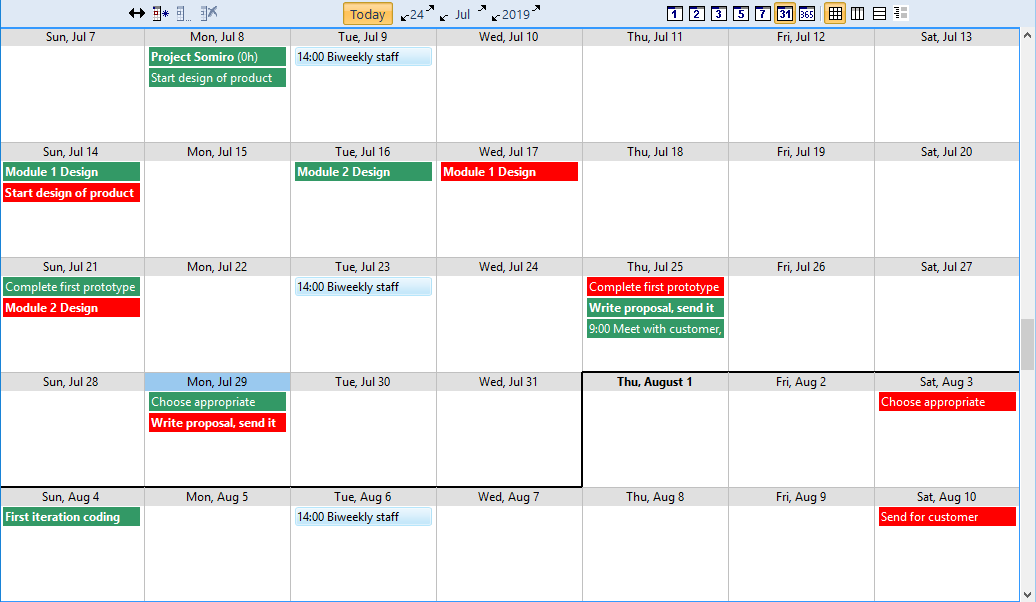
- Horizontal scroll
- In this mode, days appear as a horizontal scrollable list (full year)
- Typically, a time scale is shown on the left side and all-day / unscheduled events are shown on top
- Visually, the area is divided into working and non-working hours and days (settings in Tools > Options).
- This is similar to other calendar's day view, except you can scroll to arbitrary positions and that events that are outside the view port (earlier or later than visible) are shown on top, with all-day events
- If zoomed out so that the full day is visible then vertical scrolling (mouse wheel, touchpad, etc.) will perform a horizontal scroll
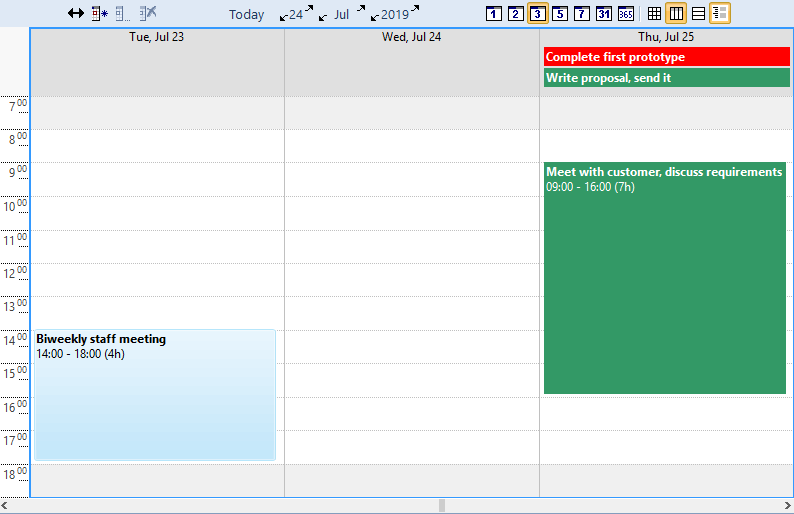
- Vertical scroll
In this mode, days appear as a vertical scrollable list (full year). The mouse wheel can be used to scroll in this list.
Time scale can be shown or hidden, depending on the number of days in view.
This is similar to other calendar's agenda view, except that it is live and scalable, not "print-only".
This is very useful when the Calendar in a narrow tab group or in a pane
- Event List
In this mode, events (including tasks and reminders) appear as a vertical scrollable list much like they would appear in a regular grid. The following columns are shown:
- Event subject
- Event date
- Time of day (scheduled events) or end date (multi-day events)
- Duration, in hours or days (empty for all-day events)
- Calendar name (i.e. associated date field)
- Description and Location
Unlike grids however, repeating events appear as distinct instances in the list.
On any event:
- Double-click to show the event in the calendar (using the previous view)
- Hold Shift or Ctrl and double-click to edit the event
- Right-click to show the context menu:
- Edit event
- Copy event, Copy event subject
- Show / Create Item. An item will be created if the event is not associated with one (i.e. a Google event)
- Mark as Done
- Delete...
On the header:
- Click to sort events
- The Date column will sort by event start date/time
- The Time of day column will sort by event end date/time
- The Calendar column has a dropdown filter button. Click it and select one or more calendars. Hit Enter to filter
(hint: you can also use the Calendars section of the left pane to filter, much like in the other 3 views)
3.2 The Time Scale
- When displayed, events are shown according to their start and end time. This is similar to other calendar's day view
- When hidden, events are shown one below the other. This is similar to other calendar's month view.
- Day-view start and end times ("Day-view" is defined in Tools > Options > This Database > Calendar, see section 9 below)
- Day-view + evening
- Full 24 hour view
- If it fits in the time scale, a horizontal red dotted line is shown at the current day and time
- All-day and unscheduled events are shown in the upper zone
- Scheduled events are shown in the main (lower) zone
- Note that scheduled events which start outside of the time scale range are also shown in the upper zone. This ensures that all events are shown without the need to scroll up / down
- Click on the toolbar command button
- Right-click on the Calendar and select Show Time Scale
- Changing the Calendar scale may also automatically toggle the display of the time scale
- The time scale will be automatically hidden if the day height is below a certain threshold.
Set the threshold height in Tools > Options > This File > Calendar > Hide time scale when the day height is less than X pixels (default=300, minimum=200)
4. Creating and modifying Calendar Events
- Double-click a blank space
- Right-click on a blank space and select New Scheduled Event, New Unscheduled Event or New All-day Event
- Calendar > New Event
- Top toolbar > New Event command button
- Left pane > New Event... link
- If the time scale is shown, click and drag while holding the Ctrl key. The Event dialog will open with the correct date and time
- Press the Insert key. The Event dialog will open with the current date and time
- Copy / paste existing events:
- Select one of more events > Copy.
- Right-click on the calendar date for the new events > Paste
- In a grid or in the Properties pane, edit any date field-value and check "Shown in Calendar"
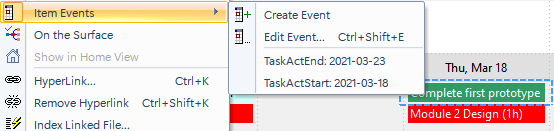
- In any view, Item > Item Events > Create Event will create an events (1 for each item / date selected). If a single item is selected, the Event dialog will be shown.
If the selected cells are dates, these will be used to create the event, otherwise the current date field is used (Calendar > New Event uses...) - If a date field has "in Calendar by default" checked, all dates added (e.g. in grids) will create calendar events.
If the date field is used in a Gantt chart, then creating a Gantt bar will also create an event - Drag-drop an item to the Calendar (from any views, from the NavBar or from the Properties pane)
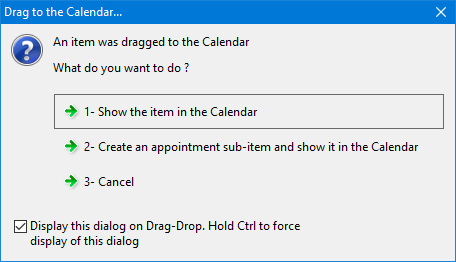
If the Ctrl key is pressed or Tools > Options > This File > Calendar > Show dialog ... is checked, a dialog will be shown to choose between:- Show the item in the Calendar
- Create a sub-item named "Appt for xxx" and show it in the Calendar
- Double-click on an event
- Right-click on an event and select Edit
- Calendar > Edit Event
- Top toolbar > Edit Event command button
- Double-click on an event in the left pane
- Double-click on an event in the NavBar
- In a grid or the Properties pane, on a date field, edit any date field-value and and click on the Edit button
4.1 The Event Dialog
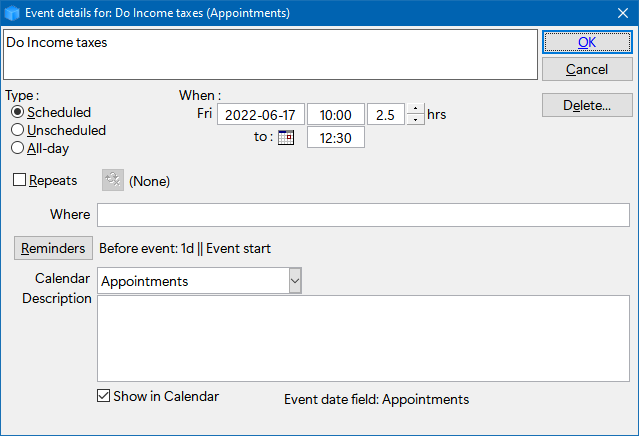
- Scheduled: Has a starting date / time and an ending date / time:

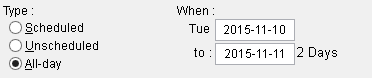
- Unscheduled: Has an event date and a duration. The actual time for the event is not set:

- All-day: Event lasts all day:

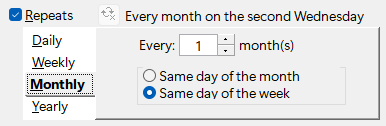
- Double-click on the first 2nd Wednesday of the pattern
- The event dialog will show and check Repeats
- Select Same day of the week (top description will update to show "Every month on the second Wednesday"
- Click OK
- In the Properties pane, find another date field and add the second event (4th Wednesday of the month) using this dialog (see section 4.2 below)

- Master event
- Regular recurrence
- Exception to the recurrence pattern
Reminders can be added for each event. Details here: Using Reminders
4.2 Adding Events using the Date Editor
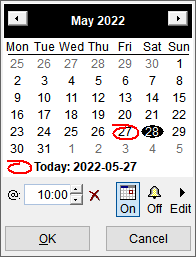
- If a time is specified, a scheduled event will be created.
- If a time is not specified, then the ItemDuration field determines the type of event:
- If the ItemDuration has a value, an unscheduled event will be created
- If the itemDuration field is empty, an all-day event will be created
4.3 Adding Events using the Item Events Command
4.3.1 Create Event
- If in a grid and 1 or more date cells are selected, events will be created for each dates. These dates can be from different items (if multiple items are selected) and / or multiple date fields (if more than one column is selected)
In this example, you'll have 6 events. The 3 tasks will appear 2 times each, once when the task starts and once when it will complete: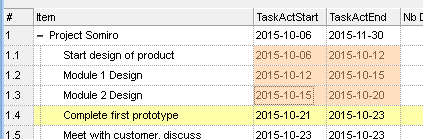
Note that if one or more of these are already in the Calendar, the number of events created may be less. The actual number of events created will be shown in a pop-up message on the Windows Taskbar. - In all other cases (i.e. other views, or if a date field is not selected), the events will be created, one for each selected item, using the Calendar default date field (see below about the Calendar default field). If the Calendar default field is other than the Appointment field, a dialog will be shown, letting you choose which field to use.
4.3.2 Edit Event...
Opens the Event dialog (section 4.1 above) for each selected event
4.3.3 Event List
List the current event(s) for the current item. Click an event in the list to show it in the Event dialog
Right-click on an event in this list to view the event in the Calendar or to Delete the event (the actual date values are not erased)
4.4 Adding Events using Drag - Drop
In this example, we'll create a appointment with Sam Simon on November 12th, 8h30:

5. Selecting, Moving and Deleting Calendar Events
5.1 Selecting Events
- Click on an event. Unselects any previously selected events
- Ctrl+Click to select an event keeping previously selected events (i.e.toggles the event select state)
- Hold the Shift key and Click and Drag to select events in an area
5.2 Moving Events
- In a grid or in the Properties pane, deleting a date field value will delete the associated event if it exists
- In a grid or in the Properties pane, in the Date editor, changing the date and/or time
- In a Gantt, by moving / resizing a Gantt bar or group of bars
- In the Calendar, using drag and drop:
Select one or move events. To select multiple events, hold the Ctrl key and click on events.
Click any selected events and move the new date / time
- Dragging an all-day or an unscheduled event to the time zone (lower zone) will change it to a scheduled event
- Dragging a scheduled event to the upper zone will change it to an unscheduled event
(to change a scheduled event to an all-day event, use the Event dialog)
5.3 Deleting Events
- In any views, deleting an item will delete the linked calendar event(s)
- In a grid or in the Properties pane, deleting a date field value will delete the associated event if it exists
- In a grid or in the Properties pane, in the Date editor, uncheck the Shown in Calendar checkbox of the associated date field
- In any views, the Item > Remove from Calendar will remove associated event(s). See above for details
- In the Calendar, select one or more events use the Calendar > Delete Event (or right-click)
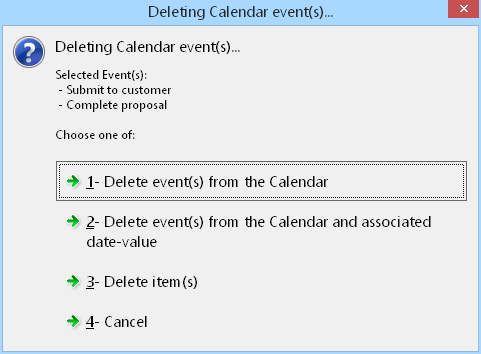
- If the event is a repeating event, you are given a few more options:
- Delete just this event
- Delete this event and all following
- Delete all events of the series
5.4 Repeating Events
Repeating events are a special kind of event supported by most calendar applications. Worth noting:
- Repeating events are in reality a single event
- Each event is referred to an "instance" of the repeat pattern
- Since they are all the same event, they share many properties and the associated item
- This means that marking an event as done, will mark all events as done (more on this later). In fact, as an item can have many events (one event per field value), marking an event as Done will mark all other events as Done
- You can drag an instance to a different date / time. This will create an event exception. It is possible to later on cancel the exception
- An instance can also be deleted
This simplicity comes in handy. It does however also come with some limitations. This is why the IQ Calendar also has these features, mostly available through the event context menu:
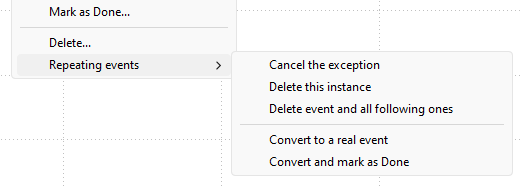
- Cancel the exception: visible when the event is an exception
- Delete this instance
- Delete instance and all following ones: This basically terminates the repeat pattern
- Convert to a real event:
- This creates a new item and event
- Users can then add tags, field values and Doc pane content without affecting other events in the series
- The item can be used in grid and hierarchies
- A "delete exception" is added to the series (so the event isn't shown twice in the Calendar)
- Convert and mark as Done: Same as above but additionally marks the item as Done
6. Date Fields and the Calendar
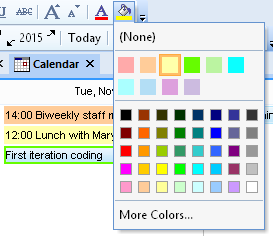
7. Event Colors

- Text Color: Event text color matches the item text color as seen elsewhere in InfoQube
- Fill Color: Event fill color matches the item color
- Frame Color: Event frame color is set by the field used for the event (see next section)
8. Date Field Properties and the Calendar
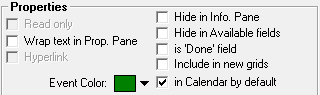
- Event color
- in Calendar by default checkbox
9. Calendar Options
- Font face and size, Bold
- Show event text in bold
- Weeks starts on: Choose the first day of the week, used whenever a calendar is shown
- Non-Working Days: Used in the 5-day day view (working days). Non-working days are shown with a grey background )when the time scale is shown)
- Work day start / end: Defines the working hours
- Day view start / end: Defines the hours visible in the Calendar, when the time scale is shown
Remember that clicking on the time scale toggles between 3 scales (see section below) - Day time scale increments
- Hide time scale: Hides the time scale when the day height is below a threshold (in pixels, default=300, minimum=200)
- Zoom step size (%)
- Show dialog when dragging an item to the Calendar: If checked will give the option to either (1) show the item in the Calendar or (2), create a sub-item and show it in the Calendar
- Show Reminder icons