Surface View
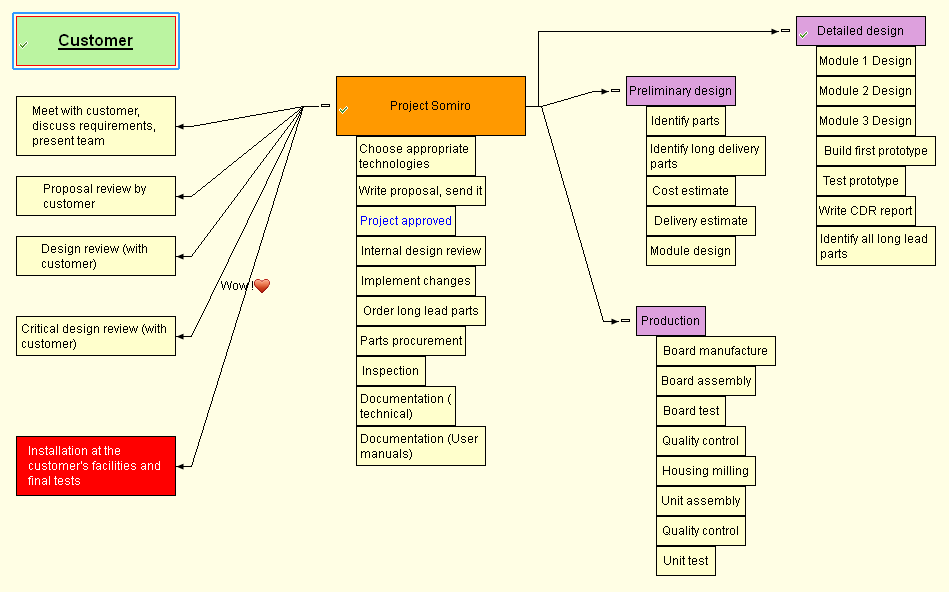
The two-dimensional IQ Surface view is an infinitely-sized sheet that can be used to show items.
It is an innovative way to view outlines, combining the free-form 2D layout and linking of concept maps with the expand / collapse features of grids:
There are now also Surface Views, one for each grid!
In a nut-shell:
- Use View > Surface (default) to open the default Surface
- Each grid can also have a Surface view. Details here
- The Surface displays all items that have the Surface1 field checked
- All child items are also shown
- A child item is shown in one of 2 ways:
- As a sub-item, immediately under the item
- As a linked item, with a line joining it to the parent item
- To switch between the two:
- Drag out a sub-item to have it shown as a linked item
- Drag a linked item back to the parent item to remove the link line and have it shown as a sub-item
- Right-click from an item to another to create a parent - child link
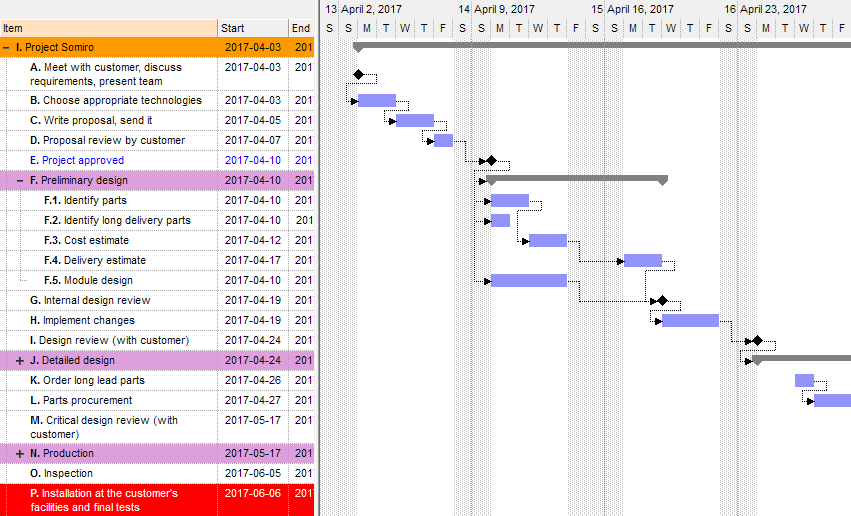
- Surface items are like any other item, and can be viewed in other views (Grids, Gantt, Calendar, Properties pane, etc)
- The Surface will update to reflect changes to items done in other views, such as adding a child item, adding / deleting a parent
- New: Auto-Arrange !
1. Adding Items
To add existing items, open a grid, the Calendar, or another view. Select 1 or more items and:
- Do Item > On the Surface
- Check the Surface1 field (show the field in a grid or use the Properties pane)
Adding child items to an item that is already on the surface is automatic. You can do it in any grid and these will show up on the Surface
When existing items are added to the Surface, these are initially placed at the Origin, with child items collapsed. Press the Home key to quickly move to the Origin
To add new items, use any of the following methods:
- Right-click on a blank area of the Surface and select New Item
- Double-click on a blank area of the Surface
- With no item selected, press Enter or the Insert key
To add a new sub-item, you can:
- Right-click on an existing item and select New Item
- Select the parent item and press Enter or the Insert key
1.1 Editing Item Text
The item text can be edited in all views and in the Properties pane. To edit it within the Surface:
- Right-click on an item > Edit
- Double-click the item
- Select an item and press the F2 key
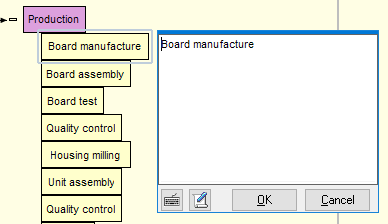
- The Item Editor can also be used to edit the item text and other item properties (field values, tags, Doc pane content). Use Edit > Edit Item... (Ctrl+E)
2. Removing Items
The Surface is not as dynamic as a grid, in that the source cannot be changed. It is set to the system field Surface1. And, as it does not support filters, it becomes essential at times to clean it up.
To remove items, select 1 or more and do one of:
- Press the Delete key
- Edit > Erase Item (or right-click)
A dialog will be shown with the following options:
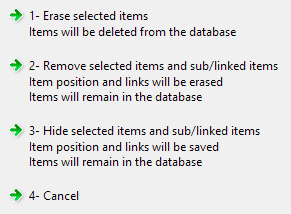
- Erase will remove the items from the database (Surface, Grids, Calendar, etc)
- Removed item remain in the database but all Surface-specific properties will be deleted
- Hidden items retain all their Surface-specific properties (box size, border color, link lines types, etc).
If a hidden item is shown again, it and its child items will be shown exactly as it was before hiding
It is the equivalent to un-checking the Surface1 field - Hidden items can be shown using Surface > Show Hidden Items
To have these show in the normal view, either do Item > On the Surface or check the Surface1 field
3. Formatting items
Items on the surface are shown as a rectangular boxes. The following system-wide properties are shown for items on the Surface:
- ItemColor: shown as the box background color
- ItemForeColor: shown as the text foreground color
- Embedded HTML codes (font, size, bold, italic, color, images, hyperlinks, etc)
- ItemFont is NOT shown for items on the Surface, all items are shown with the same font
The following are Surface-specific formatting::
- Box size: Auto-size or Sizable
- Box border color
- Item text alignment and padding
Note that:
- When 1 or more items are selected, the above commands are applied to these items
- When no item is selected, the following commands sets the default for new items created: AutoSize, Padding
- When no item is selected the remaining commands are applied to items that have the default value. For example:
- The BackColor command sets the box color for all items that do not have a value for ItemColor
- Text Fore Color and Border Color behave the same
4. Linking Items
Links on the IQ Surface are nothing more than regular parent - child relationships (i.e. seen in a grid as an outline).
Being a two-dimensional view, the Surface excels at creating links with more control on how links are shown:
- Easy link creation, in particular for multi-parent links
- Link line color, line type and shape can be set, globally or for specific links
- Links can have text (shown half way along the link line)
- Children can be shown as sub-items or as a linked item (with a connecting line)
- Expand / collapse can hide all children or just those shown as sub-items
4.1 Creating Links
To create links:
- Right-click on the parent item and drag to the child item
- Drag out a sub-item
- Select the parent item. While holding the Ctrl key, select 1 or more items. Do Surface > Link Items. Links will be created between the parent item and all other selected items
- Select the parent item. Do Surface > Link Items. A dialog will show all items on the Surface:
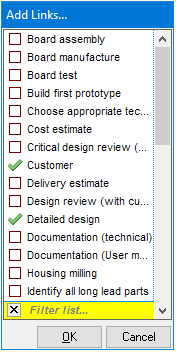
Select one of more items and click OK
4.2 Removing Links
To remove a link:
- Hover over the link text (half way on the link line). The mouse pointer will change to a hand. Right-click and select Delete Link
- Select the two items that are linked. Right-click and select Delete Link
- To delete all outgoing links, select the parent item, right-click and select Delete Link. A dialog will be shown to confirm action
- Select the child item and in the Properties pane - Parents section, right-click on the parent and select Delete Parent Link
4.3 Setting Link Text
To select link text:
- Hover over the link text (half way on the link line). The mouse pointer will change to a hand. Right-click and select Link Text
- Select the two items that are linked. Right-click and select Link Text
- Select the parent item. Right-click and select Link Text. An input box will be show for all outgoing links. The link text can include icons, using the syntax <img>IconName</img>
4.4 Formatting Links
The following properties can be set for each link:
- Line Color
- Line Type (dot, dash, etc)
- Line Shape (straight, curved, etc)
Note that:
- When the 2 sides of the link are selected, the commands will be applied to that link
- When only 1 item is selected, the commands will be applied to all outgoing links
- When no item is selected, the commands will be applied to links with default properties
5. Working with the Surface
Users can move the view point, zoom in / out, move items and expand / collapse items and links
5.1 Surface Options
The Surface menu has the following commands:
- Background Color
- Move Linked Items: Behavior when moving an item: Should linked items move with it or stay put
- Hide Linked Items on Collapse: Behavior when collapsing an item: Should linked items be shown or not
- Auto-Arrange...
- Show Hidden Items
- Show / Hide Grid Lines
- Snap to Grid
5.2 Moving the Surface
- Click on an empty area of the Surface and drag the mouse (or Tap and drag)
- On a touch screen, touch the Surface and move
- To move up / down, roll the mouse wheel (or 2-finger up / down)
- To move left / right, hold the Shift key and roll the mouse wheel
- Press the left / right / up / down keys
- Press PgUp / PgDn keys (hold Shift for horizontal)
- Press the Home key to move to the Origin and set the zoom to 100%
- Hold Ctrl and Alt and roll the mouse wheel to toggle between viewing all items and setting the zoom to 100% centered on the item under the mouse pointer. This is a great way to navigate in a large surface
- When Auto-Arrange is On, clicking on an item will center it if it is not in the central area
5.3 Zoom In / Out
- Hold the Ctrl key and roll the mouse wheel
- Pinch zoom in / out on a touchpad
- View Zoom commands: In / Out / Reset
- Ctrl + Home to view all items
- n.b. Pinch zoom on a touch screen does not currently work
5.4 Expand / Collapse Items and Links
- When an item has 1 or more sub-items, an expand button is shown to the left of the item box ( +, - ). Click on this button to expand / collapse sub-items
- For links, the behavior is set with Surface > Hide Linked Items on Collapse:
- If checked, linked items will hide when you collapse the parent item
- If un-checked, linked will not hide when you collapse the parent item (only sub-items will hide).
This is useful when the parent has many children. Simply pull-out some sub-items and collapse the parent. It effectively does a hoist
- To quickly expand / collapse a multi-level hierarchy of items, use the Ctrl + 0-9 shortcuts:
- Ctrl + n: Expand to level n where n=1, 2, ... 9
- Ctrl + 0: Expand completely
5.5 Moving Items on the Surface
- Select 1 or more items
- Click and drag to the new position (mouse, touchpad, touch screen)
- Drag to another item to create a link (Auto-Arrange Off)
- Drag to a blank area to move the selected items
- If Auto-Arrange is On (see below), other items will move when the selected items are moved
6. Auto-Arranging Items
Items can Auto-Arrange either automatically or using the Auto-Arrange command
6.1 Automatic Auto-Arrange
Item automatically move when the Auto-Arrange command is checked.
With no item selected, do Surface > Auto-Arrange to toggle the state. Alternatively, press Ctrl + Shift to toggle
- The Status bar will show the Auto-Arrange state
- When Auto-Arrange is On, links are shown as extended links (i.e. outgoing links are not combined into one)
- Dragging items will move other items so items never overlap
- As a consequence, when Auto-Arrange is On, it is not possible to change the parent-child relationships by drag-drop. Do this in a grid or set Auto-Arrange Off
- When Auto-Arrange is On, selecting an item will move the Surface so the item is roughly centered
6.2 Manual Auto-Arrange
To manually Auto-Arrange:
- Select 1 or more items
- Do Surface > Auto-Arrange... :
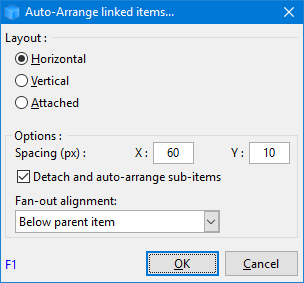
- Select Layout:
- Horizontal: Sub-items will be to the right of the parent item
- Vertical: Sub-items will be below the parent item
- Attached: Will reattach all sub-items that were detached
- Select options:
- X and Y item spacing
- Detach sub-items. If checked, sub-items will be detached from their parent
- Undoing the Auto-Arrange:
- After an auto-arrange, a pop-up notification is shown (bottom-left corner). Click this notification to cancel the auto-arrange
- On auto-save and on closing the Surface, a confirmation dialog is shown. Use this to cancel the auto-arrange
Tips and Tricks
- Create a grid named Surface1 (or set the grid source to that field) and then all actions on the Surface will be seen there too. Conversely, all changes in this grid will be reflected on the Surface
- You can quickly hide items by unchecking the Surface1 field
- Item font is not shown on the Surface. You can however set the overall font using the Grow Font and Shrink Font commands
- Press Ctrl+Shift to toggle how multiple links are shown (combined or separate). This also sets Auto-Arrange On / Off
- The Surface layout auto-saves every 60 seconds
- To know if an item was added to the Surface or just shown because it is a child of a Surface item, check the lower left of the item box. Surface items have a green check-mark