The Properties Pane
The Properties pane is used to view / modify information about items:
1. Properties Pane Sections
The Properties pane is divided into the following sections:
- Item Properties
- Marked items
- Grids
- Forms
- All Fields
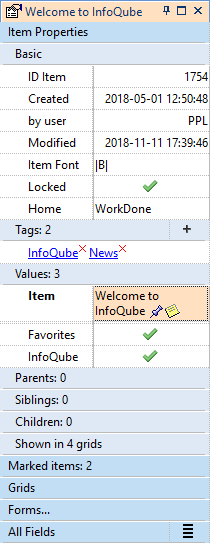
1.1 Item Properties
The Item Properties section shows everything there is to know about the current item:
- Nominal information, such as unique Item ID, when it was created / modified and by who, font and lock properties and its Home
Created and modified dates and Created By can be edited (right-click > Edit value > Confirm action) - Tags: List of tags assigned to the selected item. Details here: 3. Tags
- Values: List of field values assigned to the selected item
- Parents: List all parents of a selected item
- An item can have multiple parents
- Parent list is shown as an inverted tree. This is in particular very useful when items have multiple parents
- Each parent is a hyperlink. Click on the link to move focus to that parent
- Siblings, Children: List of such items
- Related Items. Details here: Related Items Links
- Shown in: Grids where the selected item was recently displayed. An arrow is shown after the grid name:
 . Click this arrow to open it
1.2 Marked Items
This section shows currently marked items. Marked items are a persistent list of item used in many places within InfoQube.
See Marked Items for details
1.3 Grids
Lists grid related information:
- Current Grid: This section is dynamic and shows the columns of the current grid. Values can be edited
Use Alt + Up / Down arrows to rearrange grid columns - All grids that are set to be visible in the Properties pane.
Click the grid name to expand and show its columns (and use it a simple data entry form)
An arrow is shown after the grid name: . Click this arrow to open it - Grid Groups: List the Grid Groups. Click to show the grids in each group. Click on a grid in a grid group to open it
Details here: 7. Grid Groups
1.4 Forms
List all forms. Forms are a user-defined ordered list of fields
Forms can be loaded as column sets. Details here
Drag-drop and the equivalent keyboard shortcut (Alt+Up/Down) can be used to add and move fields in forms. For more extensive changes to form, use the Manage Forms dialog. Details here: 4. Forms
1.5 All Fields
- List all fields in the current IQBase
- Flat view or tree view. Click the icon on the right to toggle between the two views
- In tree-view, fields can be arranged in hierarchy using keyboard shortcuts or drag-drop. See section 3. below for details
- If the field has the same name as a grid, an arrow is shown after the field name: . Click this arrow to open it
2. Using the Properties Pane
- The Properties pane shows the values of the currently focused item
- If using a view that supports multiple selections (most do), only one item of the selected items has the focus and it is that one that is shown in the Properties pane
- Adding / Editing / Deleting a field value is performed on ALL selected items
- The left column supports Auto-search. So to find a field, simply start typing. Press F3 to find the next occurrence
2.1 Context Menus
Right-click on a line in the Properties pane to view a context menu. Each type has a specific context menu:
- Tags
- Field
- Parents header
- Parent item
- Sibling / Children item
- Related Items header
- Related item
- Marked items header
- Marked item
- Grid and Grid Group
- Forms header
- Form
- All Fields header
3. Field Hierarchy
Fields in the All Fields section of the Properties pane can be arranged in a hierarchy
To turn on it On, click on the button to the right of the All Fields section

There are 2 methods to arrange fields :
- Keyboard
- Drag-drop
3.1 Using the Keyboard to arrange fields
You can use the same keys that you use to arrange items in hierarchy :
- Alt + Up / Down
- Alt + Left / Right
Tips :
- Only one field can be moved at a time
To move multiple fields, move these under a parent field and move the parent field - The Item > Move command buttons are enabled, so they can also be used

3.2 Using Drag-Drop
You can arrange fields using Drag and Drop. Do make sure though when dropping that the mouse pointer changes to "sub-item"" : 
4. Tips on using the Properties pane
- You can drag the Tags section to a grid to show tags as a column in the grid
- You can drag a field from the Properties pane to a grid to show it there
- You can perform bulk operation (i.e. on multiple items) using the Properties pane. e.g. on Field2, entering =[Field1] + 4 would execute that function for all items selected.
If Field2 is not set to automatically parse equations (Field properties > Properties), right-click on the equation > Parse Equation - F4 moves the focus between the Properties pane and the active view. This works even if the Properties pane is in auto-hide mode
- F7 / F8 works even when the focus is on the Properties pane (to select the Previous / Next item). It is therefore possible to view the properties of other items without going back to the active grid
- All item-type entries (parent, children, marked items, etc) can be edited in the Properties pane. Right-click > Edit (or F2) to edit
- All field-type entries support double-click: Double-click a field will open the grid that has this field as a source if it exists, otherwise, the Scratch grid will open
- In Tools > Options > Program > Other > 1.6.13 there is an option to show the checkbox to the left of the field, instead of right of it (in the values column)