Using Forms
- Forms are a user-defined group of fields, shown vertically in the Properties Pane, in a specified order.
- Forms allow you to view / edit / add items. You select the fields and the order displayed in Tools > Manage Forms. You can have as many forms as you wish.
- Forms are great for data entry. Grids can also be used for data entry, but when the number of columns gets large, they can be cumbersome.
- Forms provide an alternate way of entering information.
- In addition, default values for each field can be defined for each form. So you can have forms for contacts, tasks, one for each project (for billing perhaps).
Hint: The Form Manager is used to make changes to forms. The Forms dialog and Properties pane are to actually use forms.
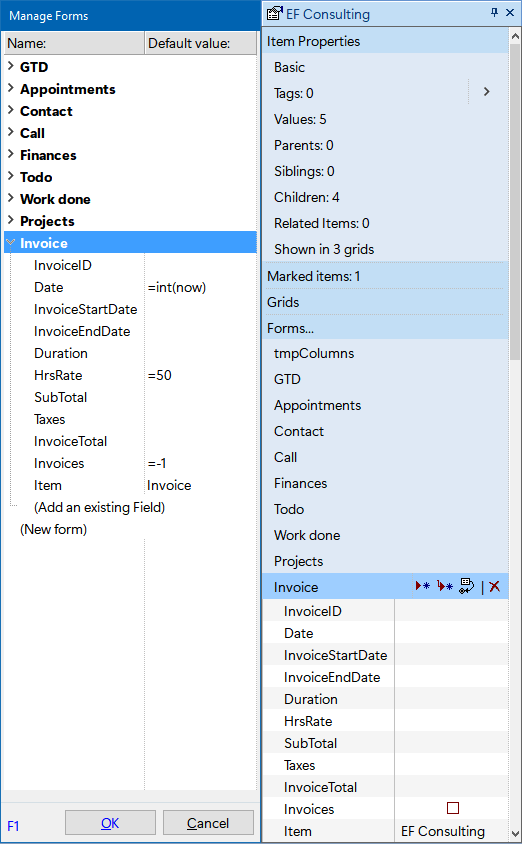
The following screen shot shows them side by side:
..............Form manager ...........................................Properties pane......................
1. Managing Forms
Use either Tools > Manage Forms or right-click on a form (in the Properties pane) to open Form Manager.
In the Form Manager, you can:
- Add / remove / rename / re-order Forms. Click (New form) to add a form.
- Add / Remove / re-order fields. Click (New field) to add an existing field to the form.
- Set the default values for each field. The default value is used when applying a form. See below
1.1 Re-arranging Forms and Fields
To re-arrange forms and fields, you can use the standard keys:
- Ctrl + Left / Right to open / close forms
- Alt + Up / Down to move forms and fields
- Delete to delete forms and fields
- Drag-drop fields within forms
1.2 Defining the Default Values
- The default values will be set for the specified fields when creating items / sub-items or when the Apply Form icon
 is clicked
 - You can enter equations as the default value e.g. to have a form ask you to enter a value, simply enter =inputbox("caption", "dialog title")
- For text field, simply enter the text string
- For dates, =Now gives the current date and time, while =int(now) gives the current date
- For yes/no, =-1 is checked, leave blank for unchecked
- Tags can be assigned. Enter the list of tags as default value for the ItemTags field (format: #Tag1 #Tag2 #Tag3 ...)
- When referencing fields, enclose these with square brackets (i.e. [SomeField] )
In the above screenshot, form Invoice:
- Date will be given today's date
- HrsRate = 50
- Invoices is checked (=-1 is checked)
- Item = "Invoice"
When you're happy with your forms, click OK. The Properties pane will be updated.
2- Using Forms in the Properties pane
- In the Properties pane, you'll find all your forms under the "Forms..." top level heading
- Click on the form to expand / collapse the form content
- By default, opening a form does not close other forms. Right-click on Forms to change the behavior
When set to close other forms, hold the Ctrl key to open multiple forms - Forms fields are identical to other fields in the Properties Pane, except that YOU control which field is listed and in which order.
- Values can be added / modified / deleted. Change is applied to all selected items
- To view the default values (as defined in Manage Forms above), hold Ctrl+Shift while hovering a field list
2.1- Using the Forms Buttons
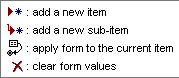
When you open a form, 4 buttons are displayed: ![]()
- Click the first one to add a new item to the current grid and apply the form
- Click the second one to add a new sub-item to the current grid and apply the form
- Click the third one to apply the form to the selected items in the current grid
- Click the forth one to clear the form values for the selected items in the current grid
Tips: Holding Ctrl while moving the mouse shows Tooltips:
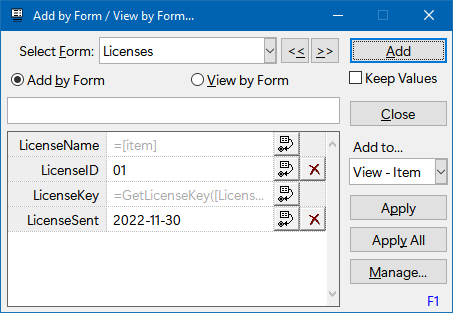
3- Using the Forms Dialog
A non-modal dialog is now available to use forms. It can be used to:
- Add items by form
- View items by form
To view the Forms dialog, do any of:
- Tools > Forms
- Tools > Forms > Add New Item by Form
- Tools > Forms > View Item by Form
(Documentation to be enhanced soon)
4. Forms and Grid Columns sets
Forms can also be used as column sets for grids. Using the Properties pane:
- Right-click on a form and select Load Column Set
- To restore the grid's native columns, right-click again on the form and select Unload Column Set
(or under Grids, right-click on the Current Grid item and select Load Column Set) - Column Sets are chosen using Column > Column Sets command
- A form can be created from grid columns. See 6. Manage Grids Dialog for details
- See 4. Grid Columns and Column Sets for more information on Column Sets
Hints:
- To have a form show the Tags assigned to the focused item, add the ItemTags field
- In addition to the Manage Forms dialog, many changes can be made directly in the Properties pane. This includes:
- Add fields: Drag-drop a field from the All Fields section to the form. It is also possible to use the context menu to Copy / Paste fields to a form
- Remove Fields: Right-click on a field > Remove Field xyz
- Move Fields: Drag-drop or Alt+Up/Down arrows
- It is also possible to create forms using the Manage Grids dialog. Right-click on a grid > Save Columns as Form