Using Tags
InfoQube has a sophisticated tagging system:
- Items can have any number of tags
- Tags can easily be added / deleted, in bulk if necessary
- Tags are assigned to items by their Tag ID (auto-generated number). This means Tag name can be changed with no impact
- Tags can be formatted (bold, italic, back color, text color) and can include icons. This, to easily identify important tags
- Tags can be hidden from the tags list (to archive tags without losing the item tags)
- Tag can be arranged in hierarchy
- Hierarchy is used to provide tag Inheritance (parent tags inherited from child tags)
- Tags can be under multiple parent tags (i.e. multiple inheritance paths)
- Tags can be used as filters in many UIs, such as Live-Search and all grids
- Tags filtering supports logical operators, such as AND, OR, NOT
- Item Tags are shown in the Properties pane (under the Tags section)
- Item Tags can be shown in grids as a grid column
- Any Tag branch can be shown in grids as a grid column
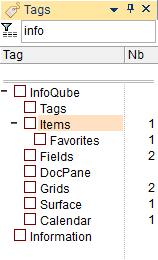
- The Tags pane is used to manage and set tags
- Field Auto-assign rules can set / unset tags
- Unlike most other tagging system, a tag must be explicitly created, this to reduce near duplicate tags, often seen as the main issue with using tags as a filing system
The Tagging System UI
Tags are present in most, if not all, aspects of InfoQube. Namely:
- Tags pane: Main UI to view / assign Tags to items
- Tags dialog: Similar to the Tags pane but as a modal dialog. In grids, can be filtered to list only a tag branch (see section 3.2 below)
- Grids: Item Tags shown as columns (all item tags or specific tag branches)
- Grids: Filtering using Tags
- Item Tags in the Properties pane and in Forms
- Tags grid: Advanced tag management including formatting
- Live-Search: Viewing item Tags and filtering using Tags
- NavBar: View Tags
- Item Editor: View and assign Tags to items
- New Item / Clipper dialog
- Hyperlink dialog
1. Tags pane
The Tags pane is where most of the interaction with Tags is typically done.
Details here: 7. Tags Pane
2. Tags Grid
Tags are just regular items with the field Tags checked and an auto-generated numerical ID (TagID). They can therefore be shown in any grid. A grid is automatically generated to view and manage tags, the Tags grid.
In the Tags grid, you can do anything that can be done in grids, some of which are not possible in the Tags pane, namely:
- Item Formatting: Size, Bold, Italic, etc (do not use embedded formatting)
- Item color: Back color, Text color
- Insert icons
- Import Tags from an external file or the clipboard
- Copy / Paste tags from one IQBase to another
- Move a tag from a parent to another
- Set a tag under 2 or more parents
- For each Tag, you may enter a description in the Notes field. This will be shown in the Tags pane (as a tooltip)
- Remember that tag names cannot contain the following invalid characters: , ; # [ ] tabs and spaces. These characters will be replaced with an underscore (or another character as defined in Tools > Options)
- The Tags grid is setup to do the following:
- Show items that have the Tags field checked
- Automatically assign the Tags field for any item created in this grid. Through auto-assign rules, this will also generate a unique value for the TagID field and lock the item (to show a dialog before deleting an item which is also a tag)
2.1 Hiding Tags from Tag lists
Over time, you may find that some tags are no longer used. While it is possible to delete these tags, you may not want to lose the tagging information.
A better approach is to archive these tags. InfoQube will hide from tag lists (i.e. Tags pane, Live-Search) all archived tags.
To archive a tag, set the item font to strikethrough (i.e. SomeTag). Archived tags assigned to items still show in grids and the Properties pane.
To archive tags and hide these from the Tags pane then:
- Select one or more items from the Tags grid
- Item > Format > Strikethrough (or click the Strikethrough button on the formatting toolbar)
- Refresh the Tags pane (as this type of change does not auto-refresh it)
By default, the Tags pane hides archived tags. To show these, do right-click > Show Archived Tags
2.2 Refreshing the Tags pane
The Tags pane will auto-update on most changes to tags, such as adding, deleting and changing the tag name.
Some changes are not currently detected, such as changing / adding parents. To refresh the Tags pane, press F5 (or right-click > Refresh Tag List)
3. Item Tags in the Properties pane and in Grids
A critical feature of a tagging system is viewing item tags, that is, what tags have been assigned to each item.
The Tags pane shows this of course (see section 1 above), but also in:
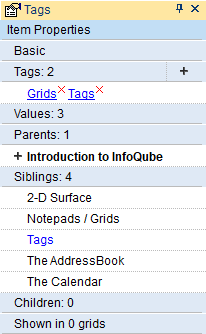
- Properties pane, in the Item Properties > Tags section
- Properties pane, in the Current Grid section (if tags are shown as a column in the current grid)
- Properties pane, in a form: Add the ItemTags system field to view tags in a form
- All Grids, as a column
3.1 Properties pane
The Properties pane has a Tags section which shows tags assigned to the currently focused item. Tags can be removed by clicking on the red x after the tag
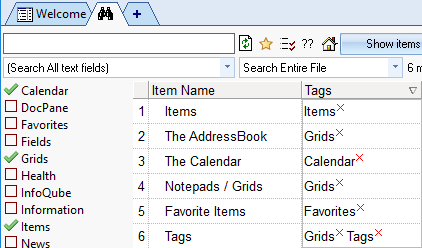
3.2 Grid Column
The Tags pane and Properties pane can show item tags for the currently focused item. That is, one item at a time.
Grids however, can show item tags for all items in the grid, which is a big plus !
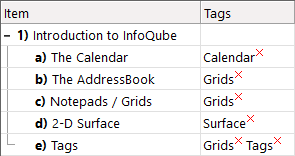
The listed tags are hyperlinks. Click on one will show all items with that tag
(plus those with parent tags with inheritance set)
The Tags column can be added to any grid, using one of the following methods:
- Drag-drop the Properties pane tags section to a grid
- Right-click on the Properties pane tags section > Show as a Grid Column
- Right-click on the Tags pane > Show Tags in Grid
- Grid Column menu > Add Columns... and add the ItemTags field
For a more concise display of tags, the field ItemTagCount can also be shown as a grid column
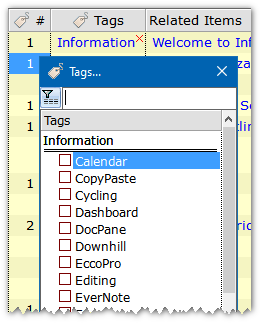
These two tag columns can be used to add / remove item tags. Select one or more items and press F2 to show the Tags dialog
The Tags dialog is very similar to the Tags pane:
A specific branch of the tag hierarchy can also be shown as a grid column. For heavy tag users this is a big plus as it becomes much easier to select tags from a limited list. Combined with multiple parent tags, this allows great flexibility
To view a specific tag branch, right-click on a tag (e.g. YourTag1) in the Tags pane and select "Show this tag in Grid". A new column will be shown in the grid with the name #YourTag1. While on this column, pressing F2 (or Edit > Edit) shows a tag selector dialog filtered to only show the YourTag1 branch.
n.b. In Tools > Options > General > Grid, it is possible to hide the red x after tags, for a cleaner look
3.3 Copy / Paste / Delete Tags
The Tags section of the Properties pane and the Tag columns in grids also support cut / copy / paste / delete operations.
This can be a real time-saver when items have many tags. Steps are:
- Select a the item's Tags column
- Edit > Copy
- Select 1 or more items, in the same grid, or in another grid
- Edit > Paste or Edit > Paste Special > Item Tags
- All selected items will now have the same list of tags
- Tags can also be deleted in bulk by selecting a set of tag cells (in a grid) and hitting the Delete key
In the Properties pane, the process is very similar.
When copying / pasting whole items (i.e. XML mode copy -- bad name, to be renamed eventually), tags are treated just like fields and new items will have the same fields and tags
4. Item Tags in Other UI
Tags have been integrated throughout InfoQube, such as:
- Item Editors
- New Item dialog / Universal Clipper dialog
- Document pane (type ## to assign a tag)
- Item Tags toolbar (right-click on a toolbar to show)
- Status bar (right-click to display tags
See the corresponding documentation pages (most have been updated)
5. Using Tags as Filters in Grids
We're already seen that tags can be shown as a column in grids. There is however lots more to tags. In fact, tags can be used much the same way Y/N field. To reference a tag, use of the following syntax:
- #TagName
- #[TagID]
- #[TagID:TagName]
The advantage of using TagID is that tag name change has no impact.
Use the #[TagID:TagName] format to have a reminder of the tag name. TagName is for reference only and may not reflect the actual tag name if it has been changed.
Support for tags include:
- As Grid source: e.g. #Tag1 AND #Tag2. Items added to the grid will have the tags automatically assigned
- As Grid filter
- In the Auto-assign field list (Grid > Properties > Data)
Tags are however different than Y/N field in the following ways:
- Tags are shown in a single column, while fields are shown in individual columns
- Tags in grid source and filter support inheritance which fields do not. The tag inheritance depth is set in Grid > Properties > Data
- To specify that items must not have a given tag, the syntax is NOT #TagName (e.g. (#Tag1 OR #Tag2) AND NOT #Tag3).
(For fields, you would use [Field1] is Null) - Tags do not have row and column equations, nor do they have auto-assign rules. Fields can however assign tags in their auto-assign rules
6. Live-Search using Tags
The Live-Search shows a Tags column and a Tags list on the left side of the window:
To use Tags in Live-Search:
- Double-click on a tag to show all items with that tag, or
- Use the checkbox to select 2 or more tags
- When 2 or more tags are selected, output is either:
- Logical OR: Items that have anyone of the selected tags
- Logical AND: Items that have all the selected tags
- In Logical AND mode, the tag list updates to only show relevant tags, that is, tags that the current list of items have
- Much like the Tags pane, right-click on the tags list to set the Inheritance depth
- The Tags column shows the item tags. Click the red x to delete a tag
- The Live-Search has 2 output modes: Item List or Live-Search
- See the Live-Search page for more details: 1. Live-Search
7. Linking Fields and Tags
Tags are new and many users have invested significant time in creating a perhaps large set of fields, mostly of Y/N type.
A large number of these fields may benefit from the advantages of Tags (see the next section)
It is possible to quickly assign a tag to all items that have a specific field. There are numerous ways to do this. One would then delete the field, since no longer of any use
An alternative approach, particularly useful when transiting from fields to tags is to link the two. Tags cannot set field values but fields can set tags
So using a simple auto-assign rule, it is possible to update 1 or more tags whenever a field is changed, hence linking fields and tags.
To do so, in the field auto-assign section enter:
- A:#TagName | E:#TagName=0
If TagName is the same name as the field name, you essentially have a field and a tag with the same name and the tag will match the field value
8. Comparing Tags to Y/N Fields
Tags and Y/N fields are indeed quite similar
Tags Pros are:
- Quicker to create, search, sort, view count
- Integrated in Live-Search
- Support Inheritance and multiple parents
- Shown as a single column in grids
- Specific branch of the tag hierarchy can be shown in a grid column
- Tags cannot trigger Auto-assign rules but the field ItemTagCount can. Use this field to trigger actions whenever item tags are added / removed. For example, the rule M:[Notes]=[ItemTags] will save the list of tag in the Notes field
Y/N fields Pros are:
- Support Equations and Auto-assigns
- Conditional Formats
- Visible to other apps, such as Excel