Items in InfoQube
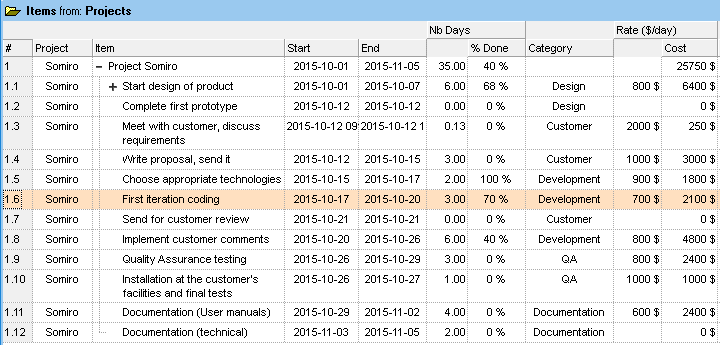
In InfoQube, the term item is used to refer to a piece of information. When displaying the item in a grid as in the above picture, an item is a row. In other types of views, such as the Calendar, Surface, Card view, Mindmap, Timeline, etc, items will have different visual representations.
Items can have values. In the above example, the highlighted item has the following field values:
- Item [Field] = First iteration coding
- Nb Days = 3
- Rate = 700
- Cost = 2100 $
- % Done = 70%
- Project = Somiro
- Category = Development
- Start, End = ...
- + others that aren't seen in the grid, but could be if the columns for these fields were displayed (like: IDItem, ItemCreated, ItemModified, etc.). These other filled fields can nevertheless be seen in the 6. Properties Pane.
Item can be organized in outlines (e.g. trees of items). There is no limit to the number of levels in a tree. When items have sub-items (e.g. children), but these are not shown, an expand button is shown (shape can vary). Single-click on the expand button will expand/close items (Ctrl+Space bar also toggles expand state).
In InfoQube:
- All items are full-fledged items. There is no such thing as a top-level item (TLI) or secondary-level item (SLI). Meaning : they don't have any inherent status or function. An item can be a TLI in one location and not in another - see #4 below
- Items can have multiple values (field-values). An item can only have one (1) value for any given field (though text fields support a multi-select editor. See [3272])
- Items can have multiple sub-items
- Items can have multiple parents. Yes, like you and me, items can have two parents (or more)
- When an item has more than one parent, one of them is marked as the "main parent".
Some views only display the main parent (Grids, Mapview), others can display all parents (Properties pane, Surface). Others, like the Calendar and Card views, do not display parents at all - You can create as many fields as you wish. Details here: 2. Fields
- System field are fields with ID < 200 (Field ID is shown as tooltips in the Properties pane and as a column in the Manage Fields dialog
- There are 4 types of field: Text, Date, Number and Binary (i.e. a Yes/No, a checkmark, a folder)
- Text fields can include basic formatting, images, hyperlinks, can wordwrap and have no limit on the number of characters.
Some views however display a limited number of characters. For grids, it is around 2000. The Doc pane has no limit, so If you have a single large piece of text, it is recommended to put it in the Doc pane (see 4. Document Pane) - In addition to system and user-defined fields, items have a few properties which are all accessible (include in search, sort, display in grids). These are:
- ID
- Created
- Created by
- Modified (any field value change updates this)
- Font
- Locked
- Home
- There are many other special fields, such as NbChildren, NbParents, TextFields which allows for searching in all text fields, the same for dates, numbers and binary fields
- Items can also have any number of tags. See 3. Tags
- InfoQube can be used as a two-pane organizer, where items are shown in a Tree and the content in the Doc pane
But the Doc pane is much more. It can display a web page, a Markdown document, a local file (with transparent edit/save), or rich text content stored in the database.
Clip from your browser (see 1. Clipping Content from other Apps) or drag-drop from word processor. Great for large pieces of text, still fully searchable
It even supports a handwriting word processor, a truly unique feature !
All information relating to items is summarized in the item properties pane:
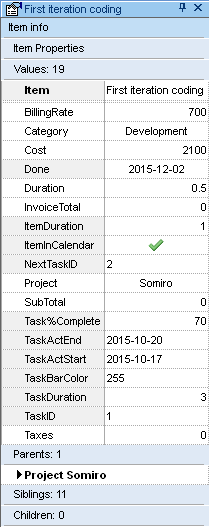
You want to see the actual dates? No problem. Drag-drop the Created or Modified from the properties pane to the grid!
Also see how to search for items using their properties: 4. Searching and Filtering Items
Moving items
Item can be moved inside a grid and across grids.
1. Moving items by Drag-Drop
Drag-drop is the most versatile way to move items:
- Select one or more items (with the mouse of shift+up/down arrow keys)
- Click anywhere in the item cell and drag to the desired position in the grid or in another grid
- By default, items are moved. To leave items at their current place and add these in another place (i.e. shown in multiple grids or under more than one parent), press the Ctrl key while dragging the item(s) (i.e. not before drag-drop)
- Hold the drag near the top / bottom of the grid to scroll the grid
- To drag to another grid, either arrange these side-by-side (using panes or tab groups) and drag from one grid to the other. It is also possible to drag to the tab of the destination grid to bring it into view
- Drag-drop to some other view types is also possible (e.g. drag-drop a contact to the Calendar can create an event)
2. Moving items using cursor keys
Cursor keys are really handy to move items with a grid. Hold the Alt key to move item up/down/left/right:
- Alt+Up/Dn moves items up/down. If the items are sub-items of a parent item, movement is limited to that parent
- Alt+Left: Moves an item to be 1 level up in the hierarchy (up to a top-level item or TLI)
- Alt-Right: Moves an item to be a child of the item just above it
- Alt+PgUp/Dn do the same as Alt+Up/Dn but move 10 places up/down. Great way to move items larger distances