Embedded Formatting
REMINDER |
|
Embedded format will be shown throughout InfoQube, not just in grids
Editors are:
- Plain text editor (Grids, Properties pane)
- WYSIWYG editor (Grids)
- Event details dialog (Calendar events)
- New Item / Clipper dialog
- Pop-up editor (All view types)
1- Plain text editor
- Shows formatting codes in plain text
- Use the formatting toolbar to enter codes.
- Enter codes manually. See below for details
2- WYSIWYG Editor
In a grid, enable the WYSIWYG editor by right-click on any text column header and check the option.
- Supports spell checking
- Use the formatting toolbar
- The edit window automatically grow in height as you enter text.
It is also possible to use Alt + down/up arrows to increase/reduce the editor height
3- Event Details dialog
Items shown in the Calendar (i.e. events) can use the Event Details dialog. The event text textbox is WYSIWYG (similar to the Pop-up editor). See 2. IQ Calendar for details.
4- New Item / Clipper dialog
Items added through Edit > New Item or using a clipper show in the Add Item dialog. The item text textbox is WYSIWYG (similar to the Pop-up editor).
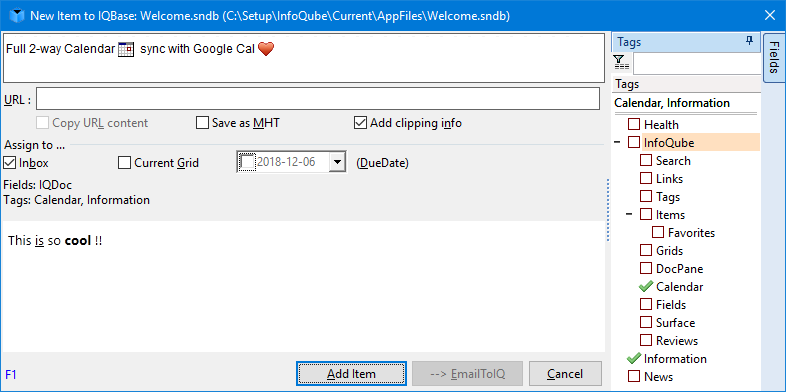
See 2. New Item dialog for details.
5- Pop-up editor
The pop-up editor can be used throughout InfoQube. This includes, grids, Properties pane, Calendar, Map view, Surface, etc. See 3. Popup Editor for details.
Using the formatting toolbar
While in edit mode, the formatting toolbar shows the following commands:
- Font dialog
- Bold, italic, underline, strikeout
- Highlight text (bright yellow back color)
- Superscript / subscript
- Text Forecolor
- Text Backcolor
- Hyperlink
- Insert Icon
Notes:
- The commands are enabled for both the plain text editor and the WYSIWYG editor.
- Like all toolbars, this toolbar can be customized. See Customizing Menus and Toolbars
Using formatting codes
In the plain text editor, formatting can be entered manually:
- <font face;size> text </font> displays portions of text with a different font and/or different size. For instance, the <font Tahoma;12>bit</font> draws the bit text using the Tahoma font, on size 12 pt. If the name of the font is missing, and instead size is present, the current font is used with a different size. For instance, <font ;12>bit</font> displays the bit text using the current font, but with a different size.
- <b> bold </b> bolds a part of the caption.
- <u> underline </u> specifies that the portion should appear as underlined.
- <i> italic </i> specifies that the portion should appear as italic.
- <s>strikeout </s> specifies that the portion should appear as strikeout.
- <fgcolor=FF0000> fgcolor </fgcolor> changes the foreground color for a portion.
- <bgcolor=FF0000> bgcolor </bgcolor> changes the background color for a portion.
- <img>IconFileNameWithoutExtension</img> inserts an icon inside the cell's caption.
- <a xyz>Hyperlink</a> creates a hyperlink to a web page or to InfoQube items. Details here: 4. Links
- <sup>superscript</sup> specifies superscripts
- <sub>subscript</sub> specifies subscripts