Working with Icons
Icons can be used in many contexts within InfoQube:
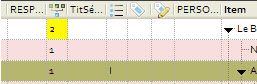
- Anywhere inside the item text. These will display in just about all InfoQube UIs (Grids, Properties pane, Calendar, Surface, TimeLine, Map View)
- Anywhere in other text fields (Grids, Properties pane)
- In Field names (Grids, Properties pane)
- As part of Outline labels (Grids)
- In Links (Surface)
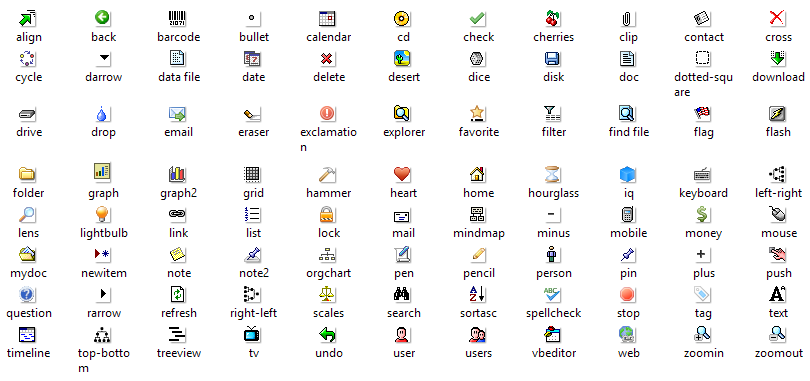
1. What Icons are available
- Icons are loaded from the \Icons folder when InfoQube starts
- The default setup has 88 icons. There are quite a few free icon sets that can be downloaded. Do not hesitate to be create !
- To add icons, add image files to that folder. Images must be 16x16 gif files (8-bit color depth or less)
- The icon file name is what is used everywhere within InfoQube, so be careful if renaming image files
2. Manually Adding Icons inside Text Fields
All text fields support icons. Typical uses are:
- Item text
- Field showing the item's type or types (contact, task, event, etc)
- Field showing the item's status (To do, In progress, Late, Done)
To add icons, do one of:
- In a grid, use the formatting toolbar and select an icon from the dropdown command button
- Insert the html code for the item. It is <img>IconName</img>. If the icon name is not correct (bad spelling, deleted), a place holder is shown
- Edit the text using the Popup Editor. Right-click and select an icon from the list
- The icon name is the file name, in lower case, without the .gif extension
- The icon name is case sensitive in some UI and not in others, so it is best to simply always use lower case
3. Icons in Field Names
It can be really useful to display icons in grid's column header, as visual cue and when the field name is rather long (such as Date_Of_Preliminary_Report)
- Grids: Right-click on the column header > Column Header > Caption. The Popup editor will show where you can change the displayed name, font, and add icon(s)
- Properties pane: Right-click on the field > Caption
4. Icons in Outline Labels
5. Icons in Surface Links
See 3. IQ Surface
6. Automatic Icons
It is possible to automatically add icons, as items are added, field values checked, etc. Typically, this uses field Auto-Assign rules.
Example 1: Item Type column
- Create a text field and name it ItemType
- In the AddressBook field properties > Equations > Auto-Assign Rules, add: A:ItemType="<img>users</img>" | E:ItemType=
- Similarly, the TaskDate could be used to show a task icon when a date is set: A:ItemType="<img>pen</img>" | E:ItemType=
- When a task is done, the icon can change with the rule: A:ItemType="<img>check</img>" | E:ItemType=
- Save and close the Field properties dialog
Example 2: Multiple Icons
It is even possible to automatically show multiple icons using VBScript. There are System supplied functions to do just that
- AddKeyword (...)
- RemoveKeyword (...)
Use the following rules for AddressBook: A:ItemType=AddKeyword(ItemType, "<img>users</img>") | E:ItemType=RemoveKeyword(ItemType, "<img>users</img>")

List of Default Icons