Send to InfoQube using EmailToIQ
What is it all about...
Sometimes, you want to capture some information and you are either not at your computer, or InfoQube is not running or you're using a mobile device.
The EmailToIQ feature really comes in handy in these situations.
The basic principle is to configure IQ to poll a special email address and import any new content.
Importing information into IQ is then as simple as emailing the desired content. As a bonus, this content is also in your emails, searchable on all your devices.
1. Step 1: Create a new email address
This is the address you'll be sending information to, and which IQ will poll. It is best if it serves this sole purpose, so create a new email address. Any IMAP enabled address is valid.
GMail is a good choice for this purpose, because it is free and has great searching capabilities. To connect to this new GMail address, 2 cases, depending on the account setting:
- 2-Step verification is OFF: Enable Less secure apps and use the account password in the IQ dialog.
Details here: https://www.google.com/settings/security/lesssecureapps
This approach is not recommended because:- It is less secure
- If / when you change your Google / Gmail account password, it will need to be changed in InfoQube
- If one day you enable 2-step verification, the password will no longer work
- 2-Step verification is ON (Recommended) : Create an application specific password.
It is this application specific password you'll enter in the IQ dialog below.
As a bonus, should you change your main mail account password (recommended every few months), IQ will not require re-connection since it is using an application specific password
Details here: https://support.google.com/accounts/answer/185833
From Google:- When logged into Gmail, click on your name / photo (top right corner)
- Click Google Account
- Under Sign-in & security, click on Signing in to Google
- Under Password & sign-in methods, click on App passwords
- Google will ask for your account password (even though you are already logged in) as an additional level of security. Enter your Google account password
- You will then be presented with the list of App passwords (you may want to delete old / unused ones at this point). Below the list is where you create a new app password:
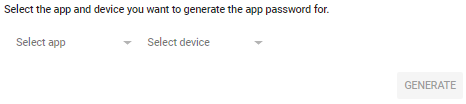
- Click Select app and select Other (Custom name)
- Enter a name for this app, such as "IQMail"
- Click GENERATE
- A dialog will show your app password
- Select the 16 digit password (with a mouse) and press Ctrl + C (or right-click > Copy)
- The app password is now on the clipboard. You'll be able to paste it in Step 2 below
2. Step 2: Configure your IQBase
The second step is to configure IQ to poll a special email address.
Note: EmailToIQ also supports simpler format when only tags are used: Your subject line #Tag1 #Tag2
-
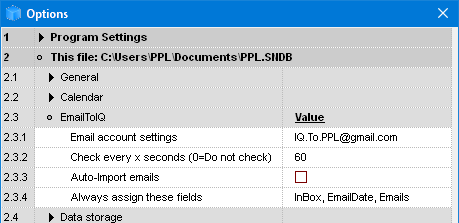
In Tools > Options > This file > EmailToIQ:
-
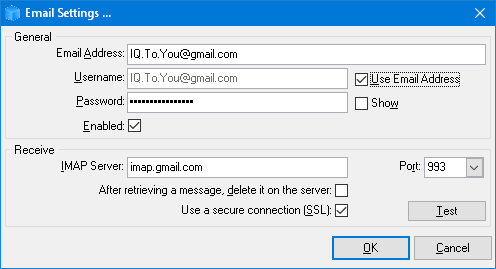
Click on the (...) button to configure the email:
-
In the General section, enter the address and password.
-
For GMail, the Username must be the same as the Email Address
Or you can check Use Email Address which will do the same -
Check the Enabled checkbox to activate this feature.
-
-
In the Receive section, enter the IMAP settings of your mail server.
-
It is a good idea to leave the message on the server so the message can be retrieved a second time if need be
-
-
Click Test to ensure that IQ can connect to the email account.
-
Click OK
-
Back in the main dialog, at line 2.3.2, enter the Auto-check delay. Enter 0 to disable Auto-check
-
In 2.3.3, enable or disable auto-import of mail when available:
-
If enabled, mail will be imported as soon as it is detected
-
If disabled, the icon on the status bar will show the number of mail items waiting to be imported. The icon tooltip will show the subject of the last email Click on the icon to perform the import
This option is particularly useful when used in conjunction with Dropbox Sync. That is, when 2 computers are both checking for emails, only the first one to check will import which can be a problem.
-
-
In 2.3.4, enter the list of fields to automatically assign values:
-
Specify EmailDate to retrieve the actual email date/time (not the imported date/time)
-
In the above example, 2 other fields will be checked: Inbox and Emails (to show imported items in these grids)
-
Once properly configured, an icon  will appear on the status bar.
3. Step 3: Email the content
3.1 Forwarding emails
If you want to keep a copy of emails (Outlook, Gmail, etc), simply forward these to your EmailToIQ address
3.2 Capturing content
When navigating the web, reading PDFs or writing documents, you can easily send this to your IQ Base using the EmailToIQ feature.
- If IQ is running, you can use the Universal Clipper and select "Email Item to IQ"
- Otherwise, simply copy the content and paste it in the body of an email
- Chrome extensions, such as AddThis, Email This, can speed up the process of sending emails to IQ
- On mobile devices (Android, iOS), use the "share" button to send the content to your EmailToIQ email address
When preparing the email, for the "subject", enter the text of the item. If left empty, the item text will default to "EmailToIQ".
3.3 Assigning fields and tags
The item will be assigned the fields listed in Tools > Options > This Database > EmailtoIQ > 2.3.4 (see screenshot above). By default, these are:
- Inbox and Emails fields will be checked
- EmailDate field (ID=88) will contain the date the content was clipped and sent by email (which will be different from the item created date)
- Also available are fields EmailSender (ID=86) and EmailRecipients (ID=87)
You can also assign specific fields and tags by adding keywords at the end of the email subject line. The syntax is: Your subject line //YNField1 /TextField1=Cool /ItemID #Tag1:
- For Y/N fields: /YourField1 /YourField2 will set the field(s)
- Other fields, values can be assigned: /YourField1=SomeFieldValue
- If the field does not exist, the item text will show it to flag the error (i.e. ItemText /UnknownField1)
- For tags, enter: #TagName or #TagID
- If a tag name does not yet exist, it is created and placed under tag #AutoGenerated. Move the tag to another parent tag if desired
You can also send content to any item (as a sub-item) (e.g. a project item, a task, a specific contact, a calendar event, to meeting minutes, etc.)
Can send to multiple items too ! The syntax is:
Can send to multiple items too ! The syntax is:
- /ItemID1. e.g. If the email subject line contains /1234, the content will appear as a subitem of item ID 1234.
- /ItemText1. e.g. If the email subject line contains /John Doe, the content will appear as a subitem of item "John Doe".
If more than one item have this text, it will send it to the one in your favorites (if not in your favorites, to the most recent item)
Important: To trigger the parsing of fields and tags, enter // to mark the end of the actual subject
Example: Email subject: Task #1: Complete Project //Inbox #IQ /Project=Project1 /Notes=Very urgent /FollowUp
- Will create an item "Task #1: Complete Project"
- Assign the Y/N fields Inbox and FollowUp
- It will also set the Project field to "Project1" and Notes to "Very urgent".
- Finally, the tag IQ will be checked
The default delimiter is the forward slash (/). EmailToIQ does however support other delimiters. The complete list is : / \ | ~ ! @ $ % & + -
(only rule: use space followed by the delimiter twice and then enter the fields and tags list)
3.4 Attaching files
You can attach any number and type of files to the email:
- Attachments are saved in the YourIQBase.Files\ItemIDXXXX_files folder.
- Attachments will appear as links at the end of the item.
- If any of these are image files, the image will also be shown at the end of the item (HTML pane).
3.5 Embedding images
With many mail apps and web pages, one can share images, drag-drop images, etc to send these by mail. These images are often not sent as attached files but rather as embedded images (base64 encoded)
- The images are saved in the YourIQBase.Files\ItemIDXXXX_files folder.
- The images will be shown at the end of the item (HTML pane).
4. Importing Emails
Once properly configured, an icon will appear on the status bar followed by:
- ? when checking
-
A number (1, 2, 3), representing the number of emails to be imported. These are the unread emails in your EmailToIQ inbox.
-
If Auto-Import Emails was not enabled, the background color will turn green to indicate that there are emails to import. Double-click on the icon to import all emails.
At any time, you can also double-click on the icon to force a check and import.
4.1 Re-importing Emails
It is possible to re-import emails. This is useful if the items were erased by mistake or if imported in an incorrect copy of the database.
To do so, use one of:
- In your EmailToIQ mail address, mark the emails as Unread. The emails will be located (see section 2.4 above):
- In your inbox, or
- In the Trash. If in the Trash, move these back to the inbox and then mark as unread
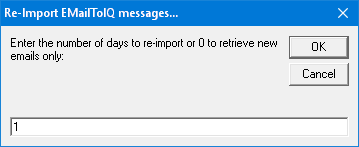
- Do Tools > Check EmailToIQ Now. Enter the number of days to re-import in the dialog:
5. Viewing the content inside InfoQube
For each email sent using EmailToIQ, an item is created. This item will typically be shown in the Inbox and Emails grids:
- The item will be assigned a special Home: EmailToIQ. Details here
- The content of the email (its body) will be saved in the IQBase or as a separate file:
- If there are no attachments or embedded images: Saved in the IQBase (embedded)
- If there are attachments: The content of the email will be in the IQBase (embedded) but the attachments will be separate files in the YourIQBase.Files\ItemIDXXXX_files folder. The files will have the same name as the attachments
- If there are embedded images: Saved as a separate file in the .Files folder (YourIQBase.Files\ItemIDXXXX.htm) and the images will be in the YourIQBase.Files\ItemIDXXXX_files folder. The files will have the same name as the original embedded image file names
See https://support.google.com/mail/answer/148408?hl=en for details on the distinction between attached and embedded images
Notes:
- IQ does not support attached files and embedded images in the same email. It such cases, only attached files will be imported
- When using EmailToIQ in conjunction with Dropbox sync, there is a possibility that emails are imported to the older file before you get the chance to sync/overwrite it with the newer one.
If this happens, you have 3 options:- Set EmailToIQ to be in manual mode (line 2.3.2 = 0)
- Open the Email client (or navigate to your web server using a browser) and mark the emails as Unread. IQ will re-import them
- Manually re-import previous emails. To do that, right-click on the Tools > Check EmailToIQ now command and select the number of days you want to re-import
- The Emails grid is not part of the sample IQBase. Create it to collect all items that arrive through EmailToIQ
- When Re-importing emails, if your setting (in section 2.4) is to delete emails from the server, you will need to move the deleted emails back to the inbox before re-importing