Multi-Select Pop-up Lists
When categorizing information, it is often useful to assign multiple properties to items. InfoQube provides many ways to do this, namely:
- Placing the item under more than one parent, the parent being a category description
- Assigning many yes/no field values. Each field representing a property
- Assigning tags. Tags support inheritance (in fact, multiple inheritance paths) so a single assigned tag can provide multiple grouping buckets
- Assigning dates. Dates can be grouped into categories (day, week, month, year)
- Assigning a value in a text field. So if the field name is Color for example, users could enter Red, Green or Blue to describe the item. To assign more than one value, additional text fields can be used.
In addition, it is possible to easily assign multiple text values in single text field.
The WikiTag field (now depreciated in favor of the new Tagging system) is a good example of this. Details here.
To do this, in the field properties Editor section, simply check the Multi-Select check box:
The Multi-Select Pop-up list is enabled for two types of field editors:
- Auto-list of values
- List of items pop-up
1. Auto-list of values
Auto-lists, as the name implies, is generated automatically, based on previously entered field-values. To set up multi-select, follow the following steps:
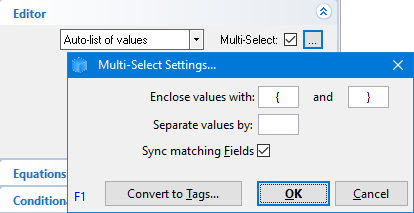
- Click on the settings button ( ... )
- Specify how to keywords are defined. Users are free to use any of these methods:
- Enclosed (i.e. { }, [ ], - -, | |)
- Hashtag (i.e. Twitter-like #IQ #Cool #SuperPIM #EccoPro)
- Delimited (i.e. CamelCase, comma separated,
, | )
- Sync matching Fields: If checked, Y/N fields with names the same as the value will sync (i.e. will check / uncheck as values are entered / removed from the list)
- Click OK
2. List of items pop-up
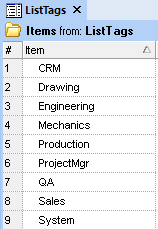
When Auto-list is not the best option, the list can come from existing items. To create such a list, first create a new grid:
- View > Grids > New Grid
- In the Create grid dialog, enter a name, such as "ListTags"
- Click OK, the new grid will open
- Enter the list items, one per line
Once the list has been created, create a new text field, such as "Categories" or "Types"
- In Field Management, click New
- Enter the name and set the data type to Text
- In the Editor section, set the type to List of items pop-up. The dialog will update to show this:

- Set the first combo box to Item (this is the field that contains the text values)
- Set the second combo box to ListTags (this is the field that was created when the above grid was created and identifies list items)
- In a similar matter as for Auto-list values above, check Multi-Select and specify how to enclose and delimit values (see section 1.0 above)
3. Entering multiple values
In the relevant grid, add the created field or use the Properties pane
- When the selected cell is under the proper column, press F2 to enter edit
- You can manually enter values, or
- Press F2 again to display the multi-select dropdown
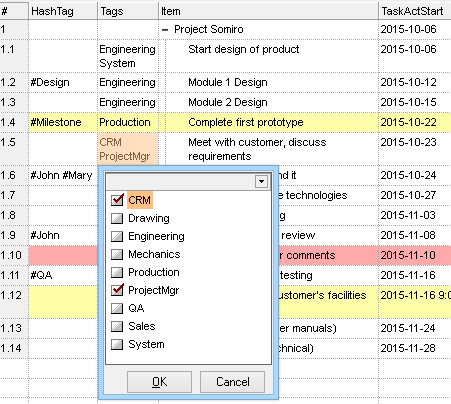
- Use the arrow keys to select a type and press enter to toggle the check box
- For long list, you can start typing to find types. Press F3 to find the next match. Enter to toggle the check box
- When done, either click OK or press F2 again
- In the above example, item "Meet with customer..." was assigned two text values, CRM and ProjectMgr. These will be shown in a single cell under the "Tags" column (not to be confused with the new Tag system column)
4. Using Multi-Select Pop-up Lists
IQ provides many ways to use these multi-valued text fields, for example:
- Create a grid to show all entries with a specific values
- Ctrl+G to filter the current grid for specific text value(s)
- Ctrl+F3 to auto-search for a specific text value
- Ctrl+F to search and collect items with specific text value(s)
5. Convert to Tags
Multi-select pop-up lists can be used as tags (e.g. the above sample). The stock WIKITag field is a good example.
The new IQ Tagging system is generally far superior to what can be done with a multi-select pop-up list.
There is therefore a need to convert from then "old" Wiki-style tagging system to the "new" one.
To convert values entered in such a text field to tags:
- Click on the Convert to Tags button:
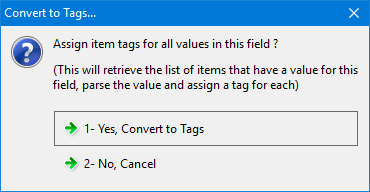
- Select 1- Yes to convert
- Tag names cannot contain the following characters: , ; # [ ] tab and spaces
An input box will be shown to select the character to use to replace invalid characters - Once converted, a dialog will show the number of new tags created and the number of tags assigned to items
6. Notes
- Currently, the Multi-Select check box is visible for Auto-List and List of Items type pop-ups.
- It is best not to change the value delimiters after values have been entered, as parsing will most likely fail, and manual editing will be required to properly format the values
- Sync matching Fields works with Y/N fields only, and sync in one direction (multi-select -> Y/N field value). It is possible to also sync in the other direction using Auto-Assign rules (hint: use the supplied helper VBScript AddKeyword and RemoveKeyword functions)