Hyperlinks
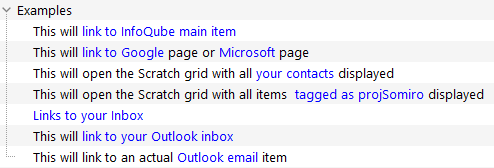
Hyperlinks are supported in just about all UIs, shown as blue text:
Hyperlinks can point to:
- Items
- Grids
- Grid sub-views (i.e. Card view, Map view, Timeline view, Pivot table / charts)
- Fields (to show all items with a value for that field)
- Tags (to show all items with that tag)
- WikiTags (shows all items that have a specific WikiTag)
- Files and folders
- URLs
- Outlook items (email, event, inbox, etc)
- Other apps items, using their URI protocol
1. Creating Hyperlinks
In grids, select the text cell to hold the link and do Item > Hyperlink (Ctrl+K). If in edit mode or in the Doc pane, you can select part of the text (ex: Microsoft as seen above)
For other UIs (and in grids), the Popup Editor can be used to create links. Details here: 3. Popup Editor
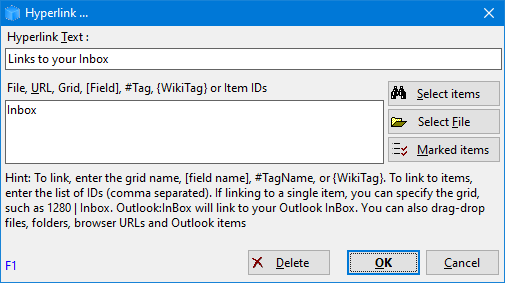
The Hyperlink dialog will open when you can:
- Browse for item(s)
- Browse for a file
- Link to the list of marked items
- Drag-drop or copy-paste a file or URL (i.e. from File Explorer or a web browser)
- Manually add one of the the following:
- One or more Item IDs, comma separated. Use Edit > Copy > Item IDs to copy the selected items IDs to the clipboard
- When linking to a single item, you can specify the grid, such as 1280|Inbox
- Grid name
- GridID : GridName and GridName : GridID: Hyperlinks using grid IDs will work even if the grid name is changed
- Grid name followed by | and one of CV, MV, TL, PT, PC to link to a grid sub-view (i.e. Card view, Map view, etc)
- Grid name followed by | and a filter string: A new instance of the grid will open with the specific filter applied
- Field name (enclosed with [square] brackets)
- Tag name (preceded with #)
- Wikitag (enclosed in {curly} brackets)
- File (path and name)
- Web Address/URL
- URI shortcut from another app (such as AnApp://C:\Data\EPIM\SomeApp.ext/mails/5894593485)
- Drag-drop an Outlook item
When WYSIWYG editing is turned off, hyperlinks can also be entered manually. Format of a link is <a xxx>Link Text</a>
When WYSIWYG editing is turned on, entering something that looks like a web page will automatically create a hyperlink
Other ways to create hyperlinks to items are:
- Select 1 or more items. Edit > Copy Special > Copy as Hyperlink. If more than 1 item is selected, a dialog is shown to choose the hyperlink type. Then Paste will add the hyperlink(s)
- Select 1 or more items. Item > Mark items (Replace). Then do Item > Mark Items > Add Hyperlinks to Marked Items
- Select an item and press Ctrl+C. In another item, Press Ctrl+K to open the Hyperlink dialog:
- In Hyperlink Text, press Ctrl+V to paste the item text
- In the Target, press Ctrl+V to paste the item ID
2. Creating IQ:// protocol links (i.e. URI links)
If the content is to be used outside of InfoQube, it can be useful to use URI links instead of regular links.
The format is: IQ://C:\SomeIQBase.sndb/items/ItemID, or
The format is: IQ://C:\SomeIQBase.sndb/items/ItemID, or
- /items/ItemID1,ItemID2, (...)
- /views/Surface
- /views/Calendar
- /views/ViewName
- /views/ViewID
To copy the link to the clipboard:
- Select one or more items and do Edit > Copy > Copy Item URIs
- Right-click on a tab > Copy View
The clipboard will now contain a universal link, such as: IQ://C:\Users\AUser\Documents\IQBases\JohnDoe.SNDB/items/1580
Switch to the other application and do Edit > Paste (or similar command)
To test a link, enter it in the address bar of a browser and hit Enter. Focus should switch to the link target (item, grid, etc)
3. Removing Hyperlinks
Use one of:
- Item > Remove Hyperlink
- In the Hyperlink dialog, click Delete
- Manually remove the <a> </a> tags (non-WYSIWYG editor)
Note: Item text can contains more than one hyperlink. When not in edit mode, using the remove hyperlinks commands removes all hyperlinks. Switch to edit mode to remove only one of the hyperlinks
4. Using Hyperlinks
In grids (not editing), the Properties pane, the Doc pane (browse mode), Calendar and other UIs, simply click on the link. While editing in the Doc pane, use Alt + click to navigate the link. The action will depend on the link type:
- Focus moves to another item
- A grid will open
- All items with a specific Tag or Wikitag will be shown
- A file will open in its native app
- A web page will be shown in the default browser
- An item in another app will be shown (defined by the URI link)
4.1 Hyperlink menu
It is possible to show a menu of commands instead of the default link action. To do so:
- Hold the shift key when clicking on the hyperlink, or
- In Tools > Options > Program > Grid, check the option to show the menu (1.2.30)
Either way, a menu will show with the following list of commands:
- Follow Link: Same as default action)
- Edit Text: Enters Edit mode
- Change Link...: Shows the Hyperlink dialog
- Remove Link: Deletes the hyperlink
- Cancel
5. Notes
- Microsoft Office (v2007 and up) no longer automatically register the Outlook link protocol (see this reference).
If not registered, the link will not work. To register the link, run the OutlookProtocol20XX.reg file supplied (installation folder), where XX is your Outlook version - Outlook has been known to change its GUID ("global unique identifier") when Outlook items (contacts, emails...) are moved around. If the GUID is changed, the link will not work