InfoQube for beginners: Writing an outline
by Cyganet, originally published in a user blog in May 2020
Introduction
Hello and welcome! Are you new to InfoQube? I'm a newcomer as well, and I wrote this guide to help someone like me who has no previous experience with InfoQube get up and running instead of getting stuck on the learning curve. InfoQube can be intimidating because it can do so much. It's easier to start by doing something simple and getting a feel for how it works.
Here is a step-by-step guide to writing, organising, formatting and exporting an outline in InfoQube. I use the keyboard a lot - we're in the middle of writing an outline after all - so this guide is full of keyboard shortcuts. There are often other ways to do the same thing (menus, toolbar buttons, right-click, other panes) that I have skipped in this introduction.
InfoQube is very easy to use as a powerful outliner. You can write a document with unlimited levels of hierarchy, outline styling and numbering, rich text formatting, hyperlinks and embedded images. To keep it simple, we are going to start by writing in plain text. We will use the Lite version of the program, InfoQube Outliner, to get started. The steps described here apply to both versions of the program.
Install and start InfoQube Outliner
Go to the InfoQube download page and download the latest portable version of InfoQube Outliner. Extract the zip file to a non-protected folder of your choice. The download page has more instructions if you need more help.
Start InfoQube Outliner. You will be greeted with the welcome page. We first need to create a new IQBase. Click on "Blank IQBase" or "IQBase (with sample data)", whichever you prefer. Name and save your database file.
Create your outline grid
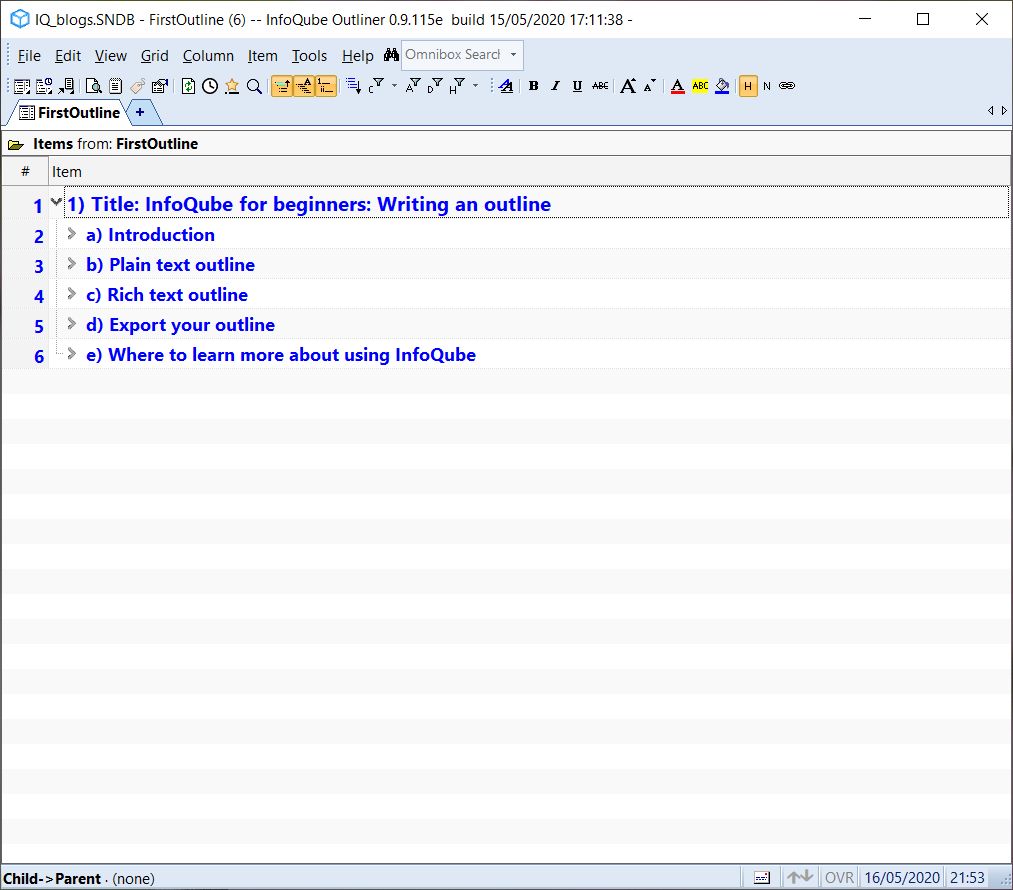
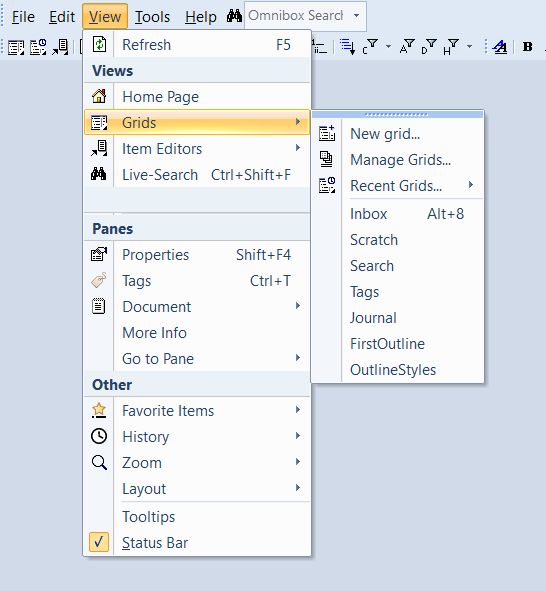
Go to the menu bar, click on View > Grid > New Grid (or click on the + tab). Enter a name for your grid and click OK. For example, you can name it My Outline. Spaces are allowed in grid names.
You will now see a blank grid with two columns: # and Item. # is the row number in the grid. Item is where you will write your text. There is one item in the grid, and it is highlighted.
Plain text outline
Write your outline text
You can start writing in the highlighted item by simply starting to type while the cell is selected. If there is existing text in the cell, it will add the text to the end. Hit ENTER to submit your text.
Hit ENTER again to create a new item below the item you just edited. Then start typing in the new item. Repeat as often as necessary.
To add an item above your selected item, hit ALT+ENTER. To add a child item to your selected item, hit CTRL+ENTER. To indent/outdent your selected item hit TAB/SHIFT+TAB
ENTER, ALT+ENTER and CTRL+ENTER operate at the same level of hierarchy as your selected item, so you can add a new item below an item with child items by hitting ENTER while that (parent) item is selected.
Your outline is automatically saved as you write.
Edit your text
Hit SPACE on a highlighted item to enter edit mode with the cursor at the end. This will not add a space to the item text. Then you can start to add text. Hit ENTER to submit your edits. If you do not wish to keep your edits, hit ESCAPE.
You can also enter edit mode by double-clicking on the item cell or pressing F2. F2 or double-click puts the edit cursor at the beginning of your text. Hit END to move the cursor to the end of the line. In a multi-line item, it will go to the end of the first line and can be moved down with the arrow down key. Inside edit mode, the standard shortcuts for select all, cut, copy, paste (CTRL+A, X, C, V) all work as expected.
To delete an item, hit CTRL+D, then hit 1 to delete it entirely. Hit ESC or 4 to cancel deletion.
Spell checking is available but needs to be enabled in the program options. Go to the menu bar and click Tools > Options. Expand the options list under 1. Program > Document. Hit the checkbox next to Spell Checking (Win 8+), then click OK. Restart the program. It will reload the grid so you can continue where you left off.
Move around your outline
Move the selection with the up and down arrows to go to the previous or next item in the grid, regardless of hierarchy. Move the selection with CTRL+up and CTRL+down to go to the previous or next item at the same level in the hierarchy, i.e. skipping the children. Hit CTRL+Home to go to the top of your outline, and CTRL+End to go to the end.
Hit CTRL+right to expand your outline and CTRL+left to collapse it. This will affect the section of the outline that you are currently working in. If you are inside a child item and hit CTRL+left, it will collapse its parent and move the selection to the parent. You can also expand and collapse outline levels by clicking on the arrows next to the parent items.
If you want to see specific levels in your outline, a handy tool is in the menu Item > Sub-Items > Show Levels, or CTRL+SHIFT+L. To collapse all headings pick All items, then click on 1. To expand everything, click on All. The Show Levels window can stay open while you write if you unclick Auto-Close.
InfoQube stores a history of items you have edited. Click on the clock icon on the toolbar, or on the menu View > History. You can choose Back, Forward, or pick a specific item in the history.
Reorganise your outline
To move an item's position in the outline, you can use ALT+arrow keys to move up, down, left (outdent), right (indent)
You can drag and drop an item inside the outline. Long-click on the item and start dragging it. You will see a red line indicating the new position of the item in the outline. Release the mouse in the new position.
If you decide while writing that you want to split an item, position the cursor inside the item at the split position, then go to the menu bar and click Item > Split Item, or hit CTRL+SHIFT+S.
If you want to join two or more items, select them using SHIFT-click or CTRL-click, then go to the menu bar and click Item > Join Items, or hit CTRL+SHIFT+J. The order in which you select the items matters for the join result. The item selected first is the one that the other items will be joined into. Child items are not brought along in a join. You will get a popup window with merge options. Check "Delete merged items" if you want the original (separate) items to be deleted. If you leave it unchecked, you will keep the original version of the merged items.
To delete an item, hit CTRL+D, then hit 1 to delete it entirely. Hit ESC or 4 to cancel deletion.
You can show the same item in multiple positions in your outline at the same time. You can edit the item at any position, and edits in one are reflected in the others. You may have noticed that the text related to deleting an item appears twice. That is the same item in two different places.
To show an item in a new position, select it and start dragging it like you would for moving it with drag and drop. While keeping the mouse held down, hit CTRL so that a + icon appears next to the red line. Drag the red line to the new position and release the mouse, while keeping CTRL held down.
If the drag distance is too far, here is another way to get to the new position. Select an item in the outline, then right-click and select Mark Items, or hit CTRL+SHIFT+M. Then go to the parent item in the outline where you want to add the item, right-click and select Add as Sub-Items
To delete an item in one position without deleting the others, select it and hit CTRL+D, then hit 3 to remove the item from this parent only.
Zoom in and out of your outline
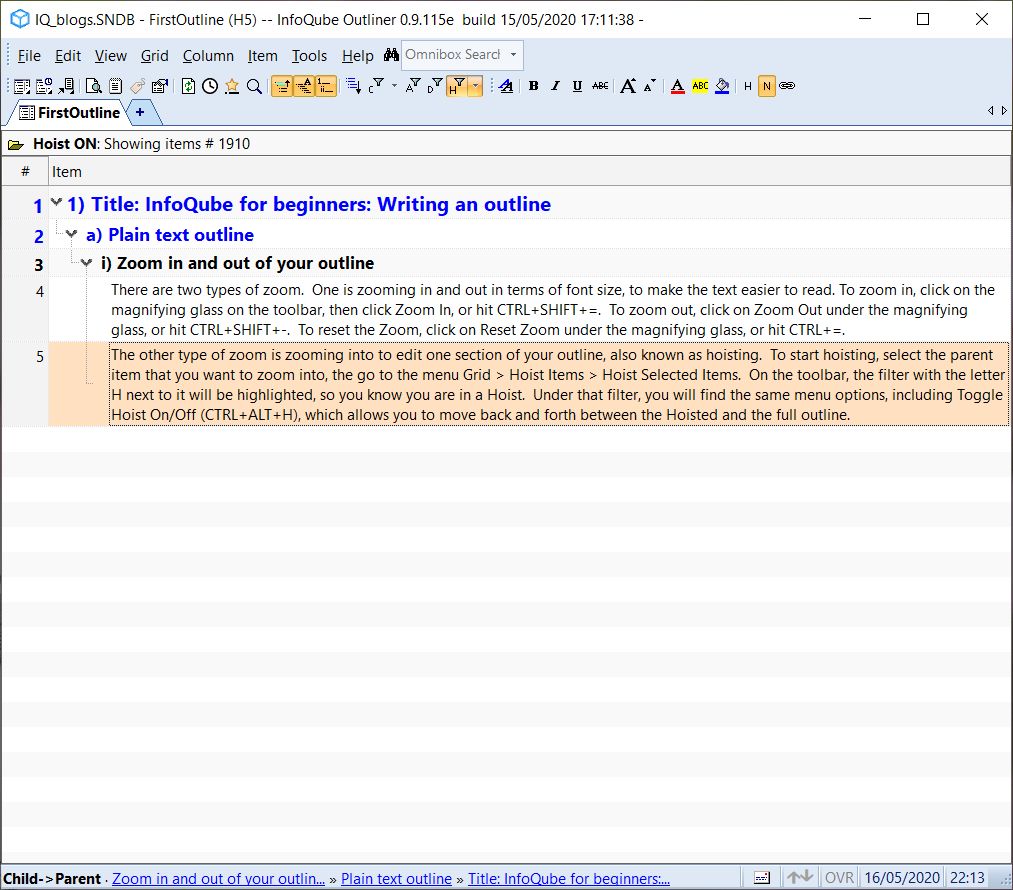
There are two types of zoom. One is zooming in and out in terms of font size, to make the text easier to read. To zoom in, click on the magnifying glass on the toolbar, then click Zoom In, or hit CTRL+SHIFT+=. To zoom out, click on Zoom Out under the magnifying glass, or hit CTRL+SHIFT+-. To reset the Zoom, click on Reset Zoom under the magnifying glass, or hit CTRL+=.
The other type of zoom is zooming into to edit one section of your outline, also known as hoisting. To start hoisting, select the parent item that you want to zoom into, the go to the menu Grid > Hoist Items > Hoist Selected Items. On the toolbar, the filter with the letter H next to it will be highlighted, so you know you are in a Hoist. Under that filter, you will find the same menu options, including Toggle Hoist On/Off (CTRL+ALT+H), which allows you to move back and forth between the Hoisted and the full outline.
Search your outline
To find text inside your outline, hit CTRL+F, type the search term in the Omnibox, then hit ENTER. This will bring up the live-search grid (the one with binoculars in the tab heading).
You can look through the results to find the item you are looking for. Then click the blue underlined link in the "Show In" column. That will take you to the item inside its grid.
So there you have it, all you need to know to make a plain text outline! If plain text is what you want, you can stop reading and get started on your own outline now.
Rich text outline
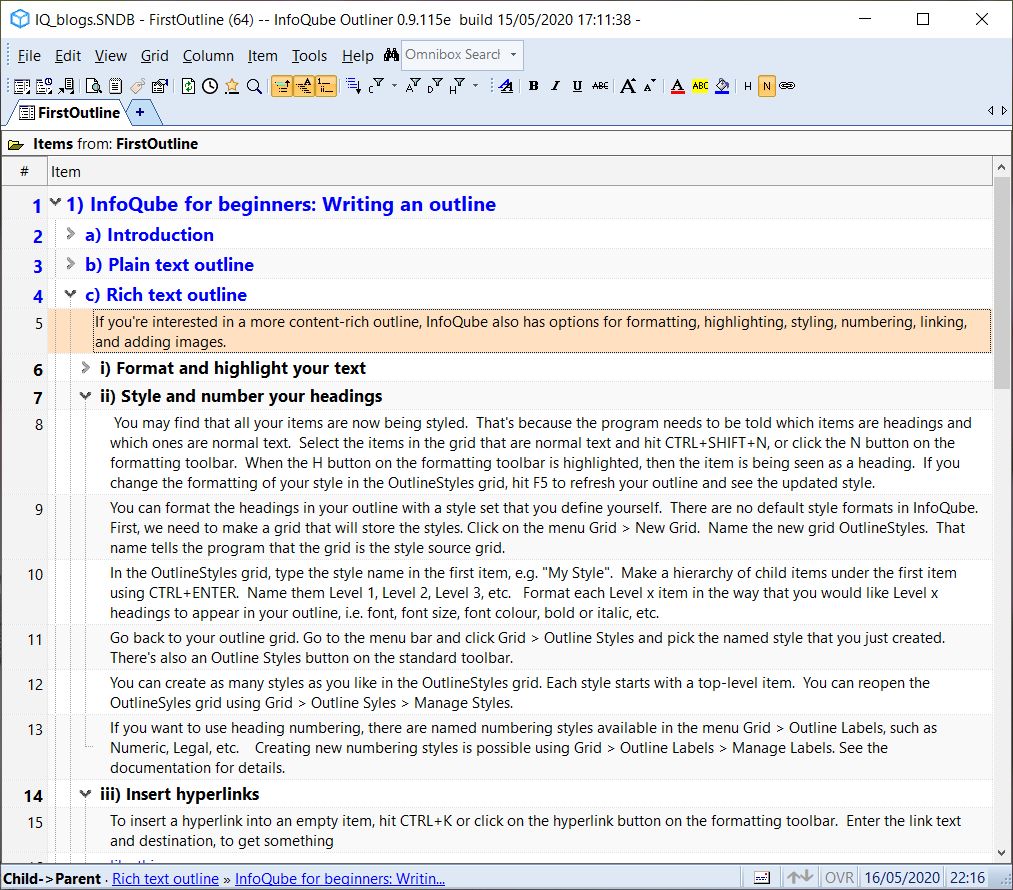
If you're interested in a more content-rich outline, InfoQube also has options for formatting, highlighting, styling, numbering, linking, and adding images.
Format and highlight your text
The grid supports rich text formatting inside the item text. When typing inside the grid, you can apply bold, italic, underline, strikethrough, superscript, subscript, font colour, highlight and background colour using the buttons on the formatting toolbar. You need to select the text first, then hit the button.
You can also format the entire item text by selecting the item (not in edit mode) and applying one of the formatting options. The options on the toolbar change to reflect the ones that are available to you. For example, you can increase or decrease the font size, or change the font of the whole item.
To highlight an item in the grid, i.e. colour the entire row, use the background colour option on the item. For example, this item is highlighted in yellow. The highlight is lost on HTML export.

If you want to add checkboxes to your outline, go the menu and click Grid > Done Checkbox. You can now click on individual checkboxes, or hit CTRL+M to mark/unmark them as done. The checkboxes are per item only, so a parent item does not check/uncheck its children. You can hide the checkboxes again with Grid > Done Checkbox. Checkbox states are saved so you can hide and unhide them as often as you like.
Style and number your headings
You can format the headings in your outline with a style set that you define yourself. There are no default style formats in InfoQube. First, we need to make a grid that will store the styles. Click on the menu Grid > New Grid. Name the new grid OutlineStyles. That name tells the program that the grid is the style source grid.
In the OutlineStyles grid, type the style name in the first item, e.g. "My Style". Make a hierarchy of child items under the first item using CTRL+ENTER. Name them Level 1, Level 2, Level 3, etc. Format each Level x item in the way that you would like Level x headings to appear in your outline, i.e. font, font size, font colour, bold or italic, etc.
Go back to your outline grid. Go to the menu bar and click Grid > Outline Styles and pick the named style that you just created. There's also an Outline Styles button on the standard toolbar.
You may find that all your items are now being styled. That's because the program needs to be told which items are headings and which ones are normal text. Select the items in the grid that are normal text and hit CTRL+SHIFT+N, or click the N button on the formatting toolbar. When the H button on the formatting toolbar is highlighted, then the item is being seen as a heading.
If you change the formatting of your style in the OutlineStyles grid, hit F5 to refresh your outline and see the updated style. You can create as many styles as you like in the OutlineStyles grid. Each style starts with a top-level item. You can reopen the OutlineSyles grid using Grid > Outline Syles > Manage Styles.
If you want to use heading numbering, there are named numbering styles available in the menu Grid > Outline Labels, such as Numeric, Legal, etc. Creating new numbering styles is possible using Grid > Outline Labels > Manage Labels. See 2. Outline Labels in the User Manual for details.
Insert hyperlinks
To insert a hyperlink into an empty item, hit CTRL+K or click on the hyperlink button on the formatting toolbar. Enter the link text and destination, to get something
As long as there is no other text inside the item, you can edit the hyperlink using CTRL+K on the selected item
Adding a hyperlink to an item that already contains text, as well as editing it, requires using another editor. Select the item, then hit Shift+F2 to bring up the pop-up editor.
Inside the pop-up editor, you can add a hyperlink using the link button at the lower right as follows: First write the link text, then select it, then hit the link button, then add the link reference to create a hyperlink more like this. Editing a hyperlink inside an item goes in the same way, using the link button inside the pop-up editor.
If you want to link to another item in your outline, you need to know its ItemID as the destination for the link. You can see the ItemID easily by holding down CTRL then hovering over the item with your mouse. A yellow popup window will tell you what its ItemID is. If you don't want to manually remember the ItemID, you can also select the item that you want to link to, and go to the menu Edit > Copy > Copy Item IDs.
Add a link to the item in the same way as adding a general hyperlink. Instead of entering a URL, just paste or type in the ItemID number, e.g. 1804, without brackets. This will link to the desired item. Internal links are lost on HTML export.
Insert images
If you want to embed an image inside your grid, you can add it using File > Import From > Text and Image Files. Select the file you wish to import, click Open, then select option 1. Your image will be added as an item to your grid.
Refresh the grid (F5) to see the image. It may be all the way at the top, so hit CTRL+Home, then use ALT+arrows or drag and drop to put it where you want it in your outline. You can drag to expand the item row height to see the entire image.
You can show/hide pictures in the grid from the menu Grid > Show > Pictures.
If the image is taking up too much space in the grid, you can replace it with a text description. Select the item with the image, hit CTRL+E, and replace the image name in the top half of the box with some text. Click OK, then F5 to refresh the grid. The image is not lost, since it is stored in the item's document pane.
You can add icons inside your text using the Add Icon button on the formatting toolbar while you are in edit mode. Icons are not visible in HTML export files.
Export your outline
When you have finished your outline, you will probably want to export it to another program or print it.
Print your outline
Select the items in your outline that you want to print. On the menu bar, click File > Print Preview, or hit CTRL+P. Select option 1, WYSIWYG printing of the complete grid. That will print your grid in its current state, i.e. with levels collapsed/expanded as they are on your screen.
In the print preview window, click on Scale. Select the checkbox for Scaling, and set the options to 1 page wide and 0 pages tall. Then click on print.
Export to HTML using outline styles
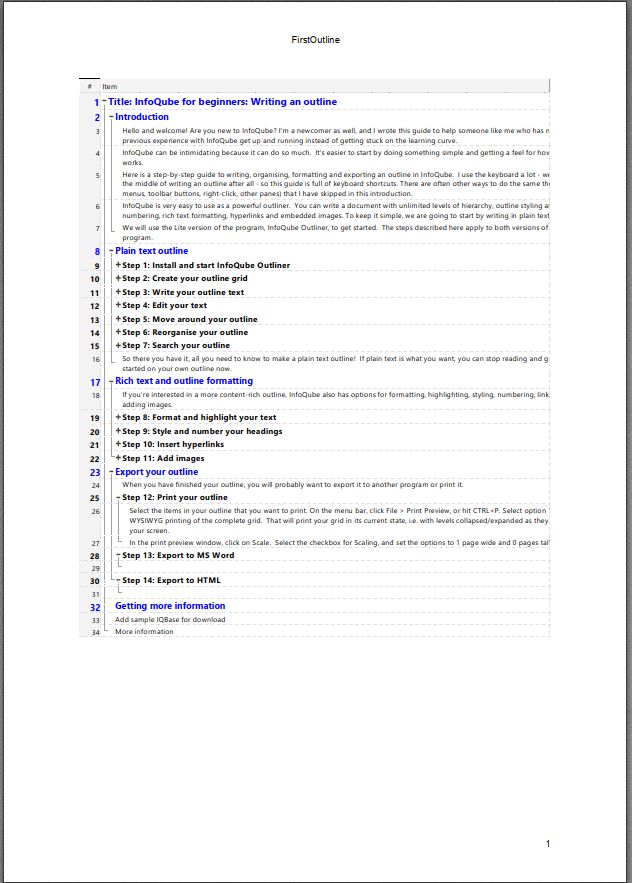
A general rule for export is that it processes items in the order that you select them, so if you want them to appear in the right order, select them from top to bottom in the grid. The easiest way to keep your outline in the right order is to have the entire outline be child items of one title item at the top, and select that one for exporting.
Export the outline using File > Export To > HTML, or File > Print Preview (CTRL+P), option 4. Both bring up the same dialog box.
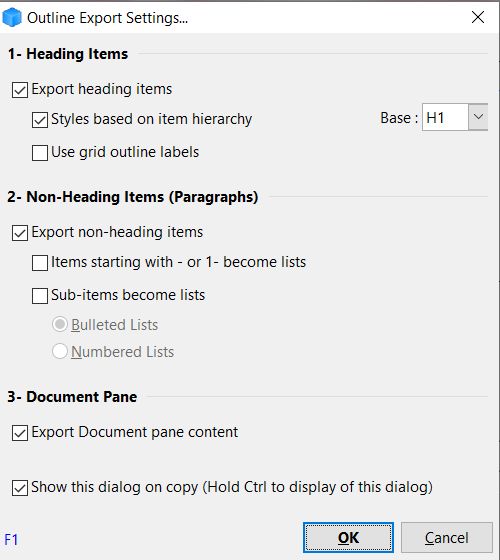
Fill in a title for your outline under heading, e.g. My Outline. Pick a name for your output file. Click "Save and Preview". The Outline Export Settings dialog box comes up.
Check "Export heading items" and "Styles based on item hierarchy" and set Base to H1, or lower if you want to start at lower heading levels. Uncheck "Use grid outline labels" if you don't want to keep them. Check "Export non-heading items", and uncheck "Sub-items become lists". Depending on how you wrote the outline, you way want to check "Items starting with - of 1- become lists". Check "Export Document Pane content". Although we did not write anything in the document pane while making this outline, any embedded images are stored there. Keep checked "Show this dialog on copy". Click OK.
You should now have a saved HTML file and a preview in your web browser.
Copy to Microsoft Word
The process is almost identical to HTML export. On the menu bar, click on Edit > Copy > Copy as HTML Outline. This opens the same Outline Export Settings dialog box. When you click OK the selected outline is copied to the Clipboard. Open MS Word and hit CTRL+V to paste.
Note that the exported outline does not get formatted in the same way as it appears in the grid. The formatting is default HTML for H1, H2, H3, etc and body text. The heading levels are preserved, so you can reformat the styles inside MS Word.
Where to learn more about using InfoQube
I hope this introduction has helped you to get started. This blog post was written inside InfoQube using the outline steps described above, and exported as HTML. If you want to see what the outline of this article looks like, please download the attached IQBase.
For more information, please have a look at the extensive InfoQube User Manual.
Thank you for reading!