InfoQube's main elements: Items, Values and Views
1. Items
In InfoQube, the information is centered on items. The term item is generic and can refer to:
- a person
- a thing
- a task
- a thought
- a file
- notes
- or just about anything...
This means that InfoQube does not try to decide for you how you enter your information. You are in control.
This is not the same behavior as in other applications! For example: if you are in Outlook, you can create a contact using the contact form... a task using the task form, etc.
In Outlook a contact item is different than a task item... but this is not the case in InfoQube .
All items are equal - regardless of where created. An item is an item.
There is no "contact item" or "task item". There are items.
Each item has a unique ID number. What also differentiates items are their field values: (see next).
2. Values and Tags
What differentiates a contact from a task in InfoQube is which values and tags it has. Values are stored in fields, of which there are 4 types: text, dates, numbers and check-mark
-
If you put a check-mark in the Contact field, it will be displayed in your contact list
-
Put a date in the ToDo field, and it will be a task
-
Assign it to a project, it will be displayed in your project grid
3. Grids and other Views
As you put more and more information in InfoQube it becomes crucial to be able to show just the section that you want to see. The Grid is the primary working window, but there are others, such as the Calendar, the Surface and Card views
A Grid displays selected items and selected fields -- items correspond to lines, and fields are shown in columns.
InfoQube grids are very flexible in the way they presents your information. See Grid Display Modes for more info.
One of the most important InfoQube principles to learn and remember is :
|
An item doesn't "belong" to a grid; a grid shows any item that meets certain filter criteria
In other words, items shown in a grid are selected from all the ones in the database using filters. How ? Using the edit boxes at the top of the grid, in what is called the source bar (Grid > Source Bar). Each grid uses those filters to define the content.
|
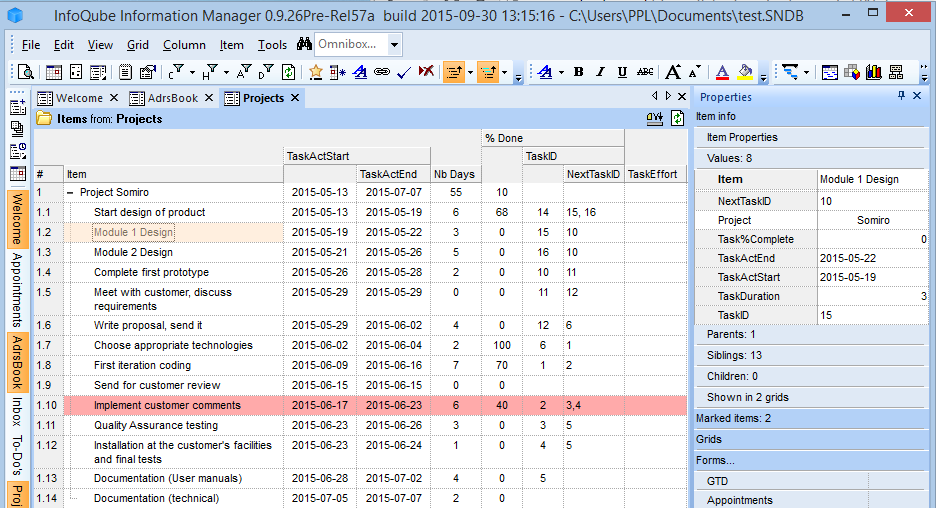
This screenshot shows some of the built-in features of InfoQube
2 windows are shown here:
-
The left window is the grid (or notepad). This shows the various items, organized in a tree-outline. Any number of fields can be defined and displayed in the grid.
-
The right window is the properties pane. It shows useful information about the selected item: the item properties
You are of course free to arrange/hide windows as desired.
You can have as many grids as you want, and even display several at the same time.
Filters can be applied to grid to further limit the items shown. See Filtering Items for details
-
Expand/Collapse buttons: Information is organized into items and sub-items. To open (expand) or close (collapse) an item, simply click the expand buttons to the left of the item.
-
Auto-numbering: The left-most column displays the item / sub-item number
- Fields support Row Equations. So entering a value in a field can fill another. In the above example, Nb Days is set from the start / end dates
-
Fields also support Column Equations: It is hierarchy based. Notice how the main project Nb Days is the sum of the sub-items.
-
Circular equations are no problem in InfoQube. In the above example, TaskActEnd can be inputted (which calculates Nb Days) but it can also be computed from TaskActStart and Nb Days. Try doing that in Excel and you'll get an error !
-
Text Formatting: 5 types of text formatting are supported by InfoQube.
-
Conditional Format: Details here
-
In-item. Use the Formatting toolbar to format parts of the text
-
Item. Choose font, size, color attributes to be applied to the item. It will be applied to all fields or just those you want (as defined by View>Grids)
-
Outline: Choose from a list of outline style (or create your own) to apply formatting based on hierarchy (text font, size, color). Details here
-
-
Number and Date Formatting: User-defined formats are supported. InfoQube uses a Microsoft-standard format string (both named and user-defined). More info from this Microsoft reference .
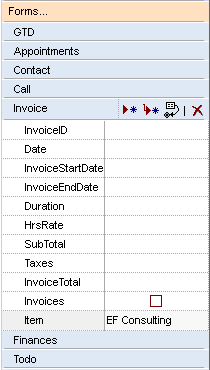
4. Forms
- Forms are another way to display fields values. If grids display fields from left to right, forms displays them from top to bottom, in a vertical list.
- In addition, forms can be used to apply values to items
- Forms are displayed in the Properties pane
- More info here
5. Panes
Panes are windows that can be:
- Left open (non-modal)
- Docked to any edge of the main IQ window
- Floating, either over the main IQ window or outside it
- Minimized (i.e. collapsed)
There are quite a few panes in InfoQube (Grids can even be shown in a pane), but the two key ones are:
- Properties pane: This is where all item information is shown. Details here
- Document pane: This page is for large text contents. It supports many formats, including handwriting. Details here