*** Work in progress ***
InfoQube for Beginners: Making a grid with columns
Hello and welcome! Are you interested in learning how to use InfoQube to manage tables of information? This guide is written to help you get up and running creating a grid that contains different fields displayed as columns.
In this guide we cover creating rows and columns, entering and formatting information, sorting, filtering and grouping rows, and creating automated data entry rules. We will look at easy ways to get things done, often using keyboard shortcuts. There are other ways to do the same thing, but not every method will be covered here.
Let's get started!
What is a grid?
MS Excel calls it a "Sheet" and MS Word calls it a "Table". In InfoQube, it is called a "Grid". It is a view showing rows and columns of data.
Let's create a new grid. Go to the menu bar and click on View > Grids > New Grid. Enter a name for your grid and click OK. For example, you can name it My Table or MyTable. Spaces are allowed in grid names, although CamelCase is recommended.
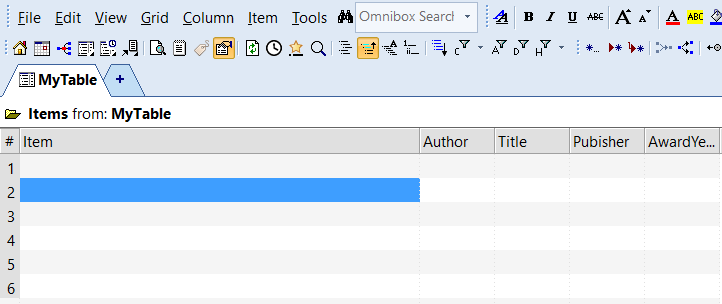
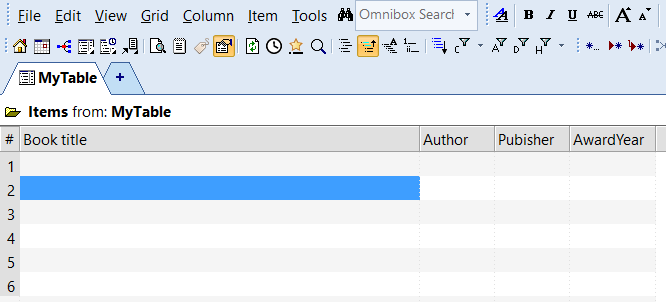
You will now see a blank grid with two columns: # and Item. # is the row number in the grid. Item is the header of the first column in the grid. There is one blank item in the grid and it is highlighted.

Before we start adding columns, here is a little explanation of what the grid is showing you:
- InfoQube is a database that contains items. Each item is shown as one row in the grid. You can make a selection of items from the database to show as rows in your grid.
- An item can have different kinds of data associated with it, which are stored in fields. All fields in the database exist for all items, so an item can have a value for any field. You can make a selection of the fields in the database and show these as columns in your grid.
- By default, a grid does not show all items and all fields that exist in the database. It only shows the items that meet the grid source criteria, and the fields that are chosen to show as columns. It is a view of the database rather than the whole database.
What are grid source criteria?
That third point can be confusing when you first start using InfoQube, so here's some more detail. Making a new grid called MyTable using View > Grids > New Grid creates a Yes/No field called MyTable, which is the grid's source field. Any item that you add to this grid will have the field MyTable set to Yes.
Conversely, any item that has its MyTable field set to Yes will show in the grid MyTable. Grids are not exclusive, so the same item can show up in different grids by having their corresponding source fields set to Yes. If you want to see all the items in the database in one grid, open the "Journal" grid using View > Grids > Journal.
Now, back to our table!
Making a simple table
InfoQube can be used as an outliner, where you indent / outdent items to arrange them in hierarchy. However, for this first table, we are not going to use the outliner functions just yet. Instead, we are going to make a simple list of items, one after the other without any hierarchy.
Adding items to the grid, i.e. rows
Another way to add a new item is to click on the "Add new item" button on the Item Commands toolbar or click Item > Insert > New Item in the menus. The new item added this way will appear at the bottom of your list.
If you want to edit a row, move your cursor to that row so that it is highlighted, then either double-click, hit SPACE or F2. SPACE puts your cursor at the end of the line, and double-click and F2 at the beginning. Confirm your edits with ENTER. Cancel your edits with ESC.
You cannot undo adding a new item, but you can delete it. If you want to delete a row from the grid, select it then type CTRL+D. Select option 1 to delete it from the database entirely, or option 2 to remove it from this grid only while keeping it in the database.
If you want to move a row up or down in the grid, type ALT+up/down arrow with that row selected. There are also Move Up and Move Down buttons on the Item Commands toolbar and in the Item > Move menu.
Adding fields to the grid, i.e. columns
You can add a column to the grid by clicking on the Column > Add Columns menu, or right-clicking on the column header to get the same menu. There is also an Add Columns button on the Item Commands toolbar.
This will bring up a list of fields that exist in the database, with those currently shown in the grid at the top. Those have a green check mark in the "Show" column. The other available fields are listed in alphabetical order. In addition to the field names, this menu lists the field types and descriptions so you know what kind of field you're choosing.
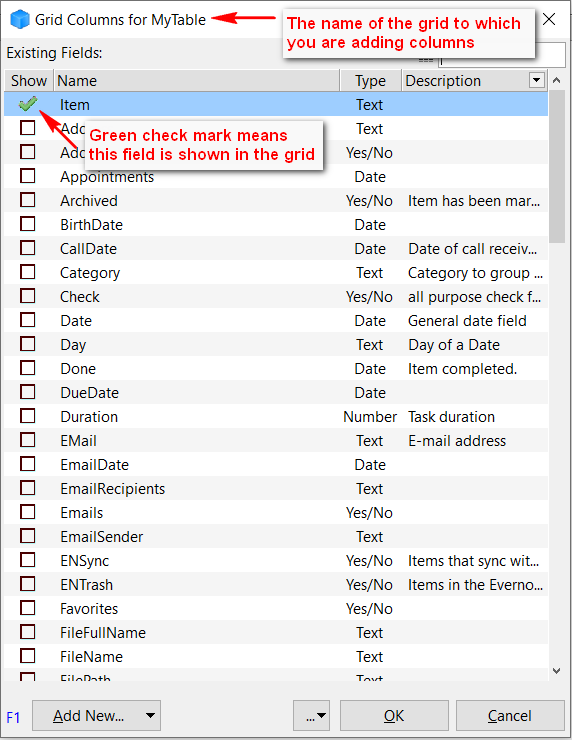
To find the field that you want to add, you can scroll through the list, or type part of the name in the filter box in the top right hand corner. Once you have found the field, click on the checkbox in the "Show" column. It will now have a green checkmark. You can add multiple fields in this way. Click OK when you are done, and the chosen fields will now appear as columns in the grid. They are added to the right of the existing columns, in reverse order to how you selected them.
By default the column header is the name of the field that is displayed in the column. You can change the column header to a new name without changing the field name. For example, if your field name is "Due" but you want it called "Due Date" in the column header, you can go to Column > Header > Caption (either via right-click or the menu) and change it. When you change the column header caption, it is set to that name for all grids in which the column appears. The Column > Header menu also has options to change the header text alignment.
Creating new fields
As you create your table, you may want to add new columns to it that don't yet exist as fields in the database. To do this you need to create new fields. When you're in the Add Columns window, there's an "Add New..." button in the lower left corner. Click on it to select the column type that you would like to add, either a text column, number column, date column or Yes/No column.
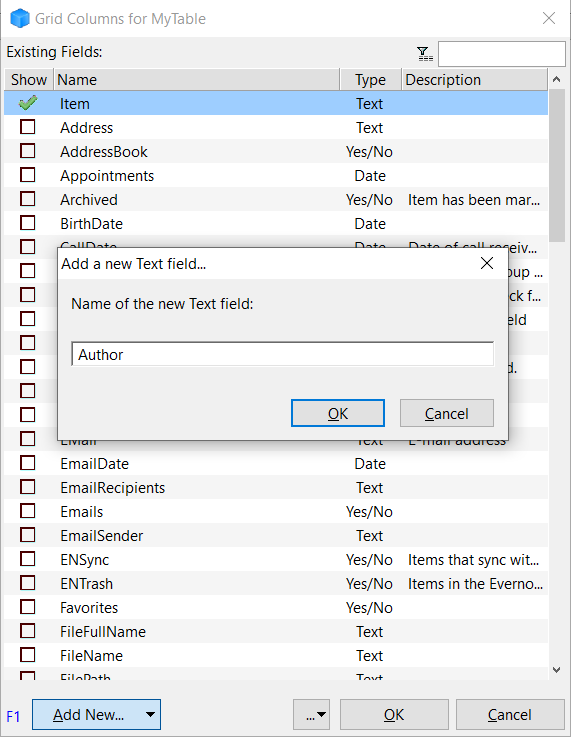
For our example we are going to make a list of Hugo Award-winning novels. So we are going to add new columns as follows:
| Author | Text column |
| Title | Text column |
| Publisher | Text column |
| AwardYear | Number column |
"AwardYear" is not a date column because we don't want to enter days or months, just years. We'll cover formatting this column below.
Note how the order in which they appear in the Add Columns window is with the most recently created column at the top.
(The screenshots show a typo in the Publisher field, which is fixed later.)
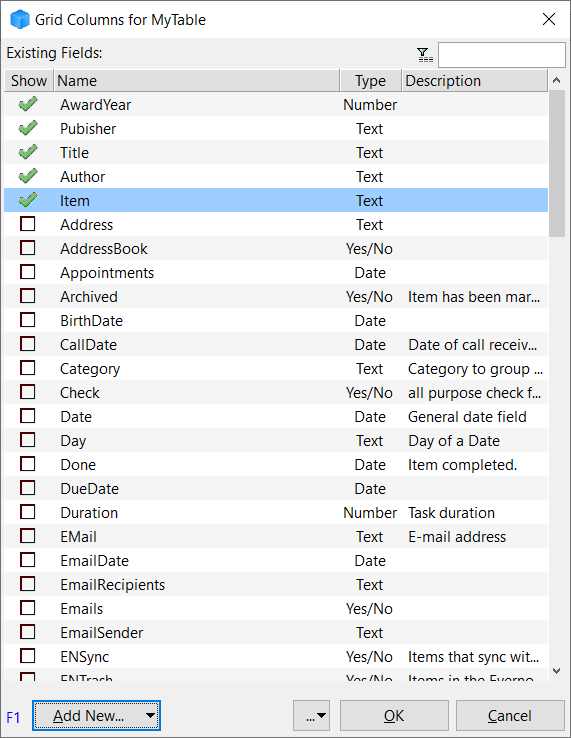
They are then added to the grid in the order they were added to the list.
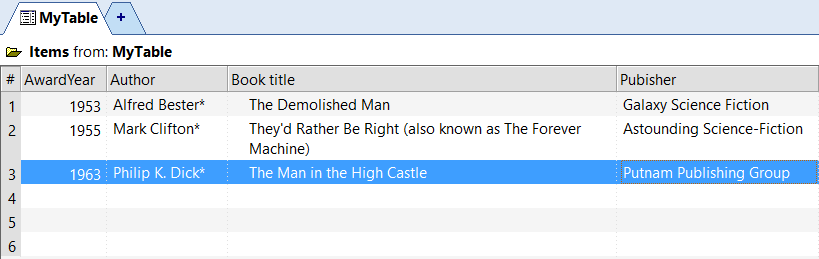
We still have the "Item" column, which is the main column in every grid. If we want the "Item" column to contain the title of the book, then we don't need the "Title" column. Let's remove it. Right-click on the Title column header and select Remove Column. We can change the caption of the "Item" column to read "Book title". Note that this changes the header in all grids, so only change it if it doesn't hinder other grids in your database.
The AwardYear column has a truncated header. Drag the border of the column header to the right to expand it. Now the grid looks like this.
Changing the grid layout
You can make a column wider or narrower by dragging on the right-hand border of the column header. You can turn word wrapping of column headers on or off using the checkbox found in Tools > Manage Grids. In the Properties box on the right, look under Options for Multiline column headers and check the box. Then press the save button.
You can rearrange columns into the order that you want by clicking on a column header (the grey box) and dragging the column to a new position. Green arrows will show you where the column will go. When you release the mouse the column is moved.
If you want to remove a column from the grid, you can right-click on the column header then selecting "Remove column". The same command is available using the menu Column > Remove Column. Removing a column from the grid does not delete any of the data that were shown in the column. The data are available in the database until you delete them.
If you have a grid with many columns, and you want to temporarily hide a column without removing it from the grid you can choose Column > Hide Column. You can bring it back using Column > Hidden Columns.
Entering data in fields
Now we can add data into the cells in the grid. The active cell that is highlighted is the one where the data will be entered. You can move the selection of the active cell with the arrows. TAB and Shift+TAB will also move the cell highlight except when the highlighted cell is in the Item column. In that case they will indent or outdent the item.
Just like in the Item column, you can start typing and the text will be added to the end of the active cell. You can also use SPACE or F2 to enter edit mode.
To delete a value from a field, simply hit the DELETE key. You can undo the deletion of one cell with CTRL+Z, but if you delete more than one it cannot be restored that way, so be careful.
Copying and pasting
You can copy data using CTRL+C/V when the field types match, so text between text fields, dates between date fields, and so on.
Pasting multiple columns in one row
Highlight the columns that you want to copy, then press CTRL+C or Edit > Copy > Copy Special... (Ctrl+Shift+C) option 3. Then highlight all the columns in which you want to paste, then press CTRL+V or Edit > Paste > Paste Special (Ctrl+Shift+V).
Pasting from other sources
You can paste text from outside InfoQube. For example, for the list of award-winning books we can copy and paste from the wikipedia webpage. First, reorder the columns to match the order on the webpage: AwardYear, Author, Book title, Publisher. Then highlight a row from the table on the webpage and press CTRL+C. Then highlight all the columns in a row in InfoQube where you want to paste, and press CTRL+V.
Pasting multiple rows and columns
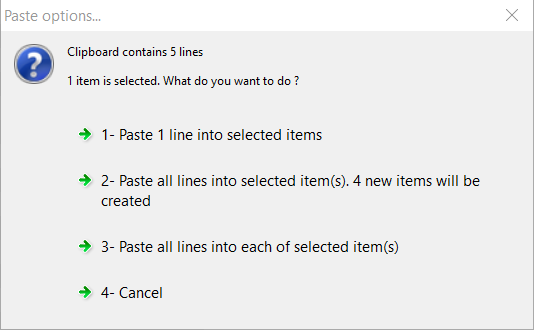
To paste multiple rows and columns at the same time, select then copy them from the source, then select the relevant columns of the row where you want to add them, and press CTRL+V. A dialog box will pop up asking you how you want to paste them. Select option 2 to create new items for the additional rows that are needed.
Alternatively, if you want to paste into existing rows, select all the rows and columns that are needed, then select Option 3.
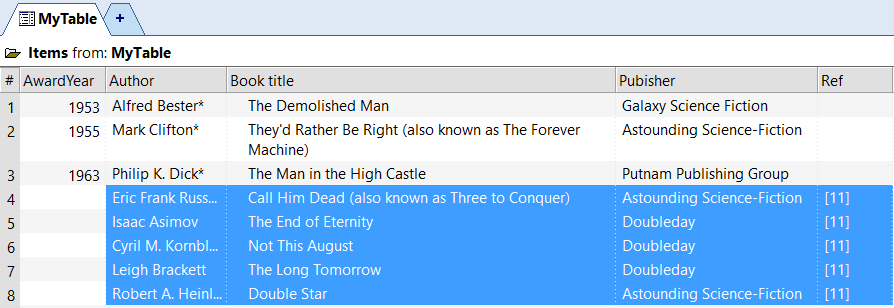
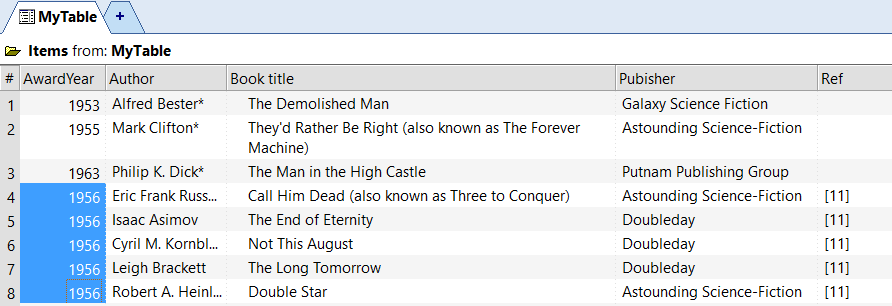
For the award-winning books table, there is an additional Ref column which we don't really need, but let's add it to the grid (as a text column) so we can copy multiple rows. An additional complication is that the year isn't repeated in each row on the webpage. Let's ignore that for the moment.
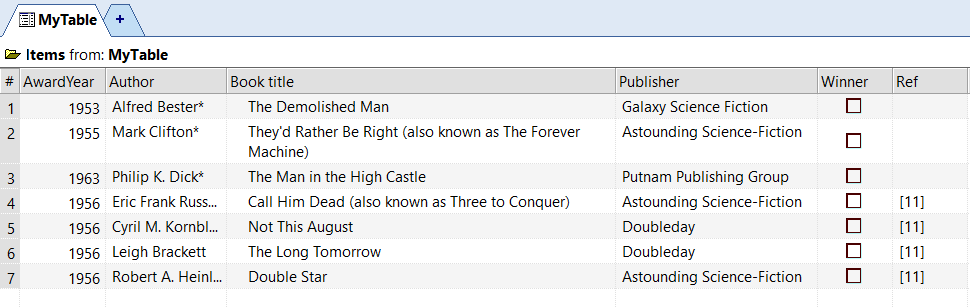
Looking at the year 1956, we can highlight the five rows starting from the author column, copy those, then highlight five rows and four columns in InfoQube, and paste them using Option 3. The result looks like this:
We don't need to manually type in the year five times. Copy the year (1956) from the webpage, then highligh the first column in the five rows and hit CTRL+V. The result looks like this:
In summary, InfoQube will paste into the highlighted columns, so you always need to highlight all the columns that are needed. You can choose to add new rows if you have more rows in the clipboard than in the selection. And IQ will repeat the contents inside the selected rows if you have fewer rows in the clipboard than in the selection.
Formatting text
You can use the text formatting options found in the Formatting menu bar to format the text. If you highlight a cell and press a button on the menu bar, like Bold for example, then all the text in the entire row becomes bold. If you just want to format the text inside one cell, double-click it to enter edit mode, select the text that you want to format, then click the button on the menu bar. The formatting applied per cell is independent from the formatting applied per row. In the image below you see that the row is green, but the text inside the publisher field is highlighted in yellow.

The "undo" button doesn't work for formatting changes, so if you want to reverse any changes you have to do it manually.
Formatting number and date fields
If you want to format a number or date field in a particular way, the options to do so are in the Field Properties dialog box. This is a very powerful dialog box with many options, but we're going to keep it simple and only use the ones we need.
Going back to our example table, the AwardYear field is a number field. We haven't constrained it yet, but we want it to contain whole numbers only, not decimals. Right-click on the AwardYear column header and select Manage Fields. The Field Properties dialog box opens with the AwardYear field highlighted on the left and the properties of that field shown on the right. There is a format box in the section headed Type.
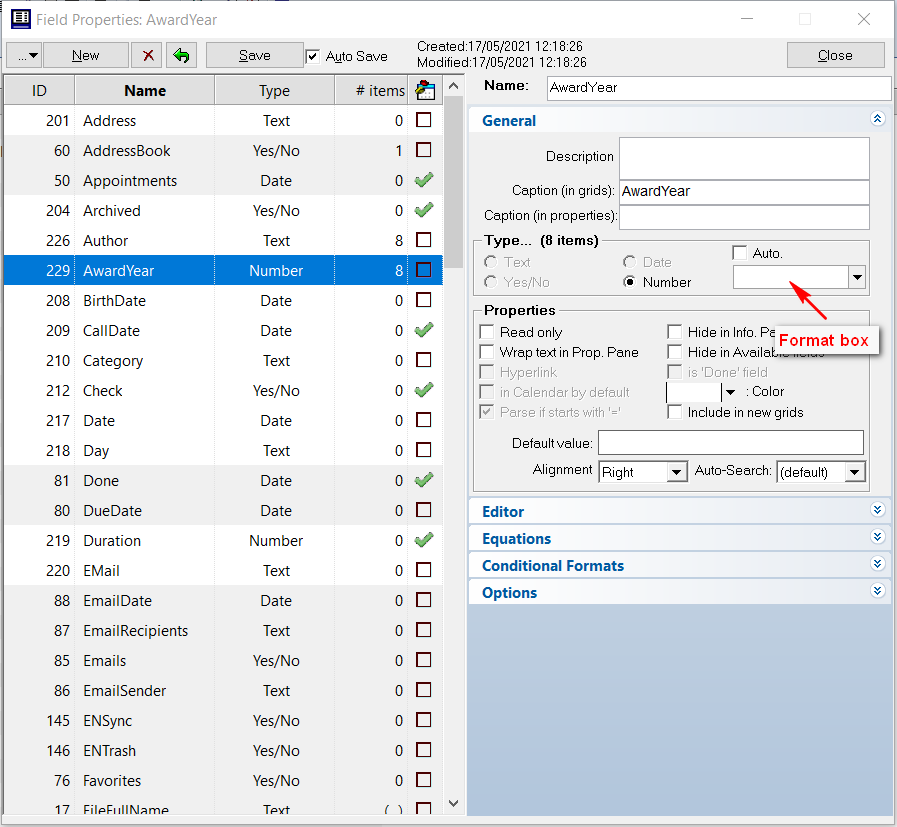
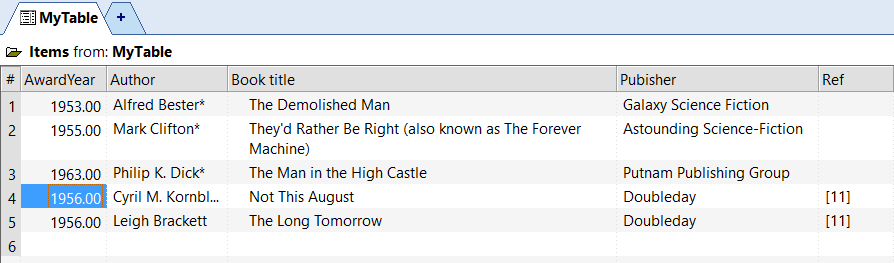
To format your number or date you manually enter a format code in that box, for example, entering 0 formats the number without decimals, and 0.00 formats it with two decimals. Just for fun, we're going to enter 0.00 in the format box, then press the save button. The grid immediately updates to show the years as 1963.00. That's not what we want, so enter 0 in the format box then press save.
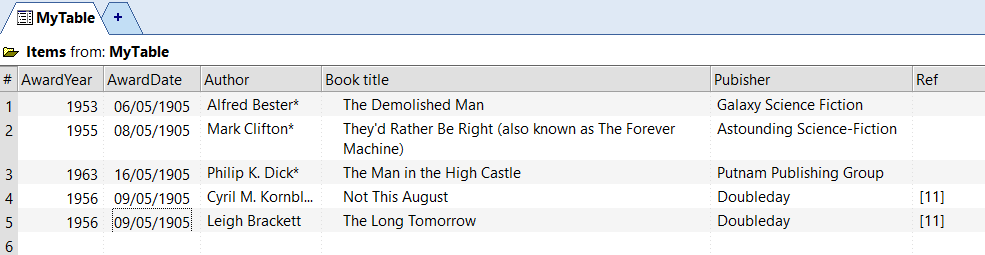
Why didn't we make AwardYear a date field? Because we cannot just enter a just a year as date. As a test, here is the table with an additional AwardDate column. If you enter 1953 in that column, it's converted to the date 6 May 1905. Look at the image below for what happened to all the years in the table.
If you want to format date fields, you can enter a formatting code like yyyy-mm-dd or mmm d yy into the format box. All the number and date formatting codes are listed on this page, and there is a link to it in the user manual so you can always find it there.
Conditional formatting
You can assign conditional formatting rules to any field in the grid. The rule will apply to all items in the grid that meet the formatting conditions. The conditions can be defined using one or more fields regardless of whether they are visible in the grid.
In our example table, we are going to add a new field "Winner" of type Yes/No, and use it to format the Book title in Bold. Go to Column > Add Columns, then to Add New... > Yes/No Column. Call it Winner.
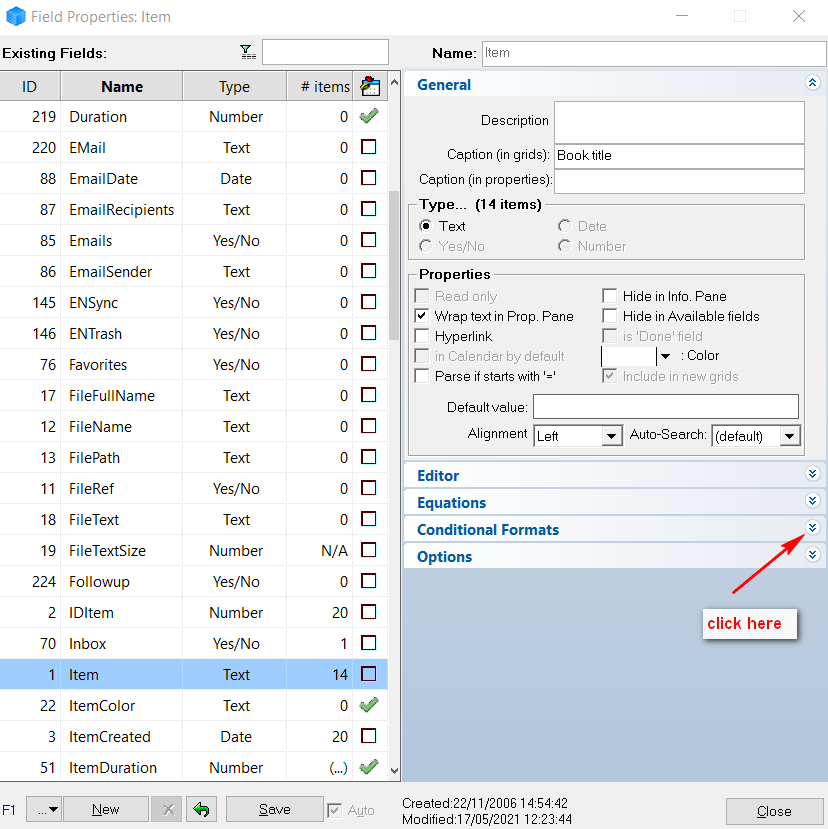
Since we want to apply the conditional format to the Book title field, richt-click on the Book title column header and select Manage Fields... The Field Properties dialog box will open, and the Item field will be highlighted (remember that Book title is just the caption for the Item field).
You can find the conditional formatting box inside the Field Properties dialog. It's in the lower-right corner, and is normally closed. Click on the downward-pointing arrows to open it.
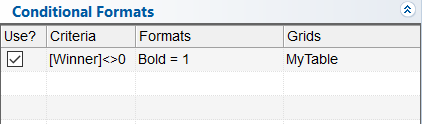
The box contains four columns:
- Use?: toggles the formatting rule on or off. Double-click under the column header the first row to make a checkbox appear. Click on the checkbox to toggle the rule on.
- Criteria: type in the conditions that must be met. In our example, the condition is "[Winner]<>0"
- Formats: type in the formatting rules for this field. In our example, the rule is "Bold=1"
- Grids: type in the grid names where the rules will be applied, separated by |. In our example, the grid name is MyTable
Click Save in the bottom of the dialog to activate the new conditional format. You can Close the dialog, or leave it open and move it to one side while you test different formatting rules.
Now go back to the table and check the Winner box for the first row. You will see that the title "The Demolished Man" has become bold.

If you want to make changes to several columns using the same rule, you have to go to each field and add that rule to them one by one. You can make quite sophisticated rules using multiple criteria and multiple formatting changes at the same time. The details are available in this page of the user manual.
work in progress, will be continued
will be covered later in the document:
Editing field properties
Depending on the field settings (more on this below), what you can enter in a cell may be constrained to a particular data type (e.g. a date field) or to a fixed list of entries. If there is a fixed list of entries defined, clicking on an active cell will show a downward arrow on the right hand side of the cell. Click on the arrow to show the list of entries, then either scroll to the entry you want or start typing, and the selection bar will move to the matching entry. You can also press F2 twice to show the list. Press ENTER or click OK to select the desired entry. For an empty cell, a quick way to show the entry list is to tap SPACE twice, which is handy when you are using the keyboard. However, this method doesn't work if the cell already contains data, use F2 instead.
to do: insert image of downward arrow to the right of a cell for selecting entries
Unlike these however, in IQ grids, you can:
- Show the items (i.e. rows) in multiple places (in the grid, and in other grids)