Importing from Hierarchical Data Files
InfoQube can import from outline-based data files. Supported formats are OML, OPML and Tab Intended.
- To import from another program, first use that program to export to a supported format. Note where the generated file is saved
- In InfoQube, open the file and grid where you want this data to appear. The grid must be one with a simple source (i.e. such as Adrsbook, Inbox, or any other grid with a single field source)
- Do File > Import from > Hierarchical Data
- Click Browse and select the file. The dialog will update with a preview of the data to import:

- The Import options contains 2 lines. First line is grid related, while the second line is field related
- First line:
- Left combo determines if all items or just top level items (TLI) are added to the grid
- Right combo determines the grid to put items. The current grid should be automatically selected
- Second line:
- Left combo determines if all items or just top level items (TLI) are set for the field
- Right combo determines the field to use
- Tab Indented format: Only the item field is imported (i.e. the tree column). For this format, there is an additional option to trim text after the Tab character. Useful when the import file contains extra column(s) after the tree column
- First line:
- Click Import
- Click Close
- Refresh the grid if necessary to show the imported items. Check that the hierarchy and field-values are correct
Importing from OPML
OPML is a rather loose standard, so the file may need to be modified a little to properly import in IQ:
- Format: <outline text="some item text" _note="some <b>html</b> text" Field1="True"/>
- If "Field1" exists in the IQBase, the value will be imported
- Some field synonyms are implemented:
- text and item are saved in field "item"
- _note, HTML, ItemHTML, description are saved in the Doc pane
- url, htmlUrl are saved in field URL
- If changes are required, these can generally be done using Notepad or similar apps
Importing from Ultra Recall Pro
The steps are:
- Export from URp:
- In the Data Explorer pane, select the items to export, or select "My Data" to export everything
- File>>Export>>Items to an XML (OML) File.
- Click Next
- Click Next (again)
- Enter an export filename. It is recommended to add the ".OML" extension, as URp does not add it automatically
- To export sub-items, check "Export child items (recursive)
- Click Finish
- Import into IQ:
- File>Import>Hierarchical Data
- Browse to select the URp export file
- Select Import options:
- You can put imported items in a specific grid
- You can also assign specific yes/no fields to the imported items
- In both cases, these can be done for Top Level Items (TLI) or for all imported items
- Click Import
- If you selected to put the items in a specific grid, this grid will open upon completing the import process and will refresh with the newly imported items:
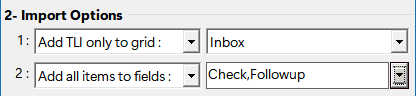
In the above example, the URp sample file is imported. The main items will be added to the Inbox. In addition, all imported items will have the following fields checked: Check and Followup
The URp item hierarchy is maintained and all RTF content has been converted to HTML.
Limitations:
- The URp export process requires that each item have a distinct item name. Otherwise, all items with the same name will have the RTF content of the last duplicate
- Bullets are converted to symbol, not to an HTML bulleted list
- Only the embedded RTF content is imported. Item notes and attributes are not imported.
- images are not imported (currently, but this will be fixed)
- If an item has more than 1 parent (logical linking in URp terminology), the item will be imported for each parent, so multiple copies will be created. This will be fixed.