Ecco Pro Import
IQ is based on the same concept as Ecco Pro, so it is easy to transfer your information from Ecco to IQ.
The Ecco Pro importer does the following:
- Import Top level items (TLI) and all their sub-items
- Creates fields for each of the Ecco Pro folders. Field types are compatible with Ecco's
- For each imported item, all folder values are imported (a field value in IQ terminology)
- Notepads are not imported. To find your imported items, you can use one of the following ways:
- Click on Step 4: View All Ecco Imported Items
- Open the Journal grid and click on the Today button
- Open the Properties pane, and in Available Fields, right-click on an Ecco imported field and select Show items with values for this field
- Create a new grid and in dialog select from an Imported Ecco field from the list
- Forms are not imported
- Filters are not imported
To import, follow these steps:
- Do File > Import > Ecco Pro File to open the import dialog:
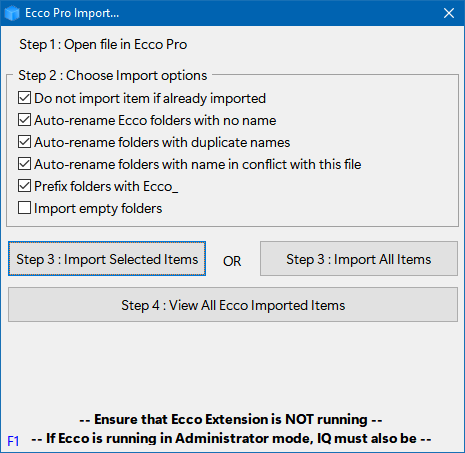
- In step 1, open Ecco Pro and load the file to import (import communicates with Ecco Pro using DDE). If you wish to import just parts of the Ecco file (i.e. the content of a notepad, the phonebook, etc), open the notepad and select the items to import.
*** The importer is not compatible with Ecco Extension, so ensure it is not loaded ***
*** Also, if Ecco Pro is running in Admin mode, InfoQube must also be in that mode ***
- In step 2, choose the import options or leave the default settings.
Adding a prefix to folders makes these easier to view in the Manage Fields dialog (when sorted alphabetically). To change the prefix from the default, uncheck and re-check the option. A dialog will show to enter the new prefix
- In step 3, click on the appropriate button to import only the items you selected in Ecco, or all items in the Ecco file
- *** If a dialog is displayed saying that Ecco is not running, it is because it is running in Admin mode which prevents the import. Close InfoQube and re-open it in open it also in Admin mode (right-click on InfoQube.exe > run as administrator) ***
- As the Ecco import dialog is not modal, you can switch to another grid and see the results of the import.
- Once import is completed, you can click on Step 4: to view the imported items. It will open the grid EccoImported (create if necessary) and display all items imported will be shown, not just those imported in the last import. If you want to view only recently imported items, you can apply a filter (a date filter would be a good option for this)
- Since notepads are not imported, users should create them inside InfoQube (called Grids). Details here: 1. Grids (Outliner with Columns)
- In a similar way as in Ecco, you can also double-click on a folder to view its content in the Scratch grid. The equivalent of Ecco's folder pane is the 6. Properties Pane
- To speed-start your transition from Ecco to IQ (they are similar in concept but with significant differences nevertheless), check out the Beginner's Guide
Notes and limitations:
- The Ecco Pro importer imports TLIs (and all sub-items), so it is not possible to just import an item which is not a TLI
- Calendar items are imported as items with the correct Appointment date. All dates that also include a time will be shown in the IQ Calendar (i.e. Events are created). This is how Ecco Pro worked. (Ecco Pro calendar only showed dates with times. Dates without times were shown in the Tickler)
- Other date properties, such as repeat pattern, reminders, etc are not imported