Exporting Outlines (Print-ready)
When working on medium, large documents, it is quite useful to break it down in parts, more specifically, in an outline (main chapters, sections, sub-sections, etc)
InfoQube can generate a compound document of all these parts. Using styles, this can be a "Print-ready" document.
To generate the compound document, the steps are as simple as:
- Select one or more main items
- Edit > Copy > Copy as Outline
 . (The command can be added to any toolbar)
(or do File > Print-Preview > Outline using Styles) - Set outline export settings
- Paste into a rich-text editor, such as MS Word, Wordpress, or an IQ item's Doc pane
- Select / Apply a style sheet
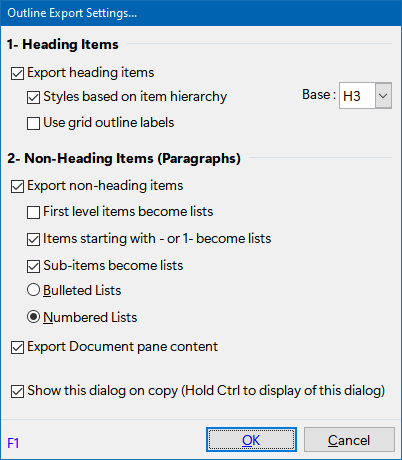
Outline export settings dialog :
1. Writing your document
When writing your document, there are a number of strategies that you can use, based on your writing style and writing project. Any of the following stategies can be used:
- Outline items represent sections / sub-sections of the document. The actual content of each section is entered in the Document pane
- Outline items describe the content of each section but are not to be part of the final document. The document content is entered entirely in the Document pane
Sub-items can be used to add notes, references, etc. to each section but are not included in the final document - Outline items represent sections / sub-sections and content of the document
The document pane is only used to enter notes, reference information, etc, not to be included in the final document - Outline items represent sections / sub-sections and simple / short form content of the document. Complex / long form content is entered in the Document pane
It's important to decide what writing style / structure you want to use as this affect where content is entered and where non-printing notes are entered
To create items, the following is a friendly reminder:
- Hit Enter to add an item.
- Ctrl+Enter adds a sub-item
- Alt + up / down / right / left arrows moves items in the hierarchy. Tab / Shift Tab also moves items to sub-items and back
- Drag-drop can also be used
- Blocks can be used in more than one document. To do so, hold the CTRL key when dragging an item block as this creates an additional parent link. More info here
- The Item Commands toolbar contains all related commands. Right-click on any toolbar to show / hide toolbars


A few guidelines:
- Select an outline style using Grid > Outline Style, as this helps visualize the document structure
- InfoQube uses the Heading / Normal Text property when formatting. By default, items are Heading item
Use the H or N command button on the formatting toolbar to set the item type (Ctrl + Shift + N) - Short / medium length content can be entered as items or in the Doc pane
- Content that includes images must be in the Doc pane
- Items can be easily be moved and expanded / collapsed. This sometimes influences where the content is entered
- Document pane content can also be expanded / collapsed, based in styles (H1... H6, use Alt + Click to expand / collapse sections), but moving is done through copy / paste
How compound documents are generated based on the above dialog settings using these simple rules:
- Heading items can be formatted as HTML heading tags (<H1> ... <H6>), based on the item hierarchy w.r.t. the main item
- Outline Labels can be used to auto-number sections / sub-sections
- Normal text item which is an immediate sub-item of a Heading item can appear as a paragraph or as a list item
- Normal text item which is a sub-item of another Normal Text item can appear as a list item
- Normal text which start with "- " can be turned into a bullet list
- Normal text which start with "1- " can be turned into a numbered list
- List can be bullets or numbered
- Content in the Doc pane can appear after the item text, as a paragraph
- You can use heading styles in the Doc pane, but these will not the adjusted based on the item hierarchy
(this means that generated document may not have the correct heading level, so it is perhaps best to avoid it if possible)
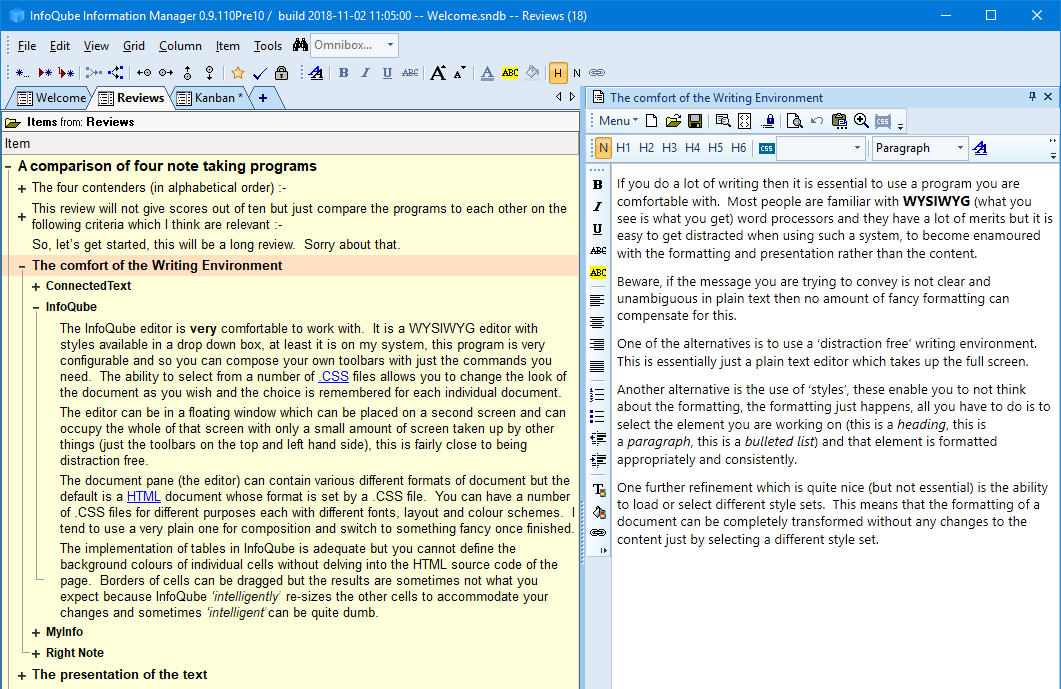
The following screenshot shows a typical use case. Notice how:
- Headings are in bold, in decreasing font sizes. See 3. Outline Styles for details
- Normal text items contain parts of the document body. These support rich text, such as bold, italic, hyperlinks, etc
- Rich text can be copy / pasted from other apps to IQ items and vice-versa
- The Doc pane is useful for long-form content
- The Doc pane always shows the content of the currently focused item (unless it is locked to a specific item)
- When generating the compound document, Normal text and Doc pane content are treated in a very similar manner
- Many Doc panes can be opened at once. This is useful to see content from more than one item
- If an item outside the current hierarchy contains a previously generated compound document, you can view the whole document (a version of it) in a pane while writing in another pane