Print Preview - Grids
File > Print Preview can be used to print / export grid content. A number of print options are available:
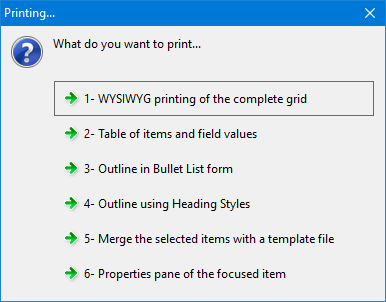
1. WYSIWYG Printing
Opens a print-preview window with a toolbar:
where you can:
- Set the view zoom
- Set the number of pages visible on screen
- Choose the paper orientation
- Set other print options:
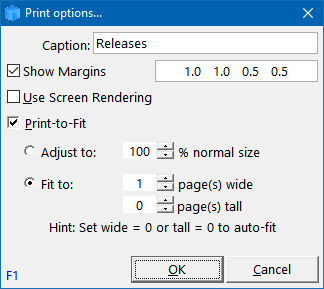
- Show / hide row colors
- Select the printer and paper size
- Save As: PDF file or an image file: JPeg, Png or EMF
- Copy as an image, to paste into other applications
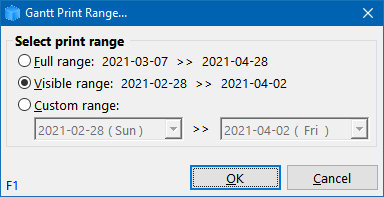
If the grid is showing a Gantt chart, a Gantt Print Options dialog is first shown:
Tips and Tricks
- WYSIWYG printing will print all items in the grid. To limit it to a list of items:
- Select the items to print
- Do a Hoist filter (Grid > Hoist Items or the H filter on the toolbar)
- Print Preview
- Repeat Grid > Hoist Items to remove the Hoist filter
- Some Print-to-Fit options result is severely degraded text quality. Test various options to see which ones provide the best print quality
- Using the Copy toolbar button will put a copy of the source grid onto the clipboard. Pasting this into a word processor document often yields excellent results. If you want to print just a section of the grid / Gantt, see the first tip in this section to apply a Hoist filter
- If you need to shrink the print output, a better option is often to:
- Select a large paper size (optionally install a printer that supports this). Tabloid (11in x 17in) is often the largest pager size available. Some printer drivers allow custom paper sizes. Try creating one even larger
- Instead of printing, click on Save As... and select an image file (e.g. PNG)
- Paste this image in a word processor, such as Microsoft Word
- Print the document to a printer or a PDF printer (to generate a PDF file)
- Instead of steps 2 to 4 above, it is possible to generate a PDF file directly by clicking on Save As... and selecting PDF file
- HP has a universal printer driver which should enable large printers (not tested). WinLine also provides drivers for HP Plotter printers (tested). With this driver, one can select very large paper sizes. Expensive (200USD), but with a free trial. Details here: WinLINE Printer Driver
- Another option to print large grids is create a copy of the grid and reduce the font size and column widths. Print this grid instead
2. HTML-Based Exports
Print-preview options 2 to 5 show the HTML Export dialog which consists of 4 tabs:
- Template Merge
- Table with Columns
- Bullet List
- Using Styles
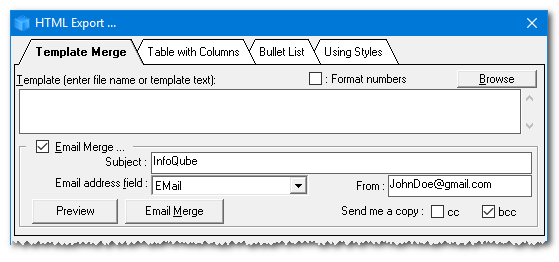
2.1 Template Merge
Template Merge is similar to any mail / email merge process and consists of 2 parts:
- One or more items to merge, each item having a list of values to fill the form template (name, email, amount, date, etc)
- A Template file which contains rich text content and field placeholders
InfoQube can Template Merge to a single document or to individual emails
2.1.1 Template File
Use the Doc pane (recommended) or another HTML editor to generate the Template file
- It is best to save the file in the IQBase Files folder
- Use the formatting tools to bold, link and add images
- To merge field-values, add the field name enclosed with { }, such as {Item}
- Item parent field-values can be used by preceding the field name with "parent.", such as {Parent.Item}
2.1.2 Merging
To perform the merge
- Select one or more items in a grid
- The fields to merge do not need to be shown in the grid as InfoQube will look in the IQBase to read them
- File > Print-Preview > Merge the selected items with a template tile
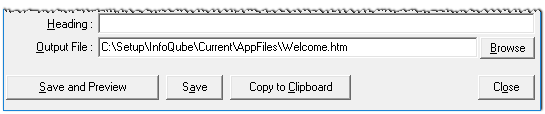
- If performing an email-merge, enter the email subject, email field and sender address. Click Preview to preview the email. Click Email Merge to perform the merge
- If merging to a document, click one of the buttons at the bottom of the dialog (i.e. Save and Preview)
3. Table with Columns
The export has many options and can even generate interactive content, such as expand / collapse sub-items and Doc pane content:
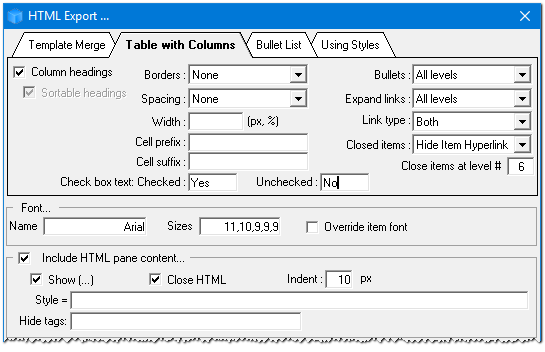
- Configure the grid to show the desired columns
- Select one or more items / sub-items
- Only selected items are included in the export
- File > Print-Preview > Table of items and field values
- Try the various options and see which ones provides the desired output
- More information can be found here: HTML Export dialog: Table with Columns
4. Bullet List
Similar to Table with column output, but generates a bullet list of items:
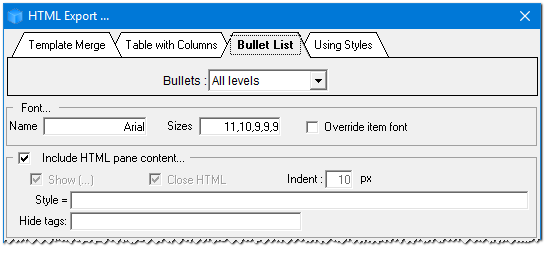
- Select one or more items / sub-items (only the tree column is exported)
- Only selected items are included in the export
- File > Print-Preview > Outline in Bullet List form
- Try the various options and see which ones provides the desired output
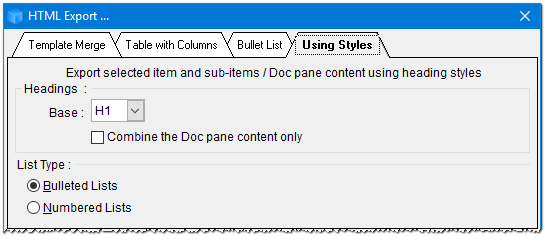
5. Using Styles
This export is identical to the command Copy > Copy as an HTML Outline. Details here: 2. Export Outlines (Print-ready)
6. Properties Pane of the Focused Item
Opens a WYSIWYG preview of the Properties pane.
Important notes
The export will display items in the order of selection, and not the ordering shown in the grid... If you want your items to be exported as shown in the grid, make sure you select them going from top to bottom (using SHIFT + mouse left click, or CONTROL+ mouse left click for non-adjacent items).