Using Ink Documents (handwriting)
Through the use of a free Ink Editor, InfoQube can handle Ink documents (i.e. handwriting) in a Doc pane:
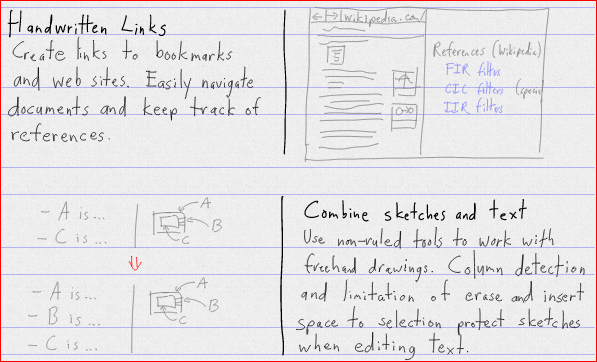
The Ink Editor has exceptional support for ink, making it into a true handwriting word processor:
- Insert / remove words
- Reflow of words on a page
- Support for columns, with reflow in each column
- Bookmarks to ease navigation
- Clippings pane (drag-drop to and from the document)
- Multiple undo / redo
- Multiple select tools
- Handwriting hyperlinks to web pages
- Handwriting hyperlinks to items and views. Use the same syntax as in the Hyperlink dialog (i.e. ItemIDs, comma separated, grid name, calendar, surface)
- Combine sketches and text
- Drag-drop images
- Resize / rotate text and images
- Customizable pen (tip size, highlighter mode), paper
- Split view to show 2 sections of the document
- Export to PDF and HTML
- Uses Internet standards (SVG)
- Real-time collaboration on the same document (Google Doc-like)
- Demo video here
To use this feature, first install the Ink Editor. Details here: InfoQube Program Install and Set-up
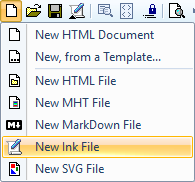
1. Creating Ink Documents
To create an Ink document, do Menu > File > New > New Ink Document (or use the toolbar button):
The Doc page will now show a blank sheet of lined paper:
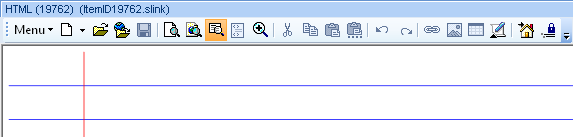
To edit, double-click on the page or click on the Ink Editor icon on the main toolbar.
Using the Ink Editor is quite self-explanatory. See this Ink document and / or the above video for details.
2. Printing / Sharing Ink Documents
Ink documents use W3C standard format SVG and as such can be viewed in any modern browser.
- The Ink file itself (i.e. file with .shtml extension) can be associated with your browser so a simple double-click will show it.
- When sending the file by email, you can change the extension to .html. Most recipients should be able to view the .shtml file, but changing it to .html increases the chances it will work
- Ink documents can be printed
- Ink documents can be part of an HTML Export:
- The export process uses the field ItemHTMLHeight field to determine the document height.
- Enter a value in this field to control the ink document height during export.
- Do File > Save to automatically compute the ItemHTMLHeight value
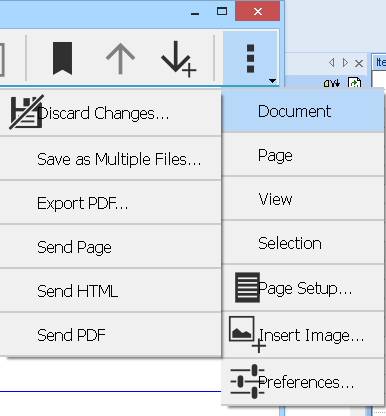
Also, while editing, Write can directly export your document in PDF or HTML formats:
Finally, through File > Print Preview, you can combine Items, field values with rich text and Ink documents into a single HTML document.
Use the ItemHTMLHeight field to control the height of the Ink document when exported.
3. Syncing Ink Documents with Android Devices
Write is available on Android devices. All devices should be compatible, but those with active pens offer the best experience, such as Samsung's Note phones and tablets:
- Download the App on Google Play. Recommended is Write 2.0 Beta
- Once installed, configure the Android Write as described in InfoQube Program Install and Set-up
When Dropbox is installed on the PC and on the Android device, it is possible to sync content between InfoQube and your device.
When properly done, any Ink document created can be viewed and edited on your mobile device. Changes are synced back to IQ.
In InfoQube:
- Configure InfoQube to use Dropbox as described in 1. Synchronization between computers using Dropbox
- If full Dropbox sync is not desired, you should at least place your .Files folder under a Dropbox folder. This is set in Tools > Options > This file > .Files path (2.4.12)
e.g. .Files folder (MyIQBase1.SNDB.Files) needs to be a Dropbox folder, such as in \Dropbox\IQBases\MyIQBase1.SNDB.files - Create Ink document in IQ
- Rename it to something more meaningful than ItemXXXX.shtml
On your Android device:
- Open the Dropbox app
- On some versions of the Dropbox app, it is essential to force it to do updates quickly otherwise changes on the phone/tablet are not sent back to your PC for a long time.
To do this, tap Settings then select Manage Notifications and select the last option (Files I download...) - Navigate to your .Files folder (e.g. IQBases > MyIQBase1.SNDB.Files). All your IQBase related files will be there
- Sort the list by date. The new Ink document should be near the top
- Click on the ... menu and select Available Offline and / or Add to Favorites
- Tap on the file. Write for Android should open
- If step 2 above was not done, click the save button (assuming save button was added during setup)
- Close Write
- IQ should detect the change and update within seconds
4. Real-Time Collaboration
While still a beta feature, multiple users can now work on the same Ink document in real-time. Ideal for brainstorming. Kind of like Google Doc for handwriting / sketches !
To enable this feature you must first create an account with StylusLabs here: http://www.styluslabs.com/account
Mark down your user name and password. Note that the user name is currently case sensitive, so copy it exactly as entered.
Mark down your user name and password. Note that the user name is currently case sensitive, so copy it exactly as entered.
4.1 Sharing an Ink Document
To share an Ink document you must create a Whiteboard:
- In the Doc pane, double-click on the Ink document to open it in Write
- In Write, click on toolbar to Create Whiteboard (or do (...) > Document > Create Whiteboard)
- Note the proposed ID or change it to something more meaningfull
- Send the whiteboard ID to other users
4.2 Connecting to a Shared Ink Document
Other users can connect to a shared Ink document to view / edit it:
- Open Write
- Click on toolbar to Open Whiteboard (or in Document view, click on Open Whiteboard)
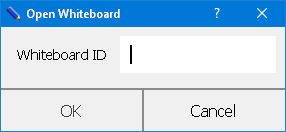
- Enter the whiteboard ID from step 3.1 above
- Enter your StylusLabs user name and password
- The shared Ink document will show
4.3 Using a Shared Ink Document
- When shared, the file name will have a "cloud" icon (top left of the window)
- All users can write on the document
- Changes are sent as soon as a user lifts the pen from the surface
- Undo / Redo is specific to each user
- While sharing an Ink document, there is an additional menu item: (...) > Whiteboard:
- Sync View: If checked, the position / zoom of the document will sync with other users
- View Master: If checked, the user will control the display of users that have Sync View checked
5. Tips and tricks
- Ink documents work best on a touch screen PC/Tablet with an active digitizer (Wacom, N-Trig or Synaptics), such as those from Microsoft (Surface line), Acer, HP, Lenovo, Dell and Toshiba (list here). A Wacom tablet is also a good option.
- You'd like to have a grid which contains all your Ink Documents. Easy, create a grid (such as InkDoc) and set it's source to: ItemHTMLFile like "*.shtml"
- The following settings generally help the writing experience: Menu > Prefences > Input: Mouse Input=Pan, Single and Multi-touch=Ignore, Smoothing=10
- Use the square brackets to quickly change the stroke width ( [ to decrease, ] to increase )
- When moving content, move snaps to the paper lines if Insert Space tool is set to Ruled Insert Space
- The Insert Space tool, when moved up / down acts on the whole page width unless a section is selected, in which case, it only acts on the selection
- The Insert Space tool, when moved left / right will wrap the text on the page (or column). If you find that the wrapping cuts words or moves group of words, change the Minimum reflow word break setting (default=0.30)
- Each ink stroke is date / time stamped. Move the mouse over handwriting to find the exact date / time of each stroke
- The blank Ink document is supplied with InfoQube and a copy is placed in your user files folder: NewInk.shtml. To use a different blank Ink document, open this file in Write, configure your document (line type, page size, etc) and save. Restart IQ
- Write has excellent palm rejection. Best is to have it open full screen so touching with your palm will not bring another window in focus
- The toolbar customize UI is missing Zoom In/Out commands. These can nevertheless be added by editing the Write.xml file: In the toolbar section, add actionZoom_In and actionZoom_Out
- Write defaults to saving files with images down sampled (to reduce file size). So if you later on increase the image size, you'll notice significant image quality degradation.
You can change this by adding this setting in the Write.xml config file:
<int name="savePicScaled" value="0" />. The file is typically located in c:\users\YourUserName\AppData\Roaming\Stylus Labs - In version 2.09 (most recent, download link), Write can rotate text and images. Each time an image is rotated and saved, the image quality will however degrade unless the "savePicScaled" setting is turned off
- Write has an option to save as a single file or as multiple files. To the user this is fairly transparent except for these two issues
- If set to multiple files, double-click on the page in InfoQube does not work. Use the Ink editor button instead
- If set to multiple files, Dropbox sync with Android is a bit more complex as there are multiple files. One needs to set all related files (.svg) to be available off-line. Only then can a tap on the Ink file will Write (Android) open correctly
- If set to single file, version 2.09/2.10 (the current, for Windows and Android) has a bug when lines are shown: The page height and width is set to a huge number. Use previous version instead
- Write is available in 2 versions:
- Current version has a useful clipboard and can rotate text and images
- Previous version saves as single file correctly